body { background:#fff url("http://www.blogblog.com/dots/bg_dots.gif") 50% 0; margin:0; padding:0 10px; text-align:center; font:x-small Verdana,Arial,Sans-serif; color:#333; font-size/* */:/**/small; font-size: /**/small; } /* Page Structure ----------------------------------------------- */ @media all { #content { background:url("http://www.blogblog.com/dots/bg_3dots.gif") no-repeat 250px 50px; width:700px; margin:0 auto; padding:50px 0; text-align:left; } #main { width:450px; float:right; padding:50px 0 20px; font-size:85%; } #main2 { background:url("http://www.blogblog.com/dots/bg_dots2.gif") -100px -100px; padding:20px 10px 15px; } #sidebar { width:200px; float:left; font-size:85%; padding-bottom:20px; } #sidebar2 { background:url("http://www.blogblog.com/dots/bg_dots2.gif") 150px -50px; padding:5px 10px 15px; width:200px; width/* */:/**/180px; width: /**/180px; } } @media handheld { #content { width:90%; } #main { width:100%; float:none; } #sidebar { width:100%; float:none; } #sidebar2 { width:100%; } } html>body #main, html>body #sidebar { /* We only give this fade from white to nothing to browsers that can handle 24-bit transparent PNGs */ background/* */:/**/url("http://www.blogblog.com/dots/bg_white_fade.png") repeat-x left bottom; } /* Title & Description ----------------------------------------------- */ @media all { #blog-title { margin:0 0 .5em; font:250%/1.4em Georgia,Serif; color:#353; } #blog-title a { color:#353; text-decoration:none; } #description { margin:0 0 1.75em; color:#996; } #blog-mobile-title { display:none; } #description-mobile { display:none; } } @media handheld { #blog-title { display:none; } #description { display:none; } #blog-mobile-title { display:block; margin:0 0 .5em; font:250%/1.4em Georgia,Serif; color:#353; } #blog-mobile-title a { color:#353; text-decoration:none; } #description-mobile { display:block; margin:0 0 1.75em; color:#996; } } /* Links ----------------------------------------------- */ a:link { color:#488; } a:visited { color:#885; } a:hover { color:#000; } a img { border-width:0; } /* Posts ----------------------------------------------- */ .date-header { margin:0 0 .75em; padding-bottom:.35em; border-bottom:1px dotted #9b9; font:95%/1.4em Georgia,Serif; text-transform:uppercase; letter-spacing:.3em; color:#663; } .post { margin:0 0 2.5em; line-height:1.6em; } .post-title { margin:.25em 0; font:bold 130%/1.4em Georgia,Serif; color:#333; } .post-title a, .post-title strong { background:url("http://www.blogblog.com/dots/bg_post_title.gif") no-repeat 0 .25em; display:block; color:#333; text-decoration:none; padding:0 0 1px 45px; } .post-title a:hover { color:#000; } .post p { margin:0 0 .75em; } p.post-footer { margin:0; text-align:right; } p.post-footer em { display:block; float:left; text-align:left; font-style:normal; color:#996; } a.comment-link { /* IE5.0/Win doesn't apply padding to inline elements, so we hide these two declarations from it */ background/* */:/**/url("http://www.blogblog.com/dots/icon_comment.gif") no-repeat 0 .25em; padding-left:15px; } html>body a.comment-link { /* Respecified, for IE5/Mac's benefit */ background:url("http://www.blogblog.com/dots/icon_comment.gif") no-repeat 0 .25em; padding-left:15px; } .post img { margin:0 0 5px 0; padding:4px; border:1px solid #cca; } /* Comments ----------------------------------------------- */ #comments { margin:0; } #comments h4 { margin:0 0 10px; border-top:1px dotted #9b9; padding-top:.5em; font:bold 110%/1.4em Georgia,Serif; color:#333; } #comments-block { line-height:1.6em; } .comment-poster { background:url("http://www.blogblog.com/dots/icon_comment.gif") no-repeat 2px .35em; margin:.5em 0 0; padding:0 0 0 20px; font-weight:bold; } .comment-body { margin:0; padding:0 0 0 20px; } .comment-body p { margin:0 0 .5em; } .comment-timestamp { margin:0 0 .5em; padding:0 0 .75em 20px; color:#996; } .comment-timestamp a:link { color:#996; } .deleted-comment { font-style:italic; color:gray; } .paging-control-container { float: right; margin: 0px 6px 0px 0px; font-size: 80%; } .unneeded-paging-control { visibility: hidden; } /* More Sidebar Content ----------------------------------------------- */ .sidebar-title { margin:2em 0 .75em; padding-bottom:.35em; border-bottom:1px dotted #9b9; font:95%/1.4em Georgia,Serif; text-transform:uppercase; letter-spacing:.3em; color:#663; } #sidebar p { margin:0 0 .75em; line-height:1.6em; } #sidebar ul { margin:.5em 0 1em; padding:0 0px; list-style:none; line-height:1.5em; } #sidebar ul li { background:url("http://www.blogblog.com/dots/bullet.gif") no-repeat 3px .45em; margin:0; padding:0 0 5px 15px; } #sidebar p { margin:0 0 .6em; } /* Profile ----------------------------------------------- */ .profile-datablock { margin:0 0 1em; } .profile-img { display:inline; } .profile-img img { float:left; margin:0 8px 5px 0; border:4px solid #cc9; } .profile-data { margin:0; line-height:1.5em; } .profile-data strong { display:block; } .profile-textblock { clear:left; } /* Footer ----------------------------------------------- */ #footer { clear:both; padding:15px 0 0; } #footer hr { display:none; } #footer p { margin:0; } /* Feeds ----------------------------------------------- */ #blogfeeds { } #postfeeds { padding-left: 20px }

Prudent Baby

Get sewing how to, sewing tutorials, and sewing help to learn sewing. We offer sewing tutorial for sewing moms.

Wednesday, September 14, 2011

Make Your Own Hair Clip Board


Does your little girl have a plethora of hair clips that get lost or scattered all over the place? I have found hair clips in my pillowcase, behind the toilet, in the refrigerator, and once in our dog's food bowl. I need a hair clip organization solution. So, today we are going to turn this storage problem into something pretty by showing you how to make a framed hair clip board with lovely fabric. Now those clips will also be a work of art of sorts. And you could also use your board to display photos, cards, or maybe even earrings?

Colleen from Thumpkin (so cute, check it out) whipped up this beauty and is going to show us how to make a hair clip board after the jump...

How to Make A Beautiful Board for Organizing Hair Clips

Materials:

  • 11x14 piece of 1/8-inch plywood
  • 11x14 picture frame
  • 11x14 sheet of 1/4-inch foam
  • Paint
  • Fabric
  • Hot glue gun
  • Staple gun (with 1/4-inch staples)
  • Ribbon


1. Cut a piece of 1/4-inch foam to 11x14 and hot glue it to the piece of plywood.


2. Cut out a piece of fabric to 13x15 so that it will cover the top of the board with extra to staple down in the back.

3. Staple gun the fabric to the board. Use only very few staples since you will be stapling all the ribbon down over the fabric.


4. Flip the board right side up. Hammer the ends of the staples down so that they do not pop out of the fabric. Make sure to hammer very carefully so that the staples do not poke through the fabric.


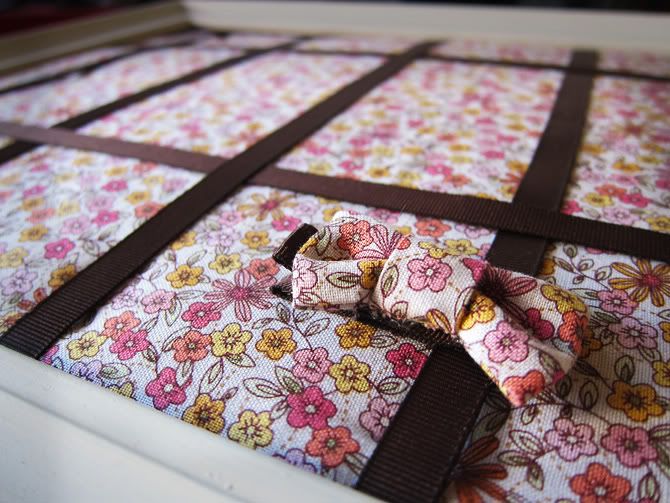
5. Measure out the number of ribbons you want to use. In this case we cut out 7 pieces of ribbon (Five 15 inch pieces and two 18 inch pieces). Place the pieces of ribbon where you would like them to go. With the 15 inch pieces, we placed the outside ribbons down first at about 1 1/2 inches in. Then, we left about 3 inches between the other three ribbons. For the 18 inch pieces we placed them about 2 1/2 inches in from both edges.

6. Staple down the ribbons. Hammer down the staples again very gently.


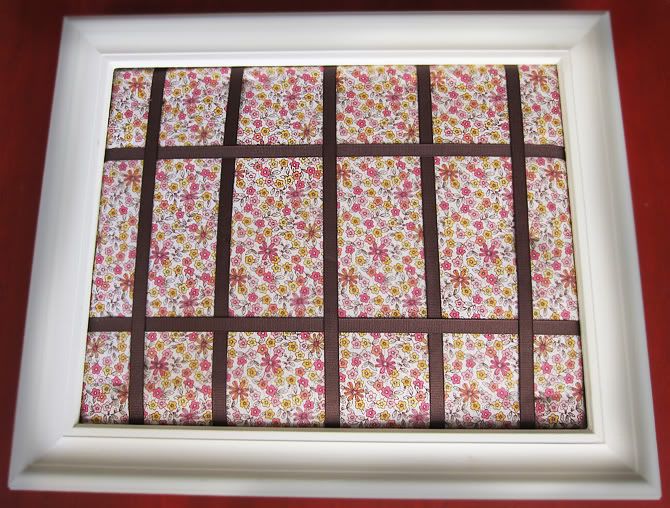
7. Optional:You can choose to paint the frame you have or keep it as is.


8. Place the hair clip board into the frame and start putting up those clips!


9. You can even make your little one a matching bow!


Also check out the awesome fabric letter hair clip holder Jacinda whipped up last year here, and all of Colleen's lovely creations at Thumpkin.

Labels: , , ,

8 Comments:

Anonymous Anonymous said...

This is GREAT! I am going to have to go make this for myself :)

September 14, 2011 at 8:51 AM  
Blogger Jacinda said...

We need one of these so badly! Love that you can make it in any dimensions.

September 14, 2011 at 10:25 AM  
Blogger Genevieve said...

According to Lily, my 4 yr old, the floor monster (aka floor vent) eats up their hair bows while they're sleeping at night. I tell you what, the way that girl tells the story anyone would be convinced there was a floor monster. Lol I will definately take advantage of this fantabulous tutorial. Thanks!

September 14, 2011 at 10:41 AM  
Blogger cd said...

Can't you just use the back of the frame instead of a separate piece of plywood? (Just hopeful since if so, I have everything on hand to make this tonight ;)

September 14, 2011 at 3:09 PM  
Blogger Genevieve said...

@cd I was thinking of doing the same thing but instead of staples, I was thinking glue since the back would be considerably thinner without the plywood.

September 14, 2011 at 3:43 PM  
Blogger cd said...

Let's try it and report back. Genevieve!

September 15, 2011 at 9:07 AM  
Blogger Unknown said...

great idea.
because there are too many hair clips laying aroud!

I linked to your tutorial on my blog - thanks for sharing!

doro K.

September 30, 2011 at 2:25 AM  
Blogger Arthur said...

What a great post, thanks a lot sharing this with us.
canvas print

October 25, 2011 at 8:52 AM  

Post a Comment

Subscribe to Post Comments [Atom]

<< Home