How to Sew Knit Fabrics: Sewing With Jersey 101
Babies love wearing cozy knits! Ladies love wearing cozy knits! The Season of Cozy is upon us, but when we asked the Prudent Mamas, we discovered everyone is nervous about knits. We get that! Since we have a bunch of cute patterns for knit jersey dresses and such planned for you, we thought we'd start by getting everyone comfortable with sewing knits. Let's start with a little primer, including what equipment you need (or don't need), the different stitches, and some basic tips to help you get on your way to Cozytown.
From the feedback on our facebook page and twitter, we see that the Prudent Mamas have concerns about stretched out seams, popping threads, and slippage while sewing. The overall conclusion was that knits are scary. No! Knits are just stretchy. Let's take the mystery out of sewing these stretchy beasts.
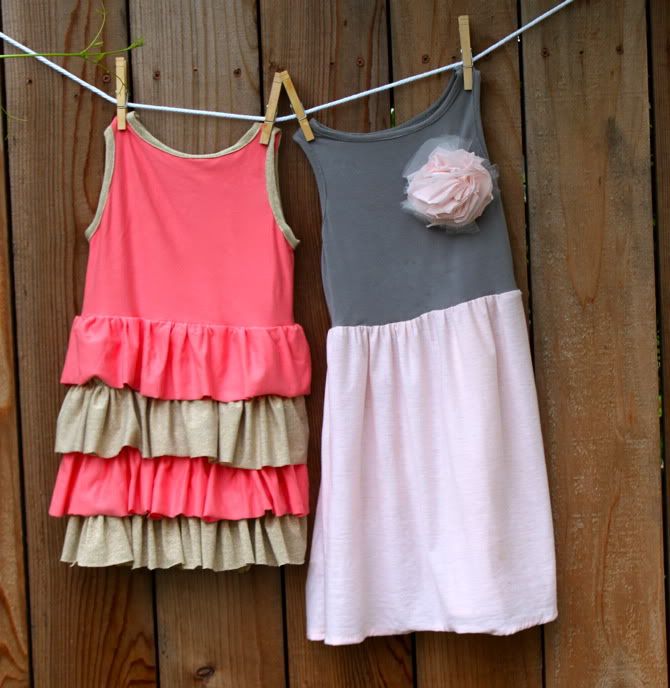
Then you can make these cute dresses I share a pattern and tutorial for here: Beginner's Jersey Baby Dress!

Learn the basics of how to sew with knit jersey fabrics after the jump...
How to Sew Knit Fabrics: Sewing With Jersey 101
First we'll talk about FABRIC, then GEAR, then STITCHING, and finally TIPS for sewing with knit jersey. Here we go...
Knit Fabric 101
There are ten trillion different knit fabrics out there. To understand the basic difference between cotton and knit, let's look at some diagrams. Cotton is woven:

Knits are, well, knitted (with loops):
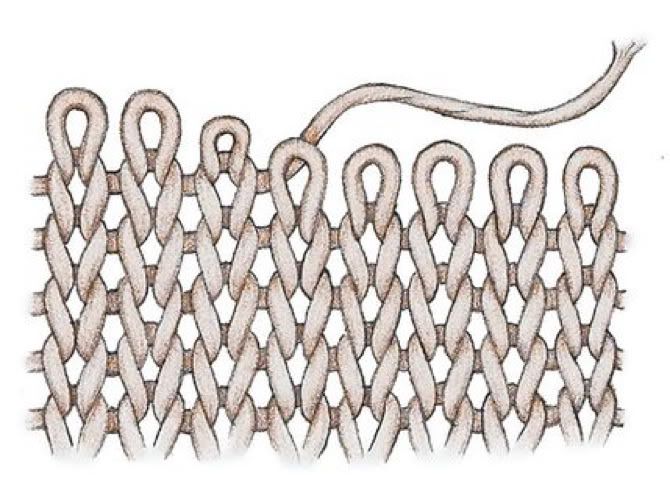
(thanks for the illustrations, threads magazine)
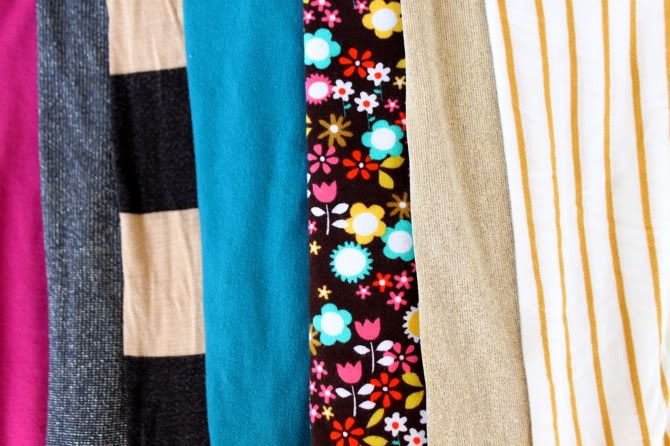
There's single knits, double knits, and rib knits. Some look different on each side. Some look the same on both sides. Some stretch a lot. Some stretch a little. Some are blended with rayon or acetate or (as Scarlet calls it) "sparkle thread." Some are thick. Some are so thin you can see through them. There are so many fun options and you can sew them all! First you need to examine your fabric. Let us do so. Which way does it stretch? Stretch on the cut edges, then from the selvedges. One way will almost always stretch more. Make a note of it and cut the pattern as directed with the more stretch facing the right way. Sleeves are usually cut width wise (most stretch), same with shirt body. Some patterns are bias cut (on the diagonal) for a lovely drape.
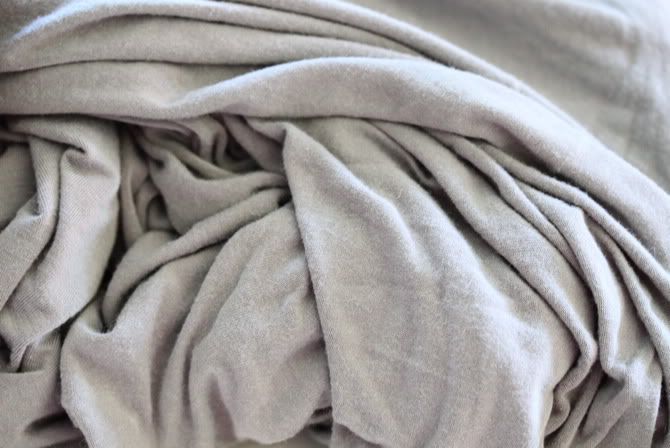
In these pics I'm sewing with one of my husband's old hanes t-shirts, and with stretchy Robert Kaufman panda knit, which I absolutely adore. Don't you just want to snuggle up in it?
So now you've got your fabric. What else do you need to start sewing knits?
Knit & Jersey Sewing Gear 101
There is some gear that makes sewing knits much easier, but you don't need all of it to sew with jersey. Let's go through it and I'll tell you what's not absolutely necessary and what's a must-have.
A Cover Stitch Machine.
Hi, almost no one has one of these at home. I sure do want one though. A commercially sewn knit item usually has a hem with a double row of stitching. A coverstitch machine hems these up quick and neat in one step. But no worries, you can simulate this look with a regular sewing machine.
A Serger.
I adore my Brother 5234 PRW. If you have a serger you can thread all four needles, then sew your jersey and cut your seams at the same time. But NO, you do NOT need a serger to sew jersey.
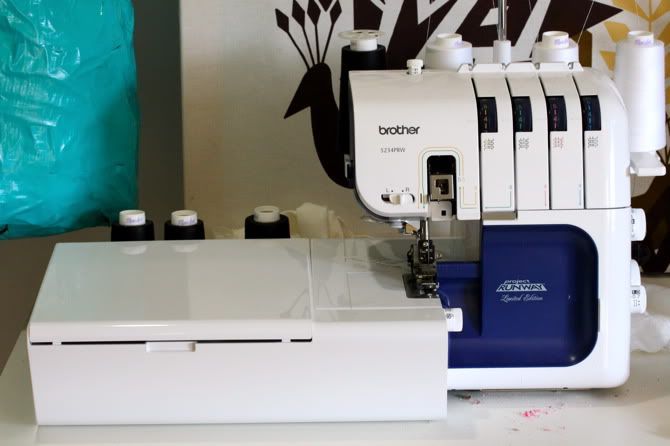
Today we will focus on how to sew jersey with a sewing machine instead.
Here are some things that are affordable to get and will help you enormously when sewing knit jerseys.
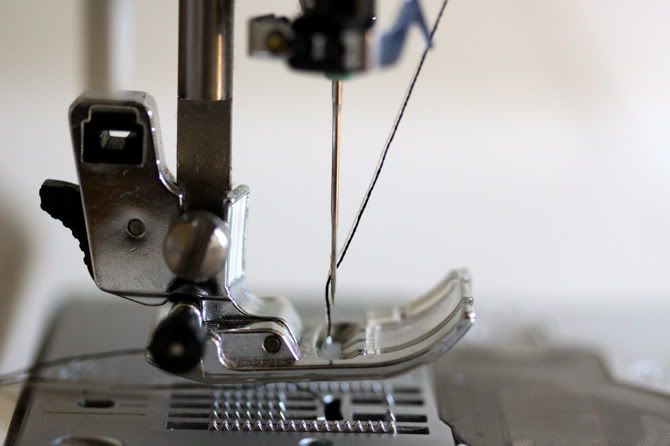
A Twin Needle
Many machines come with a twin needle, or you can purchase one inexpensively.
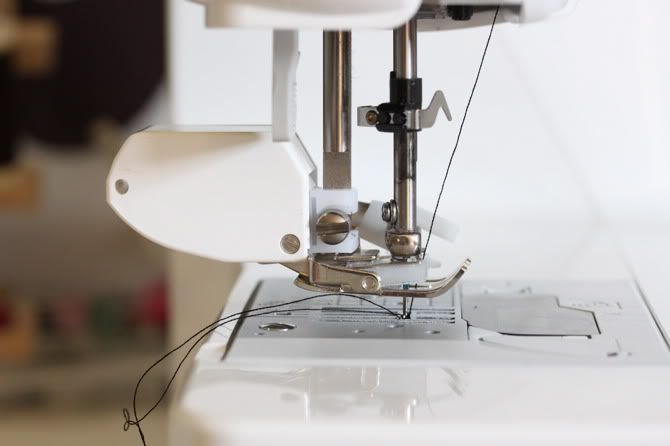
If your machine can zig-zag it can usually accommodate a twin needle. The benefit of a twin needle is that it builds stretch into your seams by creating two lines of straight stitches on the top of your item with a zig zag underneath. No popped seams, no trying to precisely stretch your fabric as you sew. Let me show you really quickly how to thread a twin needle so you understand the concept. When you use a twin needle, you'll use two spools of thread on the top. Your machine probably comes with an extra spool pin that fits on top of the bobbin holder you normally use while winding bobbins, like this:
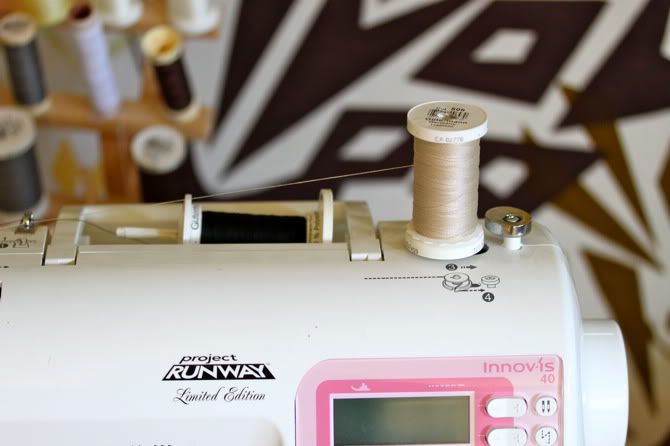
But even if you don't have an extra spool pin, you can jerry-rig it by placing the second spool of thread somewhere nearby (on a thread rack, in a cup) where it won't get tangled or resist unrolling while you sew. So once you've set up your spools, you'll run both threads through the machine as you normally would the one thread. You thread the needles manually, the left one with your normal spool, and the right one with the second spool. I did them in two colors so you could see (the normal spool is black, threaded through the left needle).
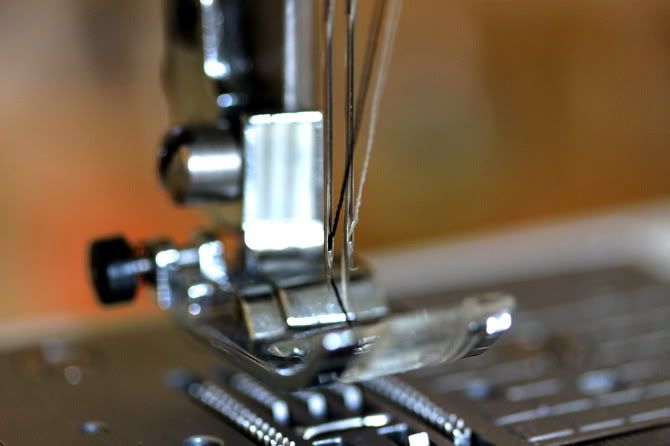
Then you use your zigzag foot while sewing.
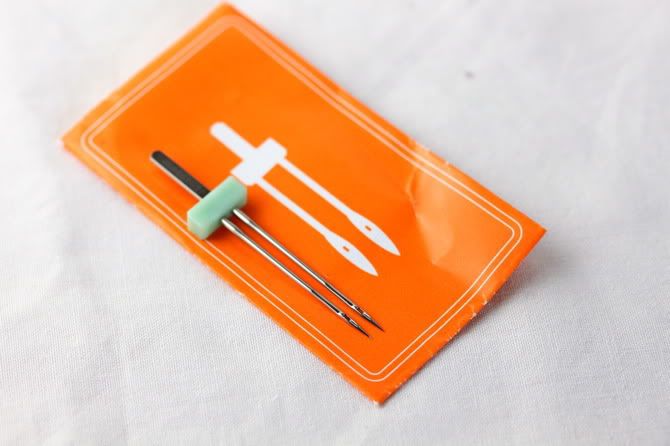
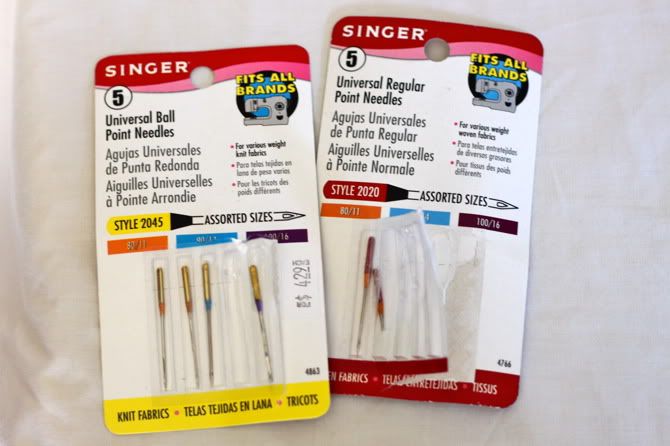
Ballpoint Needles
A ballpoint needle has a slightly rounded tip that allows it to slip through the fibers of your fabric, rather than ripping them as a regular needle would. There are also stretch needles that have a deeper indentation (so the needle can create a longer thread loop before forming the stitch, decreasing the chance for a slipped stitch). I have never bothered to get stretch needles, but for a very delicate fabric I would. There are also universal needles that say they are for both woven and knit fabrics, but I have not tried them. Now, you may want to give sewing jersey a shot with a regular needle. You can try it out if you are desperate. On a stiff men's t-shirt (like your basic Hanes or what have you), a regular needle may work. But on a stretchy or delicate knit, it's going to create tiny tears in the fabric that will get worse as you wash and wear. So I say definitely get ballpoint needles.
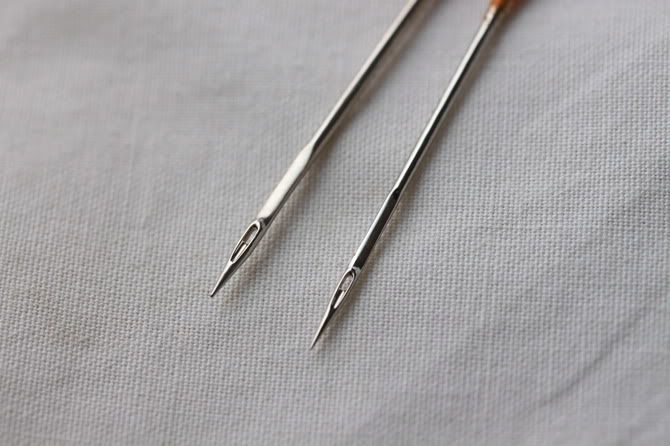
Ballpoint is on the left, straight is on the right.
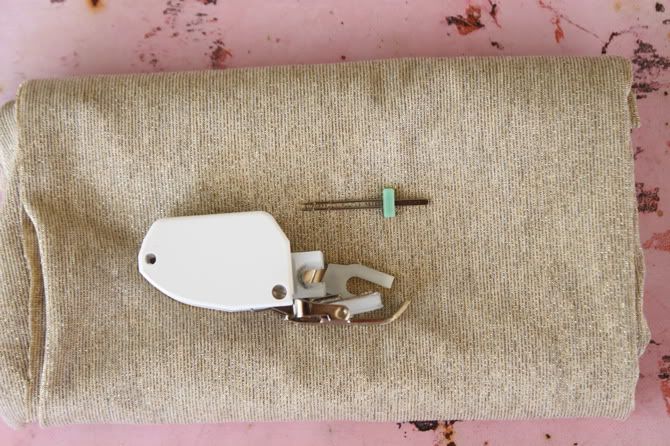
Walking foot
I like to sew knits with my walking foot, especially if they are very stretchy. A walking foot moves both the top and bottom layers of fabric at the same time. This makes it a lot easier to avoid stretching the fabric out too much. They run $15-20 and you'll use it a lot once you get one (for quilting and such). You can sew jersey without a walking foot, but it will take more trial and error with each new fabric to see how much you need to guide/stretch that specific fabric to avoid stretched seams. Here is what a walking foot looks like from the front:
And from the side:
Let's do a comparison. Here I am using my stretchy panda knit fabric. I used a ballpoint needle and stretch stitch (explanation of stretch stitch and the other stitches you can use for knits later in this post), and in this first pic I used a walking foot.
Looking good, laying flat. In this next pic I used all the same setting, but with a regular foot.
See the difference? A walking foot just makes it much easier to keep the seams from becoming stretchy and sloppy, especially with very stretchy fabrics.
Interfacing
I don't often use interfacing when sewing with jersey, but sometimes it helps to stabilize a seam that will get stretched/pulled during use (for example a shoulder seam). You don't want to use regular old interfacing, you want to find one for knits that is more flexible. Try to match it to your fabric's flex as close as you can. But for beginners, don't worry about interfacing just yet.
Stitches for Sewing with Knit Jersey Fabric
Ok, let's talk stitching.
As we've mentioned, knits and jerseys have varying degrees of stretch. If you just sew them together with a regular old straight stitch, then you have stretchy fabric with a not-stretchy seam. What do you think will happen when you stretch the fabric out? That's right, the seam will pop. Here's a pic of my panda knit stretch jersey with a straight stitch - I pulled on the fabric, check out how not-nice it looks...
One more pull and what do you think will happen?

That's right: It will pop right out. We don't want that to happen to our clothes, which should be able to move with us as we gallivant around town. So we don't want to use a straight stitch. I do want to be clear that you CAN use a straight stitch to sew knits, BUT it requires a certain skill because you have to stretch your fabric *justright* as you sew to ensure the straight stitch seam has the right amount of stretch built in. It is much easier to use one of the following stitches until you get more experienced or find your groove with knit sewing.
If you are sewing with a twin needle, you can use a straight stitch, since the twin needle straight stitch has stretch built in. Here's what that looks like on the front (the black is the left needle, the taupe is the right needle, just so you can see the difference):
And here is the back of the twin needle straight stitch, with black thread in the bobbin:
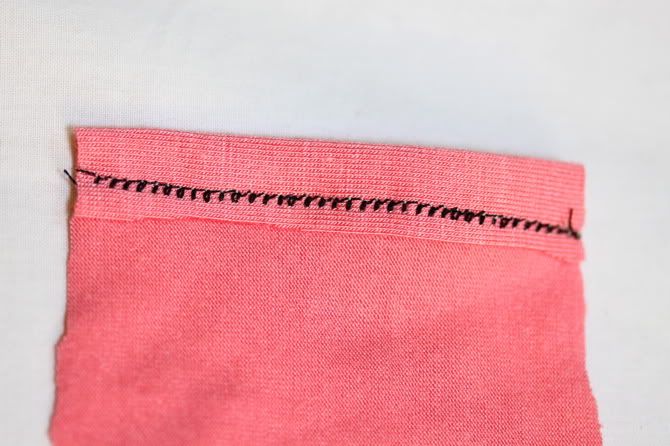
That sure looks nice. But if you don't have a twin needle, don't fear.
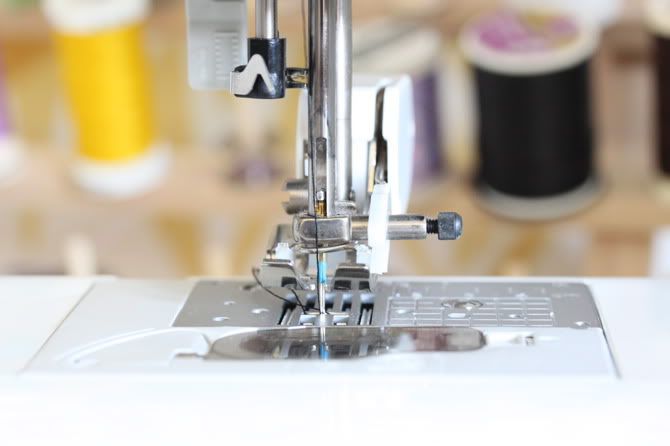
You can sew knits with one needle, no problem. Ideally, your machine has a stretch stitch. Which one is the stretch stitch? It is the one that looks like an offset zig zag. This stitch goes forward, then back a bit, to create a seam that can stretch with your fabric. Here is a pic of the stretch stitch diagram on my machine, it's #4. I call it the lightning bolt.
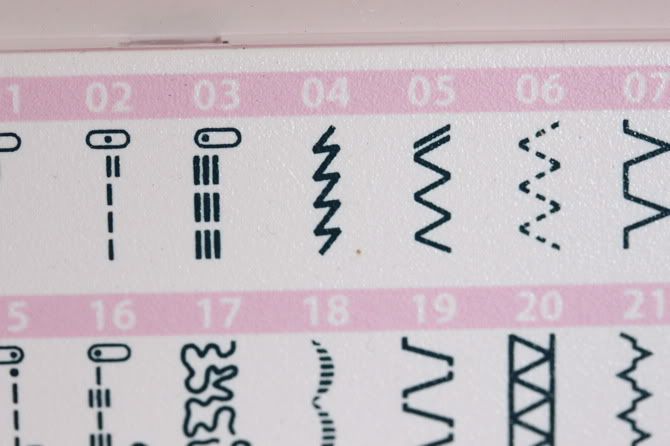
Stitch #3 is a triple stretch stitch, especially good for armholes or other areas that take a lot of abuse and may need more strength built in.
If you don't have a stretch stitch, no fear. A narrow zig zag stitch will do the trick. Set the width and length very low (2.5/.5 is a good starting point) and test it on your fabric scraps to find the best setting to make sure it lays flat. The zig zag will allow your fabric to stretch.
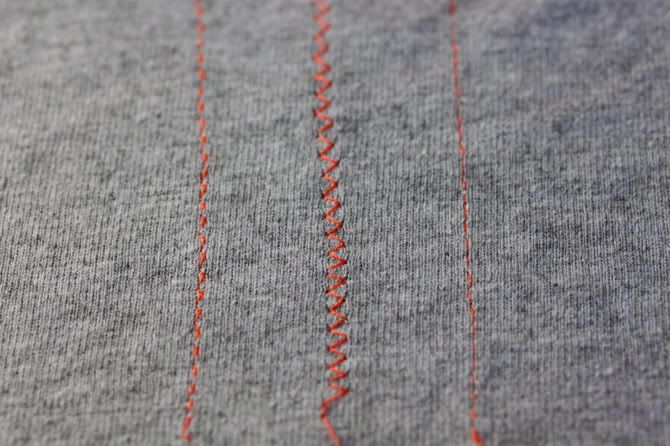
Here is a pic of all three stitches on a basic heavy knit mens tee, just so you can see what they look like. The heavy mens' t can take a lot of stitches without doing anything too funky when it's just one layer like this, but when you start to sew two pieces together, they stretch pretty easily, just an FYI. The stitches from right to left are stretch, zig zag, straight.
Whichever stitch you choose, test it out on some scraps of your fabric and adjust the tension as necessary until your stitching lays flat. It gets fancier from here, with stretch blind hem stitches and what not, but we'll stick to these basics for now. Ok, on to the sewing of knits...
Sewing Knit Jersey Fabric
A lot of your work with knits is going to involve some amount of trial and error, so always buy a little extra fabric and do some tests. I'll share some tips to help you have less error as you are doing your trials.
Beware the Stretch
If you are using your walking foot and a stitch with stretch, then you want to be sure you are not stretching your fabric out as you sew. If you do you will end up with floppy seams and stretched out armholes and the like. Let's look at an example on my stretch jersey fabric. I used my walking foot, ballpoint needle, and stretch stitch. The stitch settings are exactly the same in both rows, but on the top row I let the fabric stretch as it went through the machine, while on the bottom row I was careful not to let the fabric stretch.
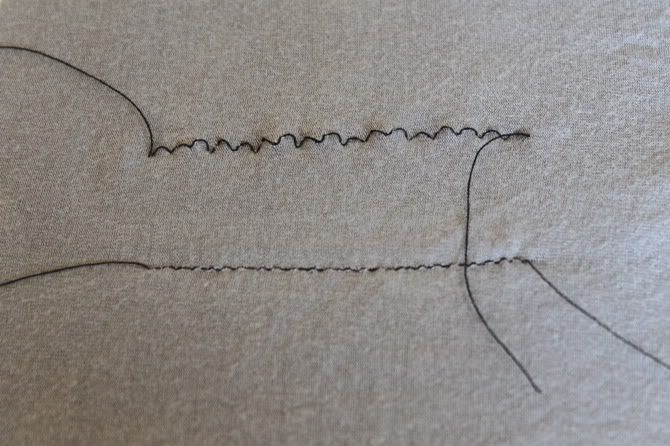
See the difference? So watch out for stretching while feeding your fabric through your machine.
Let's talk about sewing two pieces of fabric together to create a seam. This example uses cut up remnants of my husband's old hanes t-shirt sewn with a ballpoint needle, walking foot, and stretch stitch. In this first picture, I was careful not to stretch the fabric as it went through the machine:
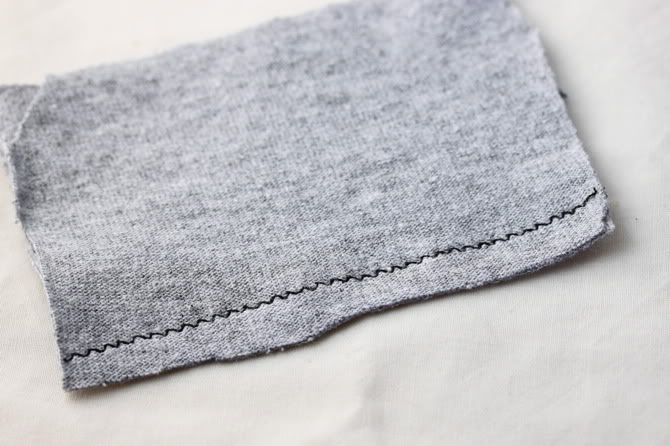
Looking good! In this second picture, I was not careful and the fabric stretched just a bit. Now look at my seam:
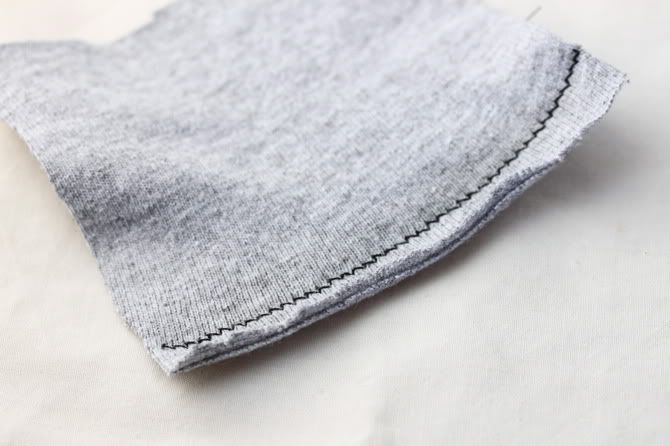
A walking foot and being careful not to stretch your fabric too much are the two best ways to avoid these gaping seams. There is more to this when it comes to finishing necklines, but I will save that for another post while we all practice a bit first.
Finishing Inside Seams
Jersey will not unravel, so you do not need to do anything to finish inside seams except cut them even. However, if you have a serger it does add nice polish to your item to serge the seams, before or after you construct the piece (I usually do it before, but that's just personal preference). If you are sewing with a thick fabric, a seam allowance from 1/2" to 5/8" is fine. If you are sewing with a thin/delicate knit fabric, the edges will roll, in which case you want to sew (or cut down) to a very small allowance, because the fabric has a tendency to curl and a big curl can be uncomfortable to whomever is wearing the item.
Hemming Knits
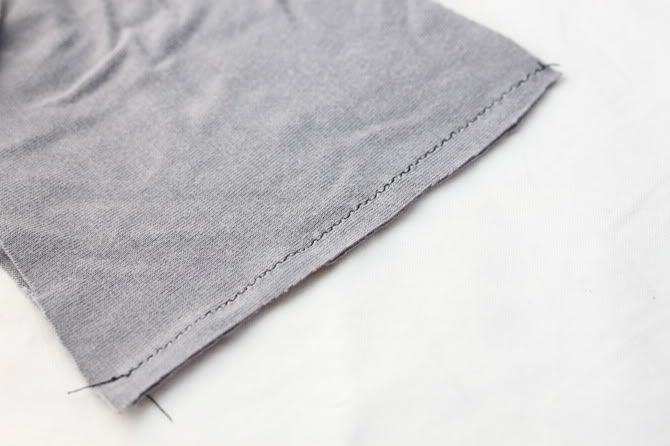
You can hem your item the traditional way, but you only need to fold under once, since the edge of the fabric won't unravel (this also reduces bulk at hems) and stitch in place (or just roll under and stitch if the fabric is very thin).
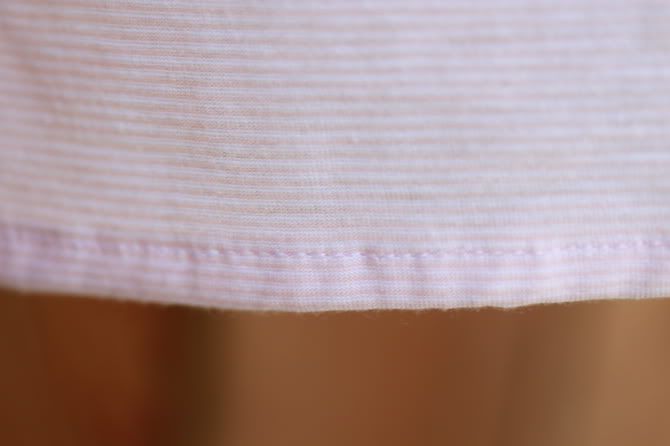
The only issue is that you will have a zig zag or stretch stitch hem, which doesn't always look very awesome. This is a great time to whip out your twin needle, so you can have straight seams with stretch built in. You can also sew with a straight stitch if you think you can stretch your fabric just the right amount to have a stretchy hem that won't break. Or if you are making a dress or skirt, where the hem is unlikely to get stretched out while it is being worn, you can risk a non-stretch straight stitch. Or you can just cut that baby, because as I said, it won't unravel.
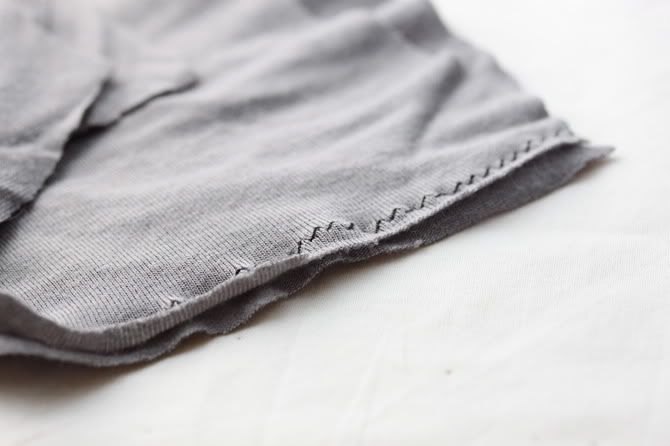
Serging a rolled hem is also fun if you can. Or if you are fancy, go ahead and do a stretch blind hem stitch or some such awesomeness.
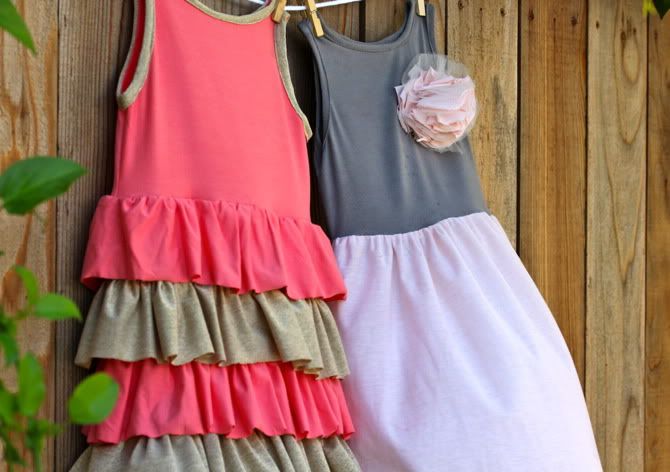
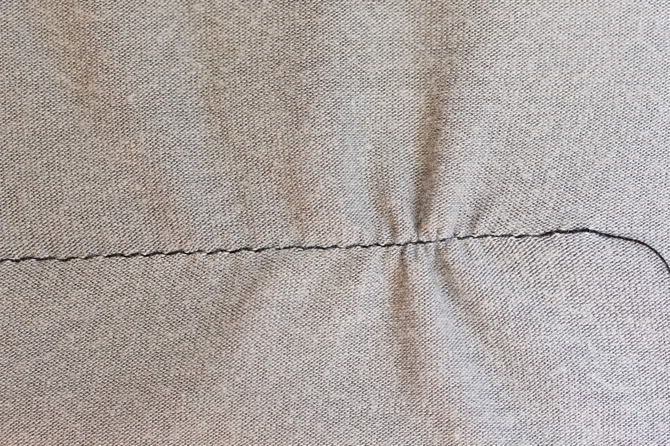
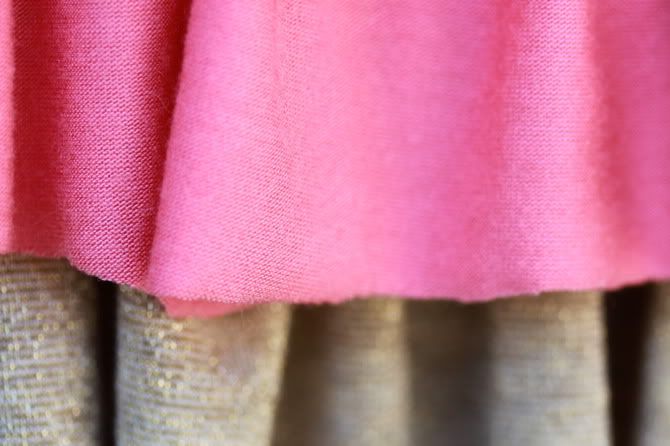
From here, I am going to share some patterns and tutorials that will allow you to practice all of these skills and learn about finishing necks and armholes, so they look polished like this (it's so not hard at all I promise):

as well as adding sleeves

gathering, and other fun things you can do with jersey.
A good starter project that you can play around with right now is Jacinda's adorable (and super giftable) Top Knot Baby Hat, which comes in three different versions and can be made from recycled tees. It'll give you a good sense of your machine and knits, and you'll get the satisfaction of a completed project of adorableness.

Okay Prudent Mamas, I hope I addressed a lot of your concerns, and took some of the scare and mystery out of sewing with knits.. Let me know if you have any questions about what I've shared here, and I'll add to this post or follow up with more information. I hope this helps you feel a little less intimidated by knit jersey and encourages you to cut up some old clothes and get crafty. Stay tuned for our first jersey dress project and pattern later this week!
Update: Get the pattern and tutorial here: Beginner's Jersey Baby Dress!
Labels: Sewing
posted by Jaime @ 12:01 AM
![]()

38 Comments:
Hi. I really liked this tutorial - took a lot of the mystery out of knits! However, I only have a vintage singer sewing machine, which doesn't do zig zag - straight stitching only in my house. Does this mean I still can't really sew with knits?
Thanks.
This is soooo coooool! I love the dresses!!
Jaime-I love this post so much. Such great information explained beautifully! Your biggest fan, Jacinda
This is probably the single most helpful sewing post I've ever read! Very clear, simple explanations, and great examples of good and not-so-good stitches! I've been reading up on how to get started with knits, but I think you've taken all of those bits and pieces and rolled them into one (along with answering pretty much every question I had!) Knits, here I come!!
SO helpful - you used my Project Runway Inovis too, so that makes it really simple! However, I also have a serger - which would you suggest? Using the Inovis just to learn, or jumping right in with the serger?
Wow.. What a great post on sewing with knits! It is very helpful and inspiring. I have a stack of knits I've been wanting to sew, but fear has prevailed! I am excited to try out the twin needle! Thank you.
Thanks for this I've always worked with knits but with a LOT of trial and error! This should make things a lot easier
Yes! Just what I needed! Thank you!!!
Amazing post, thank you! I'm excited to see the project tutorials. I am a little confused about the needles, though. Are you saying to use a ballpoint twin needle, or just one or the other? Or one for hems and the other for seams?
kimberly- you can use the twin needle for everything, or just for hems, whatever you find easier. i usually just use it for hems. you'll want a ballpoint twin needle or universal twin needle, which is what usually comes with your machine (if your machine came with a twin needle).
perfect! thanks so much, this really helps!
I can't wait to try your tips! I bought the Tea for Two pattern from Patterns by Figgy's. I made it once but it was a mess, and I really want to figure it out.
This is great....I will be sitting down to read it more carefully during some leisure time. My daughter loves knits; and I love her to wear my handiwork with enthusiam. Tips on finding the fun knit prints I can track down by the bolt. Seems like tearing up old tees is the only way to get cool designs.
Great intro. I LOVE sewing with knits and keep forgetting to pick up a twin needle. . . .
GREAT information! Do you know if there is a stretch double needle? Or does a regular one work just as good?
Thanks for all the great info! I have a knit dress that I have been needing redo some seams on and I think I will be brave enough to try it out.
Thank you so so much. I dream of owning a serger but in the meantime you've made sewing with knits a reality!
Just wanted to say thanks for posting this!! I really love sewing with knits (and use my serger alot) but Im curious about that little twin needle now, so Ill have to check her out!!
Thank you :)
Thanks so much! I'm excited for some patterns to practice with! I have a pretty simple sewing machine with no "stretch" stitch, but I do have a serger. Will you be doing a follow up extra tutorial about stitching on knits with a serger, or is there no real secrets there?
has to be the single most comprehensive tutorial for sewing knits! Thank you so much! I have never used a walking foot, but now I really want one...I always just do the "careful not to stretch it" thing.
I plan on posting a link to this on my blog.
Super great post! Thanks for all the tips. I learned so much. Have just been using my serger, but the twin needle trick sounds like a winner for a pretty finish :)
Thank you for this interesting post, I have a lot of jersey fabric and now I will try to use it! Greetings from Italy
Carmen
Thanks so, so much!!! I'm so excited! I have lots of fabric I was too scared to work with! I'll be emptying my storage drawers soon :D
Gosh, I learned SO much!! Thank you! I work at a fabric store and now I feel like I can really help people when they ask me questions about sewing on knits. Knits are going to be really big, too. All of the major pattern books are featuring patterns made specifically for knits!
Great tutorial! Thanks so much for the info--I'm excited to give it a try :)
Awesome! I have a serger, but have not got around to using it yet. Is there a site out there that shows how to sew knits with a serger? Or could you all do an awesome post on that? :) thanks!
I love your site. I learn and am inspired every time I visit. This is a wonderful tutorial. I wish I'd had something like this when I first started noodling w knits. I would like to add that you should let your knits hang for 24 hrs before marking your hem and finishing. I know it's a serious speed bump. Especially, when you're on a roll and soooo close to done, but it really is worth it. Also, try not to let your knit hang off your work surface when laying out patterns and cutting. It will stretch. It will be inaccurate. You will be miffed. Ladies, Thanks again for all your ideas and inspiration.
Thank you so much!!! This will change my life :)
Wow, what a fantastic tutorial and just in time. I've just received my first brown box of knits and have been contemplating it with trepidation. You really are my angel of mercy right now! LOL
Thank you.
I love this post! The way you word everything is so approachable, and funny :) I LOVE the pictures and would have no idea what you were talking about without them--so thanks for including so many great images! BTW I was looking in my Kenmore sewing machine book for how to get to the SS (Stretch Stitch) settings and saw that it has a serger stitch! I don't have a serger, but I can use that stitch and it works so great! I am using knits (a jersey) as headband backs for my daughter! We used to use stretch lace, but I wanted something a bit more sporty, and where I could select the width of the headband, sometimes thin is cute, but sometimes a chunky wide one is really fun too!! I could never have tackled this without you!! (was doing a miserable straight stitch before! duh!) Thanks so much!!!!
Thank you for this post!
However, I have tried to use my walking foot when sewing knits and this keeps happening: http://www.flickr.com/photos/29201952@N05/6280412353/
At some point the machine just can't go forward and when I try to help it by pulling the fabric, the needle eventually brakes.
Do you have any tips for me?
Thanks for this! I am terrible at sewing knits. Can't wait to try some of your tips.
Kata - really hard to guess without checking out your machine, but one guess i have from what you describe and your pic is that the fabric might be jamming in your feed dogs. that's the only thing i can think of that would cause enough resistance to result in a broken needle. never pull with a walking foot - if you have to pull then something is wrong! try lowering the feed dogs a bit (check your manual for instructions, it's usually a super simple adjustment). also double check with the manual for any settings required when you use your walking foot (it might suggest certain stitch widths, needle placement, etc). Also i'd narrow that zigzag width at least 50% either way. Good Luck!
Thank you very much for your answer!
I just have one question. I have banned jersey knit from my machine because no matter what I do, the bottom fabric keeps getting jammed down in the bobbing area. I finally had to put paper under the fabric as I sewed, resulting in stretched out seams and one crappy shirt. Interlock was a dream to sew compared to the jersey. Any pointers?
Thank you so much for this post! I just made my first baby hat yesterday with knit fabric and I could not have done it without this information. I was still hesitant but after playing with a scrap for a while first, my project turned out great! Now I feel like the sky is the limit since I have a 2 year old girl to dress up! Thank you again!
Thank you! This was incredibly helpful tonight while working on my 4th ever sewing project (and my sister's Christmas present). The link was included in today's post & it just so happened to link to the post I really needed today :) Christmas magic?
Oh my goodness, I can't tell you how helpful this was and is. You have done an amazing job at accommodating not only the many equipment availablities that we may have but also the varied skill levels! You rock momma!
Post a Comment
Subscribe to Post Comments [Atom]
<< Home