How to Sew A Twin Duvet Cover
First we showed you How to Sew A Duvet Cover and gave you measurements for all different sizes. Well, Scarlet outgrow the crib size duvet I made, so it was time for a twin.
How much fabric do you need to sew a twin duvet cover? This question is so hard to find an answer to out there on the Internets - so much conflicting info.
So, I was left to my own devices to figure it out, and because I love you, I will tell you how much fabric you need to sew a twin duvet cover, and how I pieced it together to get the most of my yardage.
Check out How to Sew a Twin Duvet Cover after the jump...
This week your comments could win you some pretty potholder fabric & bias tape.
How to Sew A Twin Duvet Cover
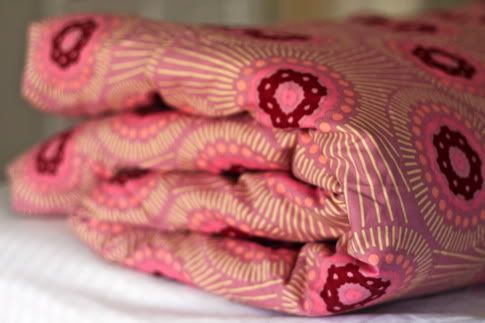
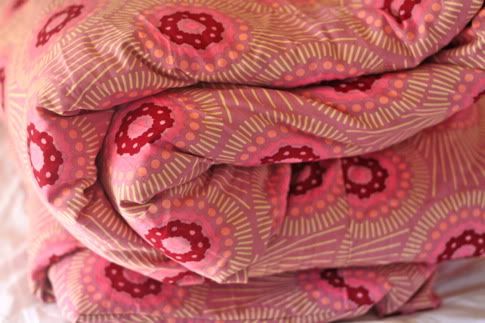
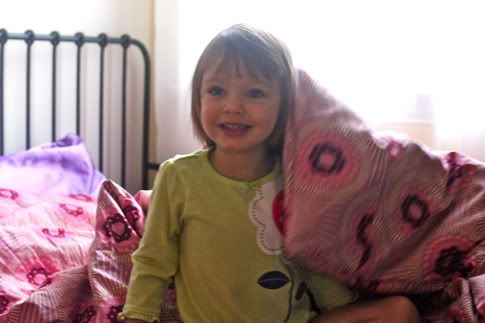
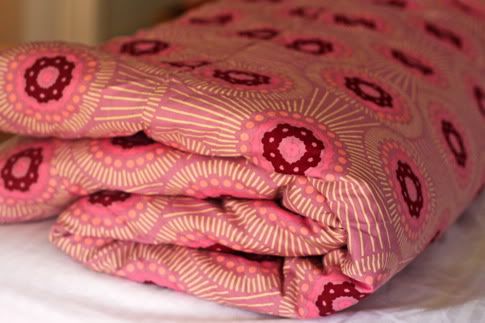
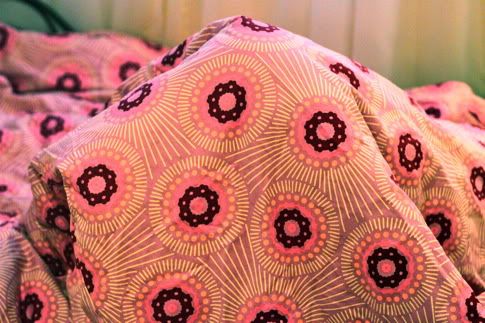
For this duvet cover, I used some beautiful (girly but modern!) fabric: Anna Maria Horner Innocent Crush (Home Decor Weight) Bubble Burst in Berry.
I ordered this twin comforter which was the least expensive decent one I could find on amazon. It's a standard size of 66"x86". Many twin comforters will vary from that by an inch or two (or more), so just measure yours first and account for an difference when cutting your fabric.
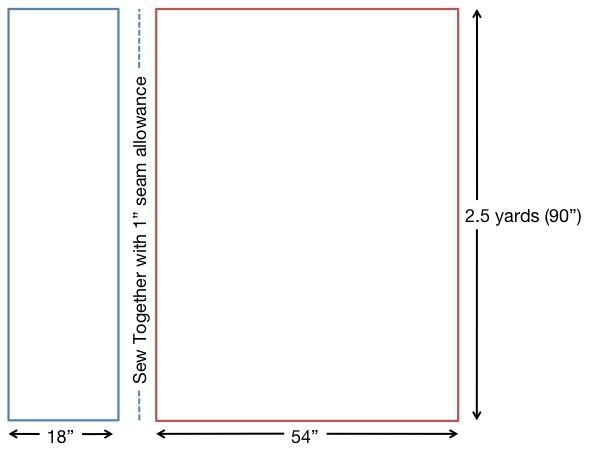
So, how much fabric do you need to sew a twin duvet comforter? You need 7.5 yards of 54" wide fabric. Home decor weight fabric is 54" wide. Let me tell you how I came to this in a very confusing manner, then show you a diagram so it all makes sense (hopefully).
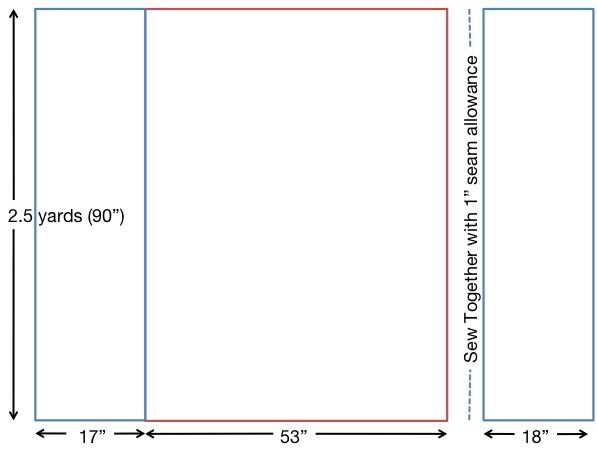
Now, you could create two flat panels for either side of the duvet by piecing your fabric together, but I wanted to use as little as possible of my fancy fabric to get the most out of it. To do that, I started by cutting the entire width of my fabric (this is home decor fabric so it is 54" wide) to the length I needed it, which is the length of the duvet plus 4 inches. So 86" + 4"= 90" long, which is 2.5 yards. So cut that, and you have 2 panels 54" wide and 2.5 yards long. Thats a total of 5 yards used so far.
Now we need to increase the width from 54" to 66" on both panels, plus seam allowances. We don't want a seam on only one side of our duvet - that would look unbalanced, we need to have the seams on both sides of our center panels we just cut. So we could cut four strips - two for the top and two for the bottom, then create two flat panels, but that would be lots of extra work. Instead, I decided to cut only two strips that would wrap around the sides of the duvet, attaching to the front and back panel. Here is how I figured it:
54"-2" for seam allowances = 52" is what we have on each panel so far.
66" + 2" for the thickness of the comforter = 68" is what we want on each side
68"-52"=14" is what we need on either side of each panel.
14" + 4" for seam allowances = 18" panels.
We already know our length is 2.5 yards. So cut 2 strips 2.5 yards long by 18" wide. You will have an additional piece of fabric 18" wide X 2.5 yards leftover to make pillows, ruffles, or other accents with.
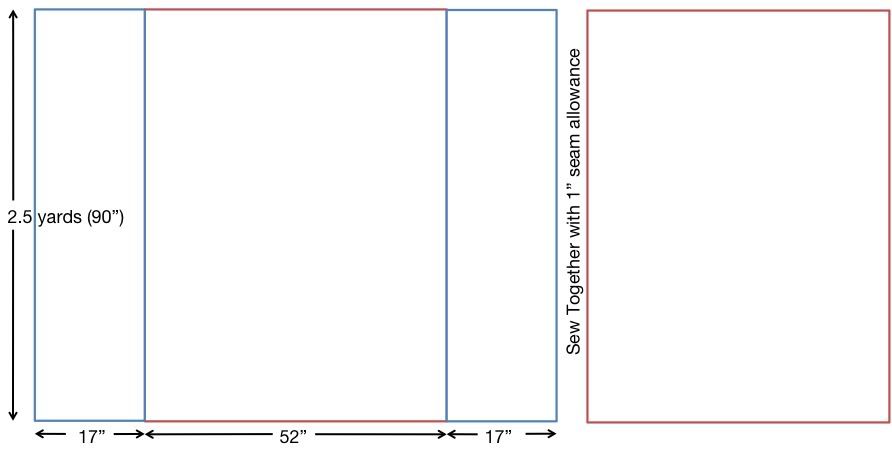
So start with one of your 54"X2.5 yard panels. Along the 2.5 yard side, sew one of your 18"X2.5 yard strips to it using a 1" seam allowance (it's that large because I used a french seam).
Then sew the other 18" strip to the other side of the 54" panel.
Now grab your other 54" wide X 2.5 yard panel. Sew it to one of the side panels along the 90" side.
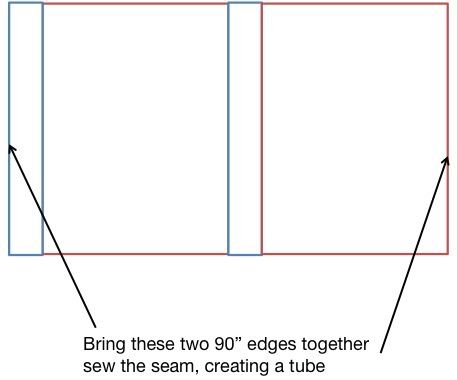
Now bring the two unfinished 90" edges together and sew the seam, creating a tube.
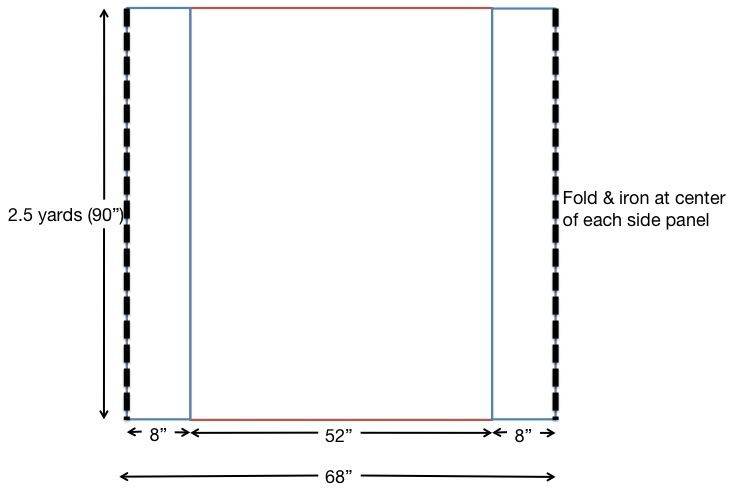
Now we want to center the two 54" wide panels by folding the side panels in half, so they go from 16" to 8" with a fold. Iron.
Now with your duvet inside out, sew the top side closed and finish the edge by serging, sewing with a ziz zag stitch, or cutting with pinking shears.
Now I wish I had taken pictures of this but I didn't so bear with me. You can also head over to our original duvet cover tutorial here, and look at the pics from step 3. But what you want to do on the bottom of the duvet is fold the entire seam under 1/4" and iron and sew in place. Now fold it in another 2" and iron. Lay it flat and sew from the corner 17" in and back stitch. Repeat on the other corner. Attach your snaps or velcro to the inside flap you just created. Yeah, way confusing without pics right? Check the original duvet tutorial for pics.
Did this just make it more confusing? Sigh, I tried! Despite this seeming a little confusing, once you are sewing it, it is actually a VERY simple project. It's just a lot of fabric to work with.
Done.
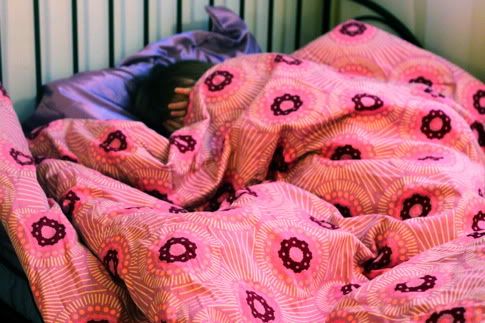
Time to hide from daddy!
Sleep tight little bean.

posted by Jaime @ 2:00 AM
![]()

25 Comments:
Great tutorial, thanks so much!
I actually used your toddler sized tutorial last night to whip up a duvet. Thanks.
I always have a hard time keeping the comforter in the duvet cover nicely. They always seem to bunch up into one corner. So I stopped using the covers. Is there a way to deal with that? Or does my family just sleep roughly with the covers?
Wow, you DO love us readers to do such an in-depth tutorial! Can't wait to make it for my toddler daughter when she's a little older! In fact, still need to get going on the toddler one!
leia- i know what you are talking about, and i think because this one (its clearer in the original tute) has a flap at the bottom it holds it in place better, but another option is to sew some times into the top corners and then put a grommet on the top corners of the actual comforter and tie it in place at the corners...
umm, "ties" not "times"
I am in love with that fabric!
grommet and ties. brilliant. I will try it. Covers are so much nicer, and cleaner!
I just finished doing crib size comforters for my girls-- twin duvet covers will be next!
Perfect timing! I've been looking to buy a duvet but I think I'll try sewing one now -thank you!!
what do you think about using coordinating fabric on the side panels?
earth mama i LOVE that idea! then you could also make some pillows in the coordinating fabric, cute!
Yay! I've been searching for a fantastic duvet cover tutorial so I can make the perfect set for my son's bed! Thank you so much!
You have the most wonderful ideas that I have started to sew more and more now all I need is the energy to do it! This summer I made curtains for my son's newly redone room and tried to find fabric that matced to his IKEA duvet cover....I think a.) get same fabric and make duvet or go back to IKEA and get another duvet cover and make some more curtains out of that and then repurpose the old cutains..sorry for the ramble decisions, decisions.
I just love love love the print you chose~!
I made them for both my kids, but took a different approach. I bought a cheapo comforter from IKEA and created a duvet cover for it, then sewed it in place (closed) with some haphazard quilting-style action. Now I just throw the whole thing in the wash when it gets peed on.
Genuis! I made my daughters, but I did it the too much cutting and measuring way by creating four panels for the sides of the front and back. This is why I love this blog, craft-i-ly efficient!
This could not have come at a better time. I hopped on here just now specifically to see if you gals had any info on exactly how much fabric I would need to make a twin size duvet cover. What luck :) I need to make three! for my little boys to go with their new bunk beds. Thanks, crafty, prudent ladies!
My duvet cover is under my machine and almost finished! I had a spare king size duvet so I'm resizing it and sewing it up. Also to keep the fabric a little cheaper I'm using a flat sheet for the bottom. So glad I googled directions because I found this amazing site!
This is a fantastic tutorial and perfectly timed! A question though...With the design of my daughter's bed, there is no way for bedding to drape over the end & sides. So, I was thinking of making a custom sized quilt/duvet of approximately 50"x72". It looks as though your daughter has the same bed and I wonder if you think this would work for it? Or, alternatively, what do you do with the extra bedding on your standard twin size?
Thanks,
Darcey
Thanks for this tutorial. I made my daughter a twin duvet cover over 10 years ago and she still uses it. It has held up well. Love your blog!
Sandra
Thank you for posting the twin duvet cover, it's just what I needed.
Nice!
- mybabyexperience.com
I find it very hard to find modern fabrics for boys especially with animals, trains or airplanes. Do you have any suggestions? Thanks!
Just a note... I always had a hard time with duvet covers bunching and the things that you can buy from bed bath and beyond never stayed put so what i did was bought some white elastic and created 4 small loops and sewed one into each of the inside corners of the duvet cover and then hand sewed a button that would fit into the loop onto each corner of my comforter so I could button them in. It has worked pretty well for me... also for my king size comforter i put loops and buttons halfway between each corner as well. It might sound like a pain to do the actual buttoning but it always looks good without all the bunching.
Post a Comment
Subscribe to Post Comments [Atom]
<< Home