body { background:#fff url("http://www.blogblog.com/dots/bg_dots.gif") 50% 0; margin:0; padding:0 10px; text-align:center; font:x-small Verdana,Arial,Sans-serif; color:#333; font-size/* */:/**/small; font-size: /**/small; } /* Page Structure ----------------------------------------------- */ @media all { #content { background:url("http://www.blogblog.com/dots/bg_3dots.gif") no-repeat 250px 50px; width:700px; margin:0 auto; padding:50px 0; text-align:left; } #main { width:450px; float:right; padding:50px 0 20px; font-size:85%; } #main2 { background:url("http://www.blogblog.com/dots/bg_dots2.gif") -100px -100px; padding:20px 10px 15px; } #sidebar { width:200px; float:left; font-size:85%; padding-bottom:20px; } #sidebar2 { background:url("http://www.blogblog.com/dots/bg_dots2.gif") 150px -50px; padding:5px 10px 15px; width:200px; width/* */:/**/180px; width: /**/180px; } } @media handheld { #content { width:90%; } #main { width:100%; float:none; } #sidebar { width:100%; float:none; } #sidebar2 { width:100%; } } html>body #main, html>body #sidebar { /* We only give this fade from white to nothing to browsers that can handle 24-bit transparent PNGs */ background/* */:/**/url("http://www.blogblog.com/dots/bg_white_fade.png") repeat-x left bottom; } /* Title & Description ----------------------------------------------- */ @media all { #blog-title { margin:0 0 .5em; font:250%/1.4em Georgia,Serif; color:#353; } #blog-title a { color:#353; text-decoration:none; } #description { margin:0 0 1.75em; color:#996; } #blog-mobile-title { display:none; } #description-mobile { display:none; } } @media handheld { #blog-title { display:none; } #description { display:none; } #blog-mobile-title { display:block; margin:0 0 .5em; font:250%/1.4em Georgia,Serif; color:#353; } #blog-mobile-title a { color:#353; text-decoration:none; } #description-mobile { display:block; margin:0 0 1.75em; color:#996; } } /* Links ----------------------------------------------- */ a:link { color:#488; } a:visited { color:#885; } a:hover { color:#000; } a img { border-width:0; } /* Posts ----------------------------------------------- */ .date-header { margin:0 0 .75em; padding-bottom:.35em; border-bottom:1px dotted #9b9; font:95%/1.4em Georgia,Serif; text-transform:uppercase; letter-spacing:.3em; color:#663; } .post { margin:0 0 2.5em; line-height:1.6em; } .post-title { margin:.25em 0; font:bold 130%/1.4em Georgia,Serif; color:#333; } .post-title a, .post-title strong { background:url("http://www.blogblog.com/dots/bg_post_title.gif") no-repeat 0 .25em; display:block; color:#333; text-decoration:none; padding:0 0 1px 45px; } .post-title a:hover { color:#000; } .post p { margin:0 0 .75em; } p.post-footer { margin:0; text-align:right; } p.post-footer em { display:block; float:left; text-align:left; font-style:normal; color:#996; } a.comment-link { /* IE5.0/Win doesn't apply padding to inline elements, so we hide these two declarations from it */ background/* */:/**/url("http://www.blogblog.com/dots/icon_comment.gif") no-repeat 0 .25em; padding-left:15px; } html>body a.comment-link { /* Respecified, for IE5/Mac's benefit */ background:url("http://www.blogblog.com/dots/icon_comment.gif") no-repeat 0 .25em; padding-left:15px; } .post img { margin:0 0 5px 0; padding:4px; border:1px solid #cca; } /* Comments ----------------------------------------------- */ #comments { margin:0; } #comments h4 { margin:0 0 10px; border-top:1px dotted #9b9; padding-top:.5em; font:bold 110%/1.4em Georgia,Serif; color:#333; } #comments-block { line-height:1.6em; } .comment-poster { background:url("http://www.blogblog.com/dots/icon_comment.gif") no-repeat 2px .35em; margin:.5em 0 0; padding:0 0 0 20px; font-weight:bold; } .comment-body { margin:0; padding:0 0 0 20px; } .comment-body p { margin:0 0 .5em; } .comment-timestamp { margin:0 0 .5em; padding:0 0 .75em 20px; color:#996; } .comment-timestamp a:link { color:#996; } .deleted-comment { font-style:italic; color:gray; } .paging-control-container { float: right; margin: 0px 6px 0px 0px; font-size: 80%; } .unneeded-paging-control { visibility: hidden; } /* More Sidebar Content ----------------------------------------------- */ .sidebar-title { margin:2em 0 .75em; padding-bottom:.35em; border-bottom:1px dotted #9b9; font:95%/1.4em Georgia,Serif; text-transform:uppercase; letter-spacing:.3em; color:#663; } #sidebar p { margin:0 0 .75em; line-height:1.6em; } #sidebar ul { margin:.5em 0 1em; padding:0 0px; list-style:none; line-height:1.5em; } #sidebar ul li { background:url("http://www.blogblog.com/dots/bullet.gif") no-repeat 3px .45em; margin:0; padding:0 0 5px 15px; } #sidebar p { margin:0 0 .6em; } /* Profile ----------------------------------------------- */ .profile-datablock { margin:0 0 1em; } .profile-img { display:inline; } .profile-img img { float:left; margin:0 8px 5px 0; border:4px solid #cc9; } .profile-data { margin:0; line-height:1.5em; } .profile-data strong { display:block; } .profile-textblock { clear:left; } /* Footer ----------------------------------------------- */ #footer { clear:both; padding:15px 0 0; } #footer hr { display:none; } #footer p { margin:0; } /* Feeds ----------------------------------------------- */ #blogfeeds { } #postfeeds { padding-left: 20px }

Prudent Baby

Get sewing how to, sewing tutorials, and sewing help to learn sewing. We offer sewing tutorial for sewing moms.

Friday, April 9, 2010

DIY Big Bow Headband


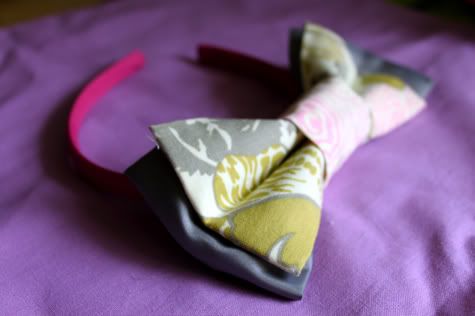
How cute are these???  I decided to make one of my own for little S. Get the DIY on how to make a Big Bow Headband after the jump...


DIY Big Bow Headband

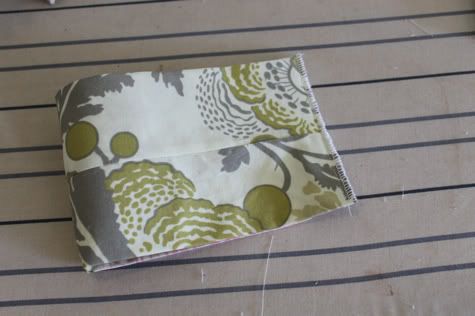
1.  Wash, iron and cut your fabric.  I used an Amy Butler cotton (Fresh Poppies in Linen), a scrap of gray poly lining, and went for two layered big ole bow, you need one piece of fabric for each layer that is double the width of the bow plus 1/4" and double the length plus 1/4".  For the top layer I cut a piece 10" long by 8" wide.  For the bottom gray piece I went 12.5" long by 10" wide.


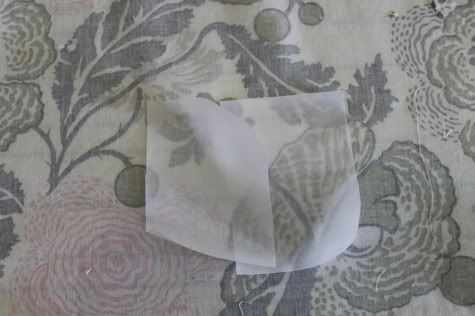
2.  Cut a small piece of double-sided lightweight fusible interfacing and iron it to the the wrong side of the fabric smack dab in the middle.  The reason for this is to give the center of the bow some stiffness but let the sides flop.  I only did this on the top cotton layer, not the bottom rayon layer:


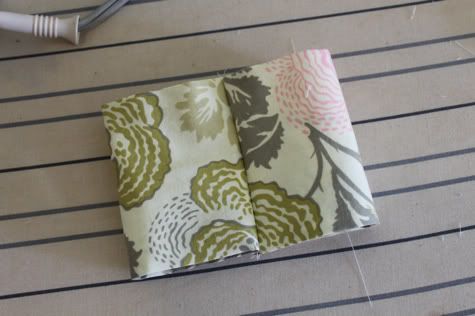
3.  Now fold the fabric in half right sides facing the long way, then sew in place just along the unfinished long edge:


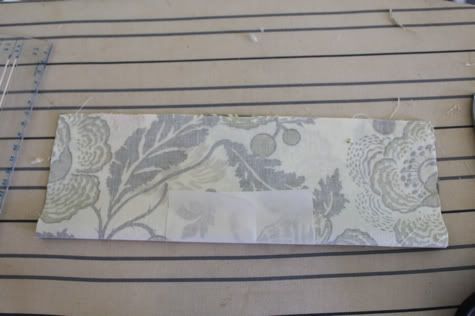
4.  Remove the paper from the other side of the interfacing, turn the tube you've sewn inside out, and iron it with the seam in the middle:


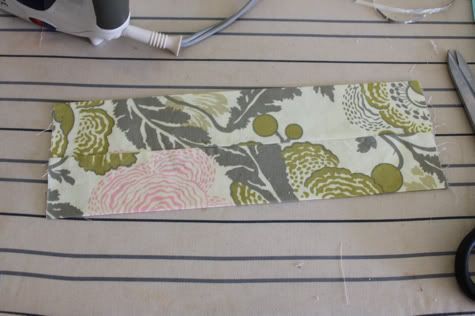
5.  Now fold it in half again right sides facing (so you are still seeing the seam) and sew up the short unfinished edge and if you want you can serge the seam (not necessary at all):


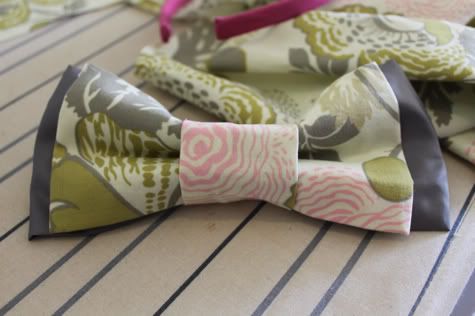
6.  Flip it inside out and align the seam in the middle of the back:

Repeat with your second fabric or however many layers you want.

7. Sew a little tube and slide it around your bow layers:


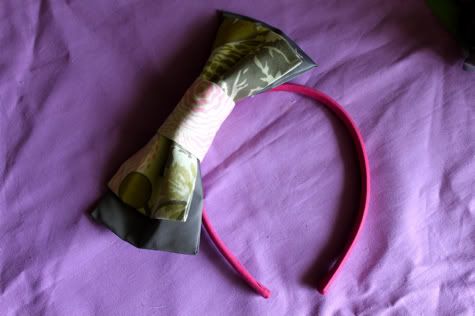
Slip it onto a head band. You can glue or stitch it in place so it doesn't slide.  Done!

Labels: , , , , , , , , ,

7 Comments:

Blogger Jordan said...

so cute! can you tell me what fabric you used? i looooove that print.

April 9, 2010 at 8:04 AM  
Anonymous Anonymous said...

thank you for sharing!!! i have so many friends that are having lil girls. great gifts!

April 9, 2010 at 8:35 AM  
Anonymous Anonymous said...

SO CUTE! Thanks for the tutorial and I love those fabrics you used!!!!

Have a lovely weekend!
xo,
sandy

April 9, 2010 at 8:36 AM  
Blogger Julie said...

And if you don't like headbands, you could easily attach that to a barrette!

April 9, 2010 at 10:54 AM  
Blogger Jaime said...

hi jordan! it's Amy Butler Fresh Poppies!

April 9, 2010 at 2:37 PM  
Blogger Unknown said...

Totally adorable!! Love your site!

Lindsay

April 14, 2010 at 5:17 PM  
Anonymous Anonymous said...

I just blogged about bows, and included this one in it - along with a picture of mine that I made! :)
Future Prudent Mama,
Elizabeth

December 18, 2010 at 3:15 PM  

Post a Comment

Subscribe to Post Comments [Atom]

<< Home