Before & After Ikat Footstool DIY
Footstools are crazy useful (vanity pouf? chair to scoot under a desk in a small space? foot rest? end table?) and so easy to find at thrift shops. I picked this one up at the National Council of Jewish Women's thrift shop on Fairfax for a few bucks. Yeah, it was stained and gross, but it had great bones. I even liked the black legs but they don't jive with my interior. The fabric was an amazing ebay find ($8 for five yards!) which I also used for the coordinating pelmets in our living room.

A footstool is a great beginner upholstery project, I walk you through the steps after the jump...
Find the screws that hold the top to the base:
Unscrew them and remove the top:
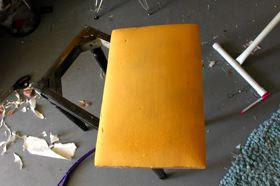
Now cut off all your old fabric:
You should remove the old staples (so you don't run the risk of stapling into them) but who has time for that:
You might need to remove the foam if it's nasty, but mine was in good condition so I left it. FYI, yellow does not mean nasty, all foam turns yellow, smelly means nasty. If you need new foam, look up foam in your yellow pages, there will be a million places you can buy it (in LA Diamond Foam on La Brea is good). for a project this small you can probably get it at Michael's:
Get a drop cloth or old cardboard box and set up your spray station. It always makes me chuckle that the instructions say to use in a "well ventilated area". There is no area well ventilated enough to spray paint besides outside. Do it outside. If it's raining, wait till it stops, then do it outside. Don't forget, if there are any rough or chipped spots on your base, sand them down before spraying:
Spray the first coat and let it dry:
Wait a bit then spray coat #2:
Wait a bit more and spray coat #3, look for any lightly coated spots (like the inside of the legs or the corner) and hit 'em up:
Meanwhile, take your top and cut some batting - enough to fit around the foam and staple to the wood:
Now you want to cut your fabric. If it has a pattern that needs to be aligned, figure out where you want the center to be and make a notch with your scissors at the center on all four sides:
Fold your batting in half and align the center with your notch:
Then unfold and cut your fabric to the same size as the batting.
Lay your fabric right side down, place your batting on top of it, and place your footstool cushion on top of it right side down. Using a ruler find the center of the bottom and make a mark:
Align the notch in your top fabric with the mark and staple it on:
Do the same on the opposite side. Repeat on the other sides and staple so the center of each of the four sides is stapled down nice and taught:
The go ahead and staple the remaining fabric 1 1/2" apart, moving from the center out on each side, pulling the fabric taut and checking that it's laying flat on the front. Stop about 2" from the corner. At the corner pull the fabric in diagonally and staple:
The pull up one side and staple, then the other, so you get a notched corner:
Which looks like this from the top:
Repeat on all four corners until your cushion is upholstered, then trim the excess fabric:
Doesn't that look nice?
Now you can add some lining to finish the cushion, though it's not totally mandatory since most people won't be examining the bottom of your stool that closely. To do that take your lining and fold the edge in and staple it around:
Take your upholstered cushion over to your base. Make sure the base is dry people. If so, lay your cushion right side down and place the base on top of it, then use the screws you removed earlier to screw it back on. If your screws got stripped, use new ones but just double check they aren't so long they'll pierce your upholstery, that would be a bummer:
what what?!
i said what what?!
Labels: Before and After, Decor, DIY, Furniture, Recycle, Upholstery


5 Comments:
I just made-out with my screen. Ask your foot-stool if it feels violated.
I'm so doing this, but with dining room chairs instead of a footstool.
Thanks for the step by step. What what?
This project would have completely intimidated me before. Thank you for breaking it down. I'm also hitting up the dining room chairs...
New favorite blog!!!
love it!!! and i am obsessed with all of the ncjw thrift stores....yay!
Great project!! I want to do this to my piano bench...but it is hinged on one side (so it will open to the storage under the lid.) Think I'd follow similar steps?
Post a Comment
Subscribe to Post Comments [Atom]
<< Home