The Craft Room Redesign Project: Help!
Ladies, I truly believe this to be true. I think most of you would agree that on some level, this is important. So, I'd like your help to create this kind of space, and maybe we can help each other in the process.
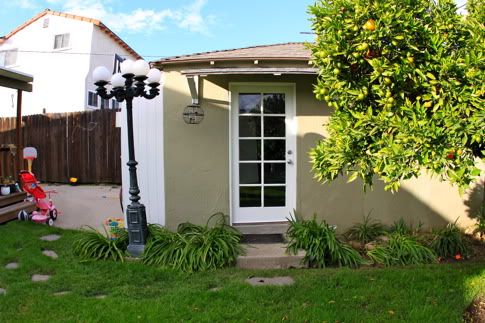
I work out of the converted garage behind my house. This is my office, my craft room, my sewing room, my writing space, and where my husband works out (note: I don't work out, ha). I know I am lucky to have a space like this, as many prudent mamas work out of closets, dining room tables, garages, or on the floor. Rather then continue to treat it like a scene from Hoarders, I'd like to embrace my good fortune and honor this space with the organization and care it deserves.
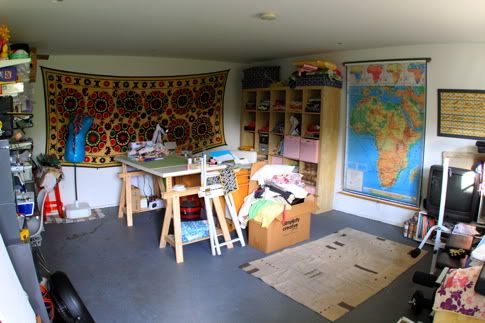
While I have made small improvements over the past few years (biggest improvement: cleaning it before I took these pictures), the space is inefficient and not-pretty, leading me to avoid entering it (i.e. doing my work). It is time for a super-prudent redesign, and I'm planning on taking you along with me as I make small, cost-effective (yet hopefully stylish) improvements. There are specific needs and challenges, so I am hoping you can make some suggestions and we can work on this project together. Maybe we will all learn something from each other about making space in our lives for our work.
I'll ask you my questions after the jump. Please leave comments with your thoughts, and bonus: our favorite comment of the week wins a yard of Dan Stiles fabric from Fabricworm!
The Craft Room Redesign Project: Help!
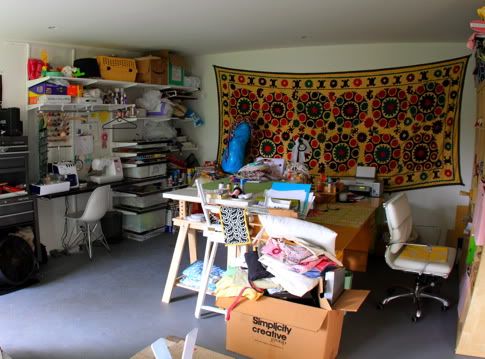
Here are some before pics and commentary. The first thing I did was install an ELFA storage system along one wall. That is not going anywhere, because I can't deal with disassembling, and also because it is working fairly well.
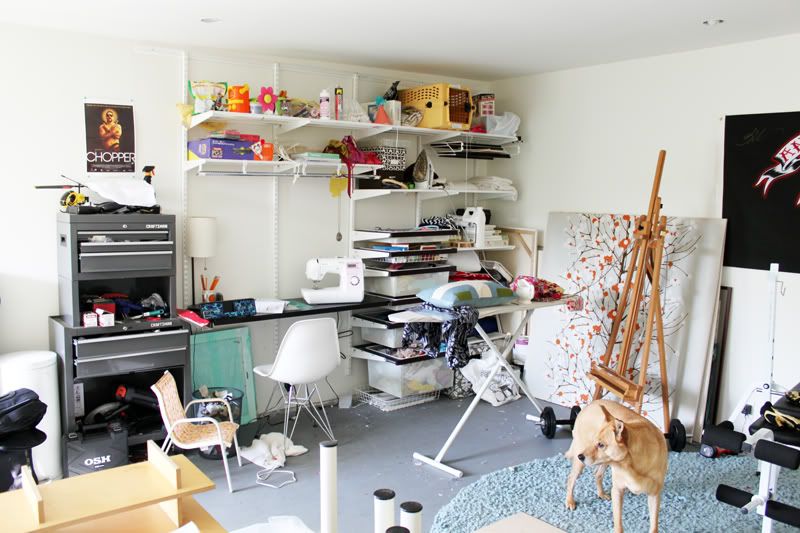
I added a cutting table from Ikea and a desk made for me by a friend.
This is the area where I do most of my sewing. I also need lots of storage for my tools (power tools), craft supplies, and fabric.
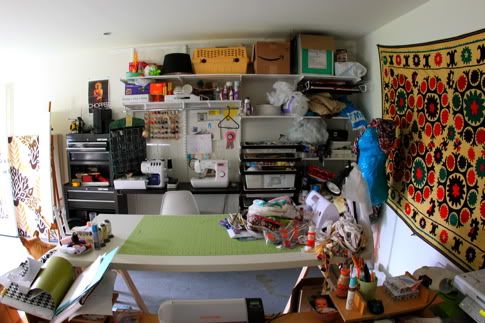
This is the area where I do my writing and other computer-based work.
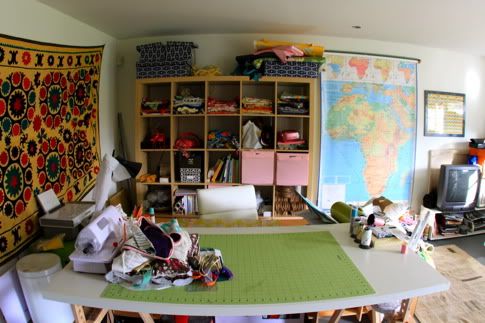
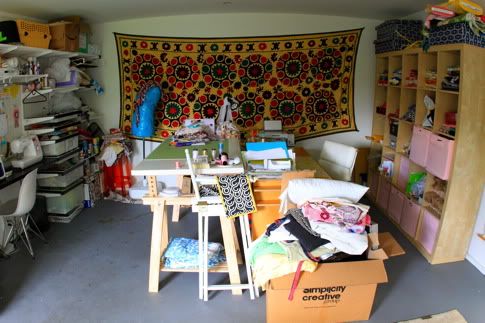
On the opposite side of the room by the entrance are some old shelving units and my husband's workout bench, along with the ironing board and my air compressor that I use mostly for upholstery projects. I'd like to make this area a sitting area, with a piece of furniture that folds out into a bed. That way I could actually have humans come to my office, and also when guests come, my husband and I can sleep out here and they can use our bedroom, since we don't have a guest room.

One of the biggest challenges in the space is the floor. It is painted cement and has some stains from who-knows-what that make the space feel more industrial than cozy. I have tried to use a variety of rugs, but with all the fabric scraps flying around it became a mess to try to vacuum a bunch of loose rugs. Also, we rent this house so a big investment in flooring doesn't seem prudent. What do you suggest?

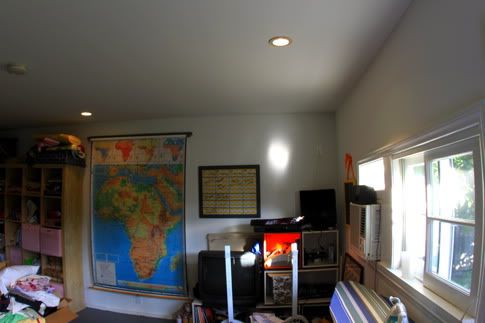
Another challenge is the lighting. Even on bright Southern California days, the space feels dark because it only has a few recessed overhead lights and a tiny window. This also makes it hard to take pictures of DIYs, as I need to stop for each step and go outside to set up a shot, or alternately I need to spend time photo editing images so you can see them (like i did with these). You can see the light sources here. What kind of general lighting and task or photo lighting set-up would you suggest?
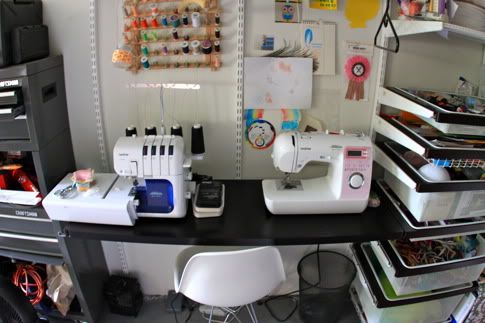
Because I need a cutting table at waist height and a desk to work on, I have placed my sewing machine and serger on the ELFA storage system wall. I love that they fit so neatly into the unit, but as you can imagine, it makes it hard to sew large items. It also makes the entire storage wall vibrate quite loudly while I sew.
Also, the walls are white, which is great for not clouding up the sensibilities when trying to create, but not especially cozy. The suzani along the back wall is going to move into my bedroom, so that space will be bright white. Should I paint the walls? Or use my fabric collection to adorn them? Would a specific color combo brighten up this dark room but allow for great picture-taking?

So, to recap: I'd like to use this 15'X18' space to have a work desk (computer/printer/office), a cutting table, a sewing area, a seating area with space for a fold out bed that is cozy enough to feel like a guest room, and it needs to be kid-safe. I'd even like to squeeze in a small craft area for Scarlet, so she can "work" with me. Do you have an idea of a better way to lay this space out or suggestions for improvements? I need great flooring, good lighting, and style.

Impossible? You tell me.
Labels: Decor, Inspiration, Organization

57 Comments:
What fun - am i crazy in feeling that redesigning a craft space is fun. I am also jealous. So my first thoughts are:Floors - what about lino or rubber tiles. Can be a bit daggy but these days you can get some great designs. Maybe a black / white checkerboard effect. use good underlay and it will be soft to walk on and the bonus is to clean you just sweep or mop. Some specific task lighting might solve your lighting (Ikea is good). Rather than a blank wall why not create some mood / inspriartion boards.
Well, I definitely think you should invest in painting your floor and purchasing a nice thick area rug to both soften it some and provide (Scarlet and the sitting area?) w/some padding.
I also think if your floor is painted something cool (think dramatic colors and patterns), you'll feel better about leaving the walls/ceiling white, which it seems like you need to do considering you have photo-taking issues. (we have dk wood ceilings and it kills my photos)
To perk up the walls, I'd invest in some blown-up photos/indie art and tackle your storage shelves with some textured storage baskets (Ikea ones and attach felt bottoms). You could also hang one of those wire/clip things for Scarlet to rotate her own art pieces.
Would you be more inspired to have your main work areas by the window? I bet the tv would probably be more fun to watch without the glare from the window...
I tend to want a wowza floor and then mellow, uniform, and textured going on for the rest of things so a) you can concentrate on a project's colors and b) the mellow uniformity keeps things cohesive in an otherwise physically/visually-busy place. It also means that should anybody need to sleep there, they're not going to feel like they're sleeping in a craft closet -even if it's you! =)
ps - I also think that if the first thing a person sees when they walk into the space is a cozy seating area on the back wall...well it's a positive first impression... =)
I'm excited to see what you decide to do with the space!
Girl, get some containers! Love that Elfa system, start there. DIY it with great coordinating fabrics or wrapping paper and cover a bunch of boxes to hold all the little stray things. I think it will really help neaten the area up.
You can also use that fabric as an inspiration for a wall color. Look at the fabric and take note of the very first color that your eye is drawn to, then get that shade - only tone it down a lot if it's a very loud hue. Take it to the paint counter and have them match it, then get only a percentage of the color.
For the floors, I think laminate wood flooring always makes any space look more sharp. It can go with any decor and you can get it pretty inexpensively at Ikea (at least I think it's a good deal - I haven't actually compared prices yet).
I am also envisioning a fantastic collection of fabrics in embroidery hoops of varying sizes along that back wall. Inspiration can be found on Flickr by searching "embroidery hoop fabric art". You can change out the colors and patterns for the seasons, or just whenever you need to make zippy pouch and you cannot be bothered with art hogging your favorite fat quarter any more.
How about framing a large version of the PB Silhouette Logo thingy (translated: the header of the old blog)?
I like Ana White's (formerly Knock-Off Wood) version of the Pottery Barn's platform storage bed. Push it up against a wall so it's like a daybed/couch for guests. Use your own fitted sheet tutorial to make a slipcover for the mattress out of a decorator weight fabric so it's more like a cushion instead of a sheet. Then rip that bad boy off of there when you and the hubs are banished to to the craft room for the sake of guests staying in your own room.
I think the work spaces should be closer to to the natural light source, which will come in handy for shooting tute pics. At least move the cutting table over there. The sitting/bed area will be okay in the darker part of the room, where you can add cozy task lighting.
Hmmm....I think I just designed *my* sewing room as I was describing what I'd do with yours. Thanks for that!
Ooooh so many possibilities!
For the floor I would look into re-painting it a different color (it's painted now right?). Personally I think that a can of paint is the least expensive way to make an area seem fresh and new. Plus if you paint the floor a nice bright color it will probably help a) brighten up the room with whatever lighting you decide on and b) help the walls not feel so white if you decide to leave them unpainted.
As for the walls - I love having an idea board, you could have a huge one! That way the walls are totally white, and you could have a place to post fabric scraps, drawings/sketches of ideas, etc on the wall and out of the way but still within reach and something to look at while you are relaxing on your futon/couch.
As for furniture - I would just keep your eyes open on craigslist or do some garage saleing when the weather is nice to snag something that can work in the space but doesn't have brand new price tags.
Good Luck!
My little one has just started to enjoy 'crafting' with her Mama and I have found that she is better sitting at a fold up table from Costco. You can adjust the height of, it folds up totally flat for storage but is a great 'extra' space when you need it, and Scarlett will feel like its her own as she won't have to kneel up to it like a big persons table. Bonus is that she can sit on an ordinary sized chair so no need to buy a chair for her that she will grow out of eventually. Hope that helps a little - can't wait to see how it progresses!
You need to check out the craft rooms on pinterest! There's some serious inspiration on there and I got some really good ideas from there.
Check this board out: http://pinterest.com/hearthandmade/craft-room/
Also for your floors, have you seen people that have done floor stencils? It's not for everybody but Ashley Ann Photography did hers and I think they turned out amazing!
Here: http://ashleyannphotography.com/blog/2011/01/24/diy-stencil-painted-subflooring/
How fun, I love to see what other people's work space looks like!
I am a big fan of tile. It keeps rooms airy and cool and you can really change the look of a room-and it is easy to install! A light cream tile or a mexican style if you want some depth.Throw rugs that you can snap outside quickly to clean and spills are easy to wipe up.
Paint the walls yellow. Hang magnet board for inspirations.
Track lighting so you can point the lights around the studio where you are working.
A day bed with a trundle for you and Hubs that doubles as a couch.
A small table & chair for Scarlet's craft station.
A doggie bed for that cute doggie in the pic.
A modern armiour to store your materials/supplies/may need a few~
A fold out iron board and an iron holder
Yahoo!
I think it's totally possible, what a great space! I would definitely paint the walls if it were me, something nice and light so if you take photos against them the wall won't distract from the photos too much. Something I've been thinking of doing for a while is to put a corkboard in my crafty area and cover the cork part with fabric, then paint the frame so it's more decorative. Then I want to add things to that board that inspire me - maybe clips from magazines, post cards, paint swatches or whatever.
For your photos, I'd suggest getting a big sheet of white poster board you can lay out on top of your cutting table, then buy several small lamps and place them around the room at strategic spots; maybe a floor lamp near your sewing/cutting areas with multiple arms so you can direct the light, like this one: http://www.target.com/Room-Essentials-Blue-Floor-Lamp/dp/B0038Z4HRG/ref=sr_1_17?ie=UTF8&searchView=grid5&keywords=floor%20lamp&fromGsearch=true&sr=1-17&qid=1298296506&rh=&searchRank=target104545&id=Room%20Essentials%20Blue%20Floor%20Lamp&node=1038576%7C1287991011&searchSize=30&searchPage=1&searchNodeID=1038576%7C1287991011&searchBinNameList=subjectbin%2Cprice%2Ctarget_com_primary_color-bin%2Ctarget_com_size-bin%2Ctarget_com_brand-bin&frombrowse=0. Then put smaller table lamps in other areas, like on a shelf and definitely one in your seating area. Then when you take photos, bring all the lamps from different directions and point them at the poster board and put your item to photograph on the board; it's like a light box without the box.
I'd also use fabric or contact paper to cover magazine holders and storage bins to put them on your shelves and add color to the room to brighten it up. Maybe you can even get one of those room divider screens to separate your sitting area from your work area for the "homey" effect in the guest room option? And I'd get a folding easel for your daughter and maybe a stool where she can sit up at your cutting table to do other crafty projects, that way she doesn't take up too much of the space but she still has room to do her own thing?
Good luck, I can't wait to see what you come up with!
Jess
I would change the areas placing the cutting table and the sewing machine closer to the window (L shape, in the light), and break a larger window if possible, and some shelves with transparent boxes for storage, and some rubber-based paint on the floor.
I would install one of those floating wood laminate floors (a la pergo). They are relatively inexpensive if you buy the products online, and are easy to install (my husband and I have done it). A nice, warm wood tone would warm up the floor, make it a little more comfortable to walk on, and will make it seem more "homey". I also think if you do track lighting and paint the walls a light blue if you go with a darker wood tone on the floors, you could solve all of your coziness issues and have it look like a real room without too much expense. You could also frame scraps of your favorite fabrics on the wall as art--very prudent mama!
LOTS of possibilities, LOTS!
Now THIS is what I love, a remodel challenge!
(1) Inexpensive wood floor
(2) Move the A/C
(3) A "light" wall
(4) drop down shelf for sewing/surging on island
(5) inexpensive pendant lighting
(6) sky tube light
Curious??? Sending you an email with more details
If I had your craft room, I would put in Pergo floors, they're fake wood, but look and clean up great. If you used a lighter wood, it would help brighten up the room a bit, in case you decide to paint. I would also either move the square boxed shelving to the wall next to where it is, or turn the cutting table that direction. Mine is up against the wall, and it saves me a lot of space. You could always set up a square with your current wall setup, the cutting table, the boxy shelving and your other table, giving you room to maneuver within the square. Everything in my craft room is against the wall, leaving the center of the room open. Wish mine was as big as yours. If you keep the harder floors, I'd also put an area rug over near the couch. I've got to say... I'm jealous of your room!
Have you seen what Young House Love did to their old sunroom floor? Check it out here:
http://www.younghouselove.com/2010/09/our-sunroom-mini-makeover-phase-three-2/
I'd say paint the floor fun, and get an area rug for the bed/sitting area. That way you can sweep up all your loose threads and fabric scraps in the sewing area while the rug will make it feel more like two spaces in one.
Good luck with the rest of the organization!
I think FLOR tiles would be great. I have used them in various spots in our house, and you can be quite creative.
A friend of mine actually painted her garage floor when it was turned into a workout/playroom. Not really comfy or soft but super cute and colorful!
In my sewing room, I put a table perpendicular to one wall (with shelving) for sewing on. That way I had a large space so my work would be supported, and my supplies were within easy reach. You could use an old interior door and support it with a couple of cabinets/chests for even more storage, and just screw it to the tops to keep it from sliding around. I also saw once a large wall area (like the one under your rug) painted a subtle color and framed out with molding, and then a few hooks hung near the top inside the frame. The idea was that you could hang projects (finished or in-progress) for pretty photographing and a sort of rotating "art" installation as well as additional storage.
For the flooring, I would use laminate wood -- fairly easy to install (right over the cement), easy to clean, and you don't have to worry as much about scratches/stains/weather as you would with real wood.
I'd also be tempted to open the space up by creating an L-desk sort of set up along that back wall -- it could be shallower along the long wall for writing/sewing, and have a deeper section under your existing shelving for cutting and laying out projects.
And make the big empty wall and inspiration space -- I think a combo of bulletin boards, framed pictures, and places to put up notes and ideas would be lovely!
I would paint the floor and maybe add some cork flooring under your desks, it's soft and relatively inexpensive and would be great for catching renegade needles (I've stepped on too many on my rug). Don't go too dark on the walls or floor, it will make your space seem smaller, maybe light earthy tones. I feel they are best for creating. Also if you put a large mirror across from the window it will reflect some natural light and maybe add some brightness.
What a fabulous space!
-Paint the floor. Maybe add some cushy foam tiles for the kid area?
-Paint the walls. Light, warm gray or warm white, if you're taking a lot of photos.
-For a waist-high cutting table, I'd go industrial and stand-alone. Build your own with plumbing supplies and some type of board. In the As-Is section at IKEA, you can often find large pieces of butcher block, countertop, etc. that you could use for the top.
have fun and keep us posted as you go!
I have a question. What do you want it to FEEL like? I'm a writer, so it is easier for me to put visuals into words first. Like, I wanted my kitchen to be "sexy." That led to black paint behind white IKEA cabinets.
I decided on "Moroccan Water Closet" for a tiny bathroom. I have no idea what that is, but it led me to warm oranges and reds, balanced by sandy beige.
What do you want to feel? Energized? Relaxed?
I would paint the floor with some good quality floor paint - it makes floor clean-up a breeze! You could always get crafty and stencil some sort of pattern on there too, maybe something subtle, only one shade lighter or darker than the base color.
Another great option would be to paint the floor a solid color and then find a FLOR type brand modular carpet that you can take up piece by piece and wash in the sink (and take with you if you move!)
I'm all for the adorning the walls with your fabric collection instead of going to the trouble to paint a rental, especially if it's something you feel like you may want to change often. You could display fabric over painting canvas stretcher bars or maybe you could design a system where you could clamp the fabric on without damaging it and then have the option to swap it out whenever you wanted a change or wanted to use the fabric.
www.whatisblik.com has some awesome vinyl wall art stick ups too, and they're not permanent. I believe they even have some moveable ones you could potentially take with you. They're pricey, and I don't like the non-green vinyl aspect, but we have the anise in our daughters room in white (on a slate blue wall) and it's stunning.
I can't wait to follow your progress! I'm currently creating my studio from an empty room in our basement that had wood paneling and cement floors. You can check out the beginning of my renovation here - http://emmmylizzzy.blogspot.com/2011/01/clean-slatefresh-startblank-canvas-and.html
and it also answers the question of what I did to (cheaply) cover the cement floors!
You have a very nice space, with tons of possibilities! I have three suggestions/possible answers to your questions:
1. For the floor you could get those carpet tiles. They just stick down and can be peeled up if you move.
2. For the big wall you could put fabric in embrodiery hoops and hang them. I love that look.
3. My kids have their own little table and a shelf with construction paper, coloring books, crayons, etc. next to my sewing table (which is one of those plastic folding tables).
I have a warning too, with the kids in there too my space gets crazy messy! Scraps of paper, fabric, crayons, toys everywhere!!! However, I do get to work on projects so it's a decent trade-off. :)
UG! I feel your pain! I use a corner of our basement that has a desk piled high with my hubby's textbooks, excess craft material that I use often enough to not warrant putting away in a closet but not often enough so that it collects MORE stuff on top of it, and things like empty diet coke cans (my creative nectar). I am anxious to see what you do with your space in hopes that it encourages me to tackle MY no-mans land!
The most helpful thing for me as I have tried to organize and decorate our concrete-walled campus apartment (just a little bigger than the room you have there) has been the mindset of attacking each area like an artist/inventor. Is this shelving as pretty as it could be? What would my dream kids area look like? What is the most wonderful large scale wall art I have seen in my whole life? Use that wall as inspiration and create the mural or 3 canvas piece you've always dreamed of. Flip through etsy for some inspiration too, I like this shop : http://www.etsy.com/shop/twoems
http://www.etsy.com/shop/twoems
Everything is possible :)
Is it a possibility to paint the floor? I have seen many many tutorials on this. A nice fun shade might brighten up the room.
I agree with sharing the space with kiddos but I think that there should only be a small space for them. ( Taking a note from your book about having your own space to create)
I just did this and included a small table for my little one with a few toys in a basket for him. Just enough.
For the walls: If you have paint, then you could paint it OR you could get some cute little frames in different sizes, maybe go to a few garage sales and pick them up, and put scraps from your favorite fabrics in them. I love the way it looks, and the white walls won't seem so uninviting with the cute framed fabric.
Oh, and does you husband actually use his weights? My husband carried them from place to place with us for a while, and yeah, he finally got rid of them. Hooray!!
If you wanted to you could probably re-paint the floor, just make sure you get the right kind of paint, or it will just become more of a mess, it's almost nicer to have the hard floor so it's easier to pick up the scraps.
For the floor, definitely Flor rug tiles. So many great color and texture combinations and they can fit wall to wall, but not be permanent.
For lighting, track lighting really does wonders.
I like white walls, or pale yellow, with fabric framed or placed in embroidery hoops.
Excited to see the project!
I so understand what your going through. My space is a semi converted garage that had dark ugly paneling and NO window! I found a little paint really helped lighten it up. So my biggest comment for you is to decorate the walls with hoopla! Buy some wooden embroidery hoops and make yourself a hoopla wall! It doesn't have to be embroidery, you can just use some of your fun fabric in your stash! I've seen some really beautiful displays of fabric that way. Then you will have some color and design to inspire you as you work. Oh and a kids space is so important too! I have a little table in my room too and some coloring books and crayons too. That way the 3 year old can be in there with me too.
(Oh and I love your cutting desk! Thats what I have too but use it for my desk desk and not for cutting. I also have the version that has a little light table spot on it. LOVE IT!)
Oh and for the floor- oi! I've heard that carpet panels (I think thats what they are called) can be pretty cheap. I have seen them on design shows before. Otherwise maybe just paint it. (maybe if you talk to your landlord they will even reimburse you for some if you improve the floor)
For the flooring, I'd look at the snap together padded flooring that can be found in some gyms and children's play areas. It'd be so much easier on your back and feet. There is also some snap together product for garage flooring.
As you rent, this is product that you could take with you when and if you move on.
It would also insulate the floor.
If you can get remnant pieces of carpet at the flooring store, these could be pieced together with duct tape to create a multi-colored floor rug.
I second the Flor tiles!!
And totally paint the walls, it will change the room completely.
It would be cool if you could hang a swing seat for visitors from the ceiling.
More wall shelves less furniture on the floor. And a minifridge :)
Have fun.
Awesome that you have this palette to work with!
Here are my thoughts if I could only have such an amazing space!
Floor: The FLOR Tiles are very cool, economical, and have a variety of choice-best of all they are portable!
Desk areas: Love the handmade table made by your friend! It their any way you can use that for your sewing-would allow for more space for bigger projects. Then use the wall system for your writing area.
Walls: I think color is always fun to have-but I do like your idea of having fabric displayed. If you can add abit of color that inspires you-do it! And then have a big cork board to change out fabrics and inspiration pieces that can change with how you are feeling! I love that branch like painting tucked away in one of the pics. That would look lovely on the wall!
Lighting: There are great lighting systems that are inexpensive-one that I like is a tube lighting that is kind of fun-kinda like holiday lights that can frame an area. But I think task lighting will help. Plus when you paint the walls, the lighting will change.-So keep that in mind!
Have fun creating!! And invite us all over for a make and take!!!! Or how about a sewing lesson! :)
First.. I just found your blog last night... and I love it! I am a super crafty mama and this is just my niche. Thank you for all the goodies. Now onto your project, which I love that you want to re-do it. I hear IKEA calling your name!! I feel the need to make a list.
1. De-Clutter... get rid of all those extra things you don't really use or need in there.
2. Organize... get containers and totes for your all that craft stuff and fabric. IKEA has Snalis totes with lids that will fit right into your Expedit shelfing, and sort your fabrics by colors into the totes. They are slightly transparent so you'll be able to see what color is inside without labeling. Put your books and reading material up on the shelves all together, so you aren't wondering where something is. Get the matching magazine holders at IKEA. They hold about 16-18 magazines each.
3. Don't paint... keep your walls white, it will help the light bounce around.
4. Flooring ... go for it, you should be able to get flooring from IKEA for that size space at around $180. Choose a light color, again this will help with the lighting.
5. Lighting... think about getting pendulum lighting to put over your cutting table. Also look for coutertop lighting or cabinet lighting for under your shelf over top your sewing machine and Serger.
6. Decorate the walls... put up some sheets of corkboard to keep it simple beacause with all the stuff on the board you really won't need to have anything additional to it. Maybe seperate them so you can post info for each project you have going on. Think about some of those inspirational wall vinyls. Put all this on the wall where the suzani is.
7.Guest/Scarlet's Space... Get a futon, a short coffee table, area rug, and floor cushions, that double as accent pillows when not being sat on. Scarlet can sit on the floor cushions, it will be cozy and she can work at her level.
8. Re-arrange the furniture... Keep both shelfing units where they are. Create an island with your cutting table and desk. The desk in front of the cutting table and turn them 90 degrees from where they are. That way you can flow around them. Put the sitting area in the area at the front by the windows.
I would recommend that you sew and serg on your desk, but continue to store them on the shelf. Try to store things in an effecient manner, things you use a lot at arms length. THINK ABOUT YOUR PROCESS, set up your area so that you can go step by step down the line, like an assembly line. Hope all this info helps!
the first thing that popped into my mind was that you need Peter Walsh to get you organized http://www.peterwalshdesign.com/index.php
and Candice Olson to design your space.
http://www.hgtv.com/divine-design/show/index.html
I can't wait to see the finished product. Good luck.
Oh me, oh my...what a great space! I haven't read ANY of the previous comments so not to cloud my vision here...which is copywrited, so you'll have to fly me to Southern Cali to help out executing the improvements ;)
Girl, why is your desk in the back? I say move hubby's workout equipment and TV to the back, and shove that awesome table up to the front, near the window. I can't work without sublight...it's a must and great for your spirit!
It's hard to tell the size of the space without being there...but could you turn the natural wood colored storage unit (opposite sewing wall) perpendicular to the wall? Once you move your table up to the window, you might be able to create a cozy & private nook for guests in the back...or a fun kids play area...just a thought if the space will allow. I've also seen some fabric organizers that allow you to fold your fabric in half or fourths and then roll onto a small board. You can stand them up right, and organize like a book shelf. You could use your own fabric for a splash of color and inspiration!
As far as a rug goes, you need something to soften that harsh floor. How 'bout a large piece of canvas, with cute trim of course, painted a glossy white or orange? the glossy-ness and lack of texture will help with the sweepability. Or cork tiles with a sealer. You can make it modular so you can take it with you if you should move. And the natural color of cork would add some much needed warmth to the floor and room.
Good luck! I love space planning!! I'm about to tackle my guest bedroom closet to convert into a crafting and sewing space...your post has inspired me to "get the lead out" and get it finished!
I'm not an interior designer but if it were me, I would paint the floor a warm tone. You mentioned a few times that you want it cozy, but it could be dangerous if you made it too cozy. You might want to walk in and take a nap instead of sew, which sometimes is a hard decision for me having three kids! Anyhow what I'm trying to get at is this: Keep the floor cement and once you paint it, buff it up so it shines. It will look inviting, but not make you sleepy. Then try to make the place look spacious but still inviting by eliminating or trying to hide clutter in pretty boxes on your shelves. Here is what I'm thinking of:
http://www.makeit-loveit.com/2010/04/craft-room-part-1.html
She has some great ideas for a organizing a craft room.
Another thing is your yellow and red wall hanging is really beautiful but it takes up the whole wall, which make the room look smaller. The same thing with the map. So you definitely want something on the walls to inspire you, but I would find something smaller. Hope that helps!
Painting the floor a great color and ading a few well placed stencils will do a great deal to brighten up you room. A gallon of epoxy concrete paint is comprable price-wise to a gallon of quality wall paint (~#30/gall). You can use a large area rug for sitting/guest area to soften things up.
Another great product for flooring (but more expensive) is snap and lock cork tiles (http://www.dwellsmart.com/Products/Cork/Globus-Cork-Snap-Lock-Floating-Floors). Cork is sustainable, comes in lots of colors, and is very soft underfoot. If you talk to your landlord, maybe they'll reimburse you because I think reflooring the area may improve their home's value!
I don't have any new and exciting ideas for the rest of the room, mainly I'm waiting to see what you're going to do and then I'll shamelessly copy it!
Pick out a carpet that you really like. Carpet mostly comes in 12' widths, and you have a 15'wide area to work with, and an area that is 18' long. That gives you on and a half feet on each side of the carpet, which isn't bad. Purchase a rug that is 16 or 17' long of 12' wide goods. Ask your carpet dealer about having it BOUND. Once it is bound, it will have a clean finished edge like an area rug that can be picked up and moved with you and perhaps resized in another location. You can also purchase padding to lay underneath your carpet. If need be, double faced tape can be used along the edges underneath the carpet to keep it down so you can vacuum with ease and the edges won't be pulled up.
Find a geometric rug that you love and then copy it by painting the rug onto the floor with a stencil. (You can paint it back to grey if you guys move)
Paint the walls a light but coordinating color.
Get baskets to hide your materials.
Turn your waist height table facing the door and put that huge wooden elfa shelf behind it. Maybe paint the shelf a bold color to pop out???
Those are my suggestions. Take them or leave them, I will love your blog nonetheless.
We used carpet tiles from Flor (flor dot com) to cover up the yucky wood floor in daughters room because we couldn't afford to refinish. We really loved them. They stick to the floor but can be removed. They are easy to vacuum and if you have an unfortunate spill you can pull up the messy square, wash, and stick back down! (And a bonus for us was that when we moved we could pull it up and take that investment with us!) Good luck! Can't wait to see what you do with the space!
Definitely move your working area closer to the natural light. What about installing some of those suspended 5V lighting systems with halogen bulbs? Can be bought very cheaply, look stylish and deal with your lighting issues in one hit.
Double up the size of the IKEA cutting table and keep your machine in the usual place, but you'll be able to move easily to the table for larger projects. Invest in some storage cubes for the bookcase - you can make much more efficient use of those hutches :)
Cover the floor for sure - concrete is very hard and unforgiving on the feet. Maybe some remnant carpet tiles? I know there are a few places round here that sells end of lines for $1 a tile.
How about a potted plant or two? Nothing like a bit of fresh greenery to liven up a place!
Looking forward to seeing where this project goes :)
You said you're renting, and also want to be cost conscious. I'd suggest first power-washing the concrete floor (rent or borrow)with the cleaner they recommend for the power washer. Now, if you lived closer to me in the Chicago area, I'd send my retired hubby over to help. He LOVES using his new power washer! LOL
Then check out sheet vinyl remnants and/or carpet remnants, depending on how you're using the separate areas. Another possibility that can move with you is FLOR carpet tiles, or even the rubber squares sold in lots of colors that snap together (sorry I can't remember the brand name.)
I agree with other posters that you should move your work area closer to the windows, and keep the windowless part for a sleeper sofa or daybed with a pop-up trundle. You can probably find a decent daybed and trundle frame on craigslist and just purchase new mattresses. These would be more comfy than a sofa sleeper anyway.
Just my two cents worth . . .
Real Simple had some garage redesigns a while back that had me thinking of your floor issue. While they are garage-y and not all crafy and inspirational, I was thinking of the floors for you! Can't wait to see what you do with the space!!! Here's a link tile lock together floors- http://www.realsimple.com/home-organizing/organizing/tips-techniques/great-garage-makeovers-00000000034588/page3.html
This is what I like thinking of a child crafting space but with a low table http://www.realsimple.com/home-organizing/organizing/tips-techniques/great-garage-makeovers-00000000034588/page13.html
I'd try painting your floor with a nice color. It can be done! Or possibly cork tiles. I've heard they vacuum up well. And if one busts, they're easily replaceable. Check your local Lowe's store.
Since you've already got an Ikea desk (my "day job") why not go for an ikea fold out bed?
http://www.ikea.com/us/en/catalog/products/S09874375
For the walls, I'd suggest printing photos of your favorite holiday moments or some big prints of things that make you happy. (Frosted cupcakes, bouquet of flowers, sunsets etc.) Frame them in cheap but nice frames and make a collage on your wall.
What a fabulous space!
Not sure what your landlord will let you do, but here are a few thoughts.
As already suggested, you could paint and stencil the floor - these guys have some pretties for inspiration - http://www.stencilgallery.com.au/photogallery116.html. If you'd prefer a softer flooring, then I would go for cork tiles, a bit easier than carpet for finding all those dropped pins when you also have a little person in the room!
You could also have a design wall - maybe where the map is at the moment. A large sheet of batting works well, and provides an extra (vertical) surface for laying out fabrics and seeing what they look like together.
I'd probably change things around to use the Elfa Unit as your 'desk' and then have the cutting table and desk as an L shape under the window to get better use of the natural light. Your seating / fold out couch space could then be against the wall that currently has the suzani on it. Perhaps the shelving unit that the TV is currently sitting on could be put on castors and used as a coffee table and child friendly crafting area in front of the couch, with a few baskets to store supplies?
The weight bench is the non-matching piece. Perhaps tell hubby that he looks so magnificent there's no way his physique can be improved any further and you could sell it???!
I don't have suggestions but I am enjoying reading every one else's suggestions. I have my eye on a corner of our basement that I want to eventually turn into a craft room and office. I'll be watching to see what works for you before I have to go through the same process myself.
Totally possible!
Flooring, I suggest carpet tiles. They are peel and stick. If one gets stained or ruined, you just peel it up (not totally easy) and replace it. You can also do a hodge podge of colors and make it really fun.
As for photographing, I suggest for smaller projects getting a set up like this. http://www.amazon.com/CowboyStudio-30-Photo-Soft-Light/dp/B001TKCZVM/ref=sr_1_1?ie=UTF8&qid=1298352515&sr=8-1 You light from the sides and the material diffuses the light beautifully. This is actually on my wish list right now.
Definitely don't be afraid to completely rearrange. I do it all the time, I think I finally have a set up that works for me and flows. This would be seriously like the 8th time I have rearranged my creative space.
Also, for storage, I like clear bins and have been doing photo labels like what I did here for my kids toys. It gives a clean look, but is also pleasing and helpful to look at. http://erinscreative.blogspot.com/2011/02/photo-label-tutorial.html
I would also create a large "idea" board. Make/buy a large cork board where you can tack up pictures that inspire you, projects on your to do list, tack up color combinations for any upcoming projects. What about also framing some of your favorite fabrics?
For my 3 year old son, I have a school style desk with a flip up table top that he has some of his craft supplies in. The desk is also small enough to be pushed out of the way when he isn't in there.
Hope some of these ideas help you out.
paint it up and the floor to lots of storage and tabled to work on
I'm too busy being jealous that you have a work space to offer any constructive advice. I think it's great you are going to honor it, there are lots of good suggestions in the other comments, good luck!
So many possibilities! First, paint the floor, there are tons of concrete paints out there and ones you can add sparkles to, which I've seen look really nice. Wall color, a light silver grey will add class but still be warm and homey. Lighting... call an electrician and get some track lighting in there stat! (or DIY if you have the skills!) Plenty of light that you can reposition easily! orrrr call one of those home shows where they do makeovers, maybe they will pick you!
Whew, I'm overwhelmed and it's not even my room! Seriously though, your space is awesome and you have tons of great ideas from many clever ladies. My prudentest (real word?) advice is to hit up Goodwill and Craigslist often. I always find great organizing trays/bins/totes at my local Goodwill. Plus you could probably find some good stuff to use for Scarlet's space.
So many comments I didn't read them all so if I'm repeating someone, my bad! When I was in photography classes in college, we used painters' lights when we needed bright light/spotlight (it's amazing what you can do with these plus posterboard). The great thing is, they clip easily so you can put up and put away as they aren't the prettiest things out there. For backdrops, we used plain bed sheets that we'd hang on the wall. That way, it didn't matter what color walls we had. I know this isn't decorating help as I'm hopeless in that department but thought it would be useful so you don't have to stress so much about lighting.
I don't have many suggestions because I'm not very good at this spatial-visual things but one thing I've seen that is great is painting a rug on the floor. You could style it as much/little as possible and then wouldn't have to worry about vacuuming BUT I also thing some soft rugs for little ones to play on is essential.
In order of mood priority:
Lighting: gotta have it, and the brighter the better. I've found sunny windows sometimes compete with room lighting too much, so maybe some diffusing curtains? or move your task area to take advantage of the brightness. Also, no matter the strength of the light, you'll find it cheerier and feeling more well lit with both overhead and eye level lighting.
Color scheme: nothing pulls together a room, esp a messy one, like a theme palette. Pick one or two brights and one neutral, then make as much as possible fit that palette exactly. The upholstery, the paint, the floor, the outside of baskets and containers, the curtains etc. Don't use too many patterns as they will compete with the jumble.
Lines: the more uniform and clean-lines you use to contain and direct the mess, the more neat the room will look, and the more mentally appealing. If you love keeping things visible, then it's even more important. You have a great start with the cubby and shelves. As much as possible clear off tabletops. Match up your bins. Print uniform labels if that's your thing. Put up square clean frames around your artwork and inspiration boards. Take time to fold or hang your fabric pieces into uniform lengths and shapes. Make dividers for catch-all bins.
my vote is a good quality futon with a cover matching your theme. cheaper than sleepersofas, modern, clean and the good ones are extremely easy to convert.
http://hopestudios.blogspot.com/2011/02/painted-floor-tiles-diy.html
saw this and thought it might be useful for your floor issue?
How exciting!!! I love creating new spaces out of old! For your sewing machine, serger, and storage space why not buy an Expedit desk, or something similar) and Book shelf http://www.ikea.com/us/en/catalog/products/20116071. I'm not positive, but it looks like your sewing machine and serger can fit into the bookshelf; along with other projects you do. When you need one, just simply pull it out and use. (I'm planning on going to Ikea to take a look for my own crafty area). I know you wanted to keep the system you have in place already but this might add more of a home feel to it vs. a garage feel.
I do also think if you are taking pictures to leave the walls white and maybe move your crafty area to the front of the room and have a foldout couch at the back wall with a mirror above.
Just a few ideas.
darajo.haslam@gmail.com
Post a Comment
Subscribe to Post Comments [Atom]
<< Home