body { background:#fff url("http://www.blogblog.com/dots/bg_dots.gif") 50% 0; margin:0; padding:0 10px; text-align:center; font:x-small Verdana,Arial,Sans-serif; color:#333; font-size/* */:/**/small; font-size: /**/small; } /* Page Structure ----------------------------------------------- */ @media all { #content { background:url("http://www.blogblog.com/dots/bg_3dots.gif") no-repeat 250px 50px; width:700px; margin:0 auto; padding:50px 0; text-align:left; } #main { width:450px; float:right; padding:50px 0 20px; font-size:85%; } #main2 { background:url("http://www.blogblog.com/dots/bg_dots2.gif") -100px -100px; padding:20px 10px 15px; } #sidebar { width:200px; float:left; font-size:85%; padding-bottom:20px; } #sidebar2 { background:url("http://www.blogblog.com/dots/bg_dots2.gif") 150px -50px; padding:5px 10px 15px; width:200px; width/* */:/**/180px; width: /**/180px; } } @media handheld { #content { width:90%; } #main { width:100%; float:none; } #sidebar { width:100%; float:none; } #sidebar2 { width:100%; } } html>body #main, html>body #sidebar { /* We only give this fade from white to nothing to browsers that can handle 24-bit transparent PNGs */ background/* */:/**/url("http://www.blogblog.com/dots/bg_white_fade.png") repeat-x left bottom; } /* Title & Description ----------------------------------------------- */ @media all { #blog-title { margin:0 0 .5em; font:250%/1.4em Georgia,Serif; color:#353; } #blog-title a { color:#353; text-decoration:none; } #description { margin:0 0 1.75em; color:#996; } #blog-mobile-title { display:none; } #description-mobile { display:none; } } @media handheld { #blog-title { display:none; } #description { display:none; } #blog-mobile-title { display:block; margin:0 0 .5em; font:250%/1.4em Georgia,Serif; color:#353; } #blog-mobile-title a { color:#353; text-decoration:none; } #description-mobile { display:block; margin:0 0 1.75em; color:#996; } } /* Links ----------------------------------------------- */ a:link { color:#488; } a:visited { color:#885; } a:hover { color:#000; } a img { border-width:0; } /* Posts ----------------------------------------------- */ .date-header { margin:0 0 .75em; padding-bottom:.35em; border-bottom:1px dotted #9b9; font:95%/1.4em Georgia,Serif; text-transform:uppercase; letter-spacing:.3em; color:#663; } .post { margin:0 0 2.5em; line-height:1.6em; } .post-title { margin:.25em 0; font:bold 130%/1.4em Georgia,Serif; color:#333; } .post-title a, .post-title strong { background:url("http://www.blogblog.com/dots/bg_post_title.gif") no-repeat 0 .25em; display:block; color:#333; text-decoration:none; padding:0 0 1px 45px; } .post-title a:hover { color:#000; } .post p { margin:0 0 .75em; } p.post-footer { margin:0; text-align:right; } p.post-footer em { display:block; float:left; text-align:left; font-style:normal; color:#996; } a.comment-link { /* IE5.0/Win doesn't apply padding to inline elements, so we hide these two declarations from it */ background/* */:/**/url("http://www.blogblog.com/dots/icon_comment.gif") no-repeat 0 .25em; padding-left:15px; } html>body a.comment-link { /* Respecified, for IE5/Mac's benefit */ background:url("http://www.blogblog.com/dots/icon_comment.gif") no-repeat 0 .25em; padding-left:15px; } .post img { margin:0 0 5px 0; padding:4px; border:1px solid #cca; } /* Comments ----------------------------------------------- */ #comments { margin:0; } #comments h4 { margin:0 0 10px; border-top:1px dotted #9b9; padding-top:.5em; font:bold 110%/1.4em Georgia,Serif; color:#333; } #comments-block { line-height:1.6em; } .comment-poster { background:url("http://www.blogblog.com/dots/icon_comment.gif") no-repeat 2px .35em; margin:.5em 0 0; padding:0 0 0 20px; font-weight:bold; } .comment-body { margin:0; padding:0 0 0 20px; } .comment-body p { margin:0 0 .5em; } .comment-timestamp { margin:0 0 .5em; padding:0 0 .75em 20px; color:#996; } .comment-timestamp a:link { color:#996; } .deleted-comment { font-style:italic; color:gray; } .paging-control-container { float: right; margin: 0px 6px 0px 0px; font-size: 80%; } .unneeded-paging-control { visibility: hidden; } /* More Sidebar Content ----------------------------------------------- */ .sidebar-title { margin:2em 0 .75em; padding-bottom:.35em; border-bottom:1px dotted #9b9; font:95%/1.4em Georgia,Serif; text-transform:uppercase; letter-spacing:.3em; color:#663; } #sidebar p { margin:0 0 .75em; line-height:1.6em; } #sidebar ul { margin:.5em 0 1em; padding:0 0px; list-style:none; line-height:1.5em; } #sidebar ul li { background:url("http://www.blogblog.com/dots/bullet.gif") no-repeat 3px .45em; margin:0; padding:0 0 5px 15px; } #sidebar p { margin:0 0 .6em; } /* Profile ----------------------------------------------- */ .profile-datablock { margin:0 0 1em; } .profile-img { display:inline; } .profile-img img { float:left; margin:0 8px 5px 0; border:4px solid #cc9; } .profile-data { margin:0; line-height:1.5em; } .profile-data strong { display:block; } .profile-textblock { clear:left; } /* Footer ----------------------------------------------- */ #footer { clear:both; padding:15px 0 0; } #footer hr { display:none; } #footer p { margin:0; } /* Feeds ----------------------------------------------- */ #blogfeeds { } #postfeeds { padding-left: 20px }

Prudent Baby

Get sewing how to, sewing tutorials, and sewing help to learn sewing. We offer sewing tutorial for sewing moms.

Monday, October 4, 2010

No-Sew Rolled Fabric Flower Baby Headband


Look at that so-cute-I-could-cry baby headband! I came across this picture at Post Road Vintage while surfing the web. She made the headband using an adorable no-sew Rolled Fabric Flower tutorial she found at My Sparkle. I asked the tute author, Danielle, to share the how-to with us so we could all make adorable baby headbands too!
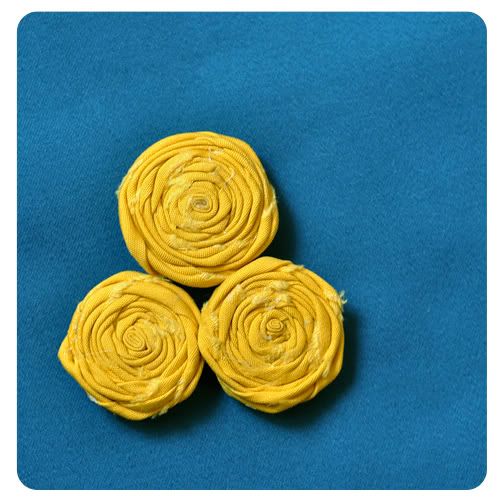
Take it away Danielle from My Sparkle...
So I am jumping on the bandwagon and loving all the rolled fabric flowers I've seen here and there. We decided to make some with the girls in our church youth group, but I couldn't find a great tutorial on how to make them so I played around and this is what I came up with. Enjoy!

Get the full Rolled Fabric Flower Tutorial after the jump...

And remember, leave a comment on this or any post this week and you could win that pretty Alexander Henry fat quarter.


How to Make Rolled Fabric Flowers

Start with about a 1" ripped strip of fabric (you can use any width...this was the width I liked best). The length and weight of your fabric will dictate the end diameter of your flower.
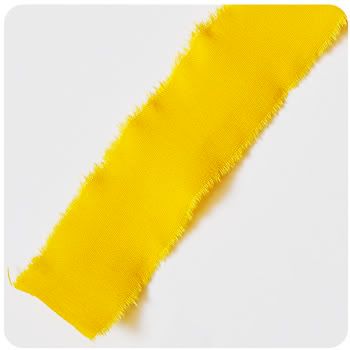
Fold the strip in half and dot a little fabric glue on the end 1/2" or so.
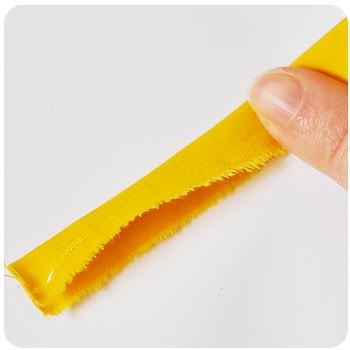

Roll the glued end a few times to get a nice tight center.
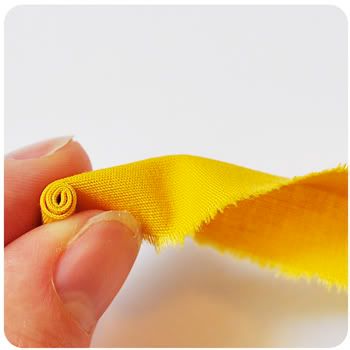

Then, once you have a center you like, start twist/folding your fabric away from the center as you roll.
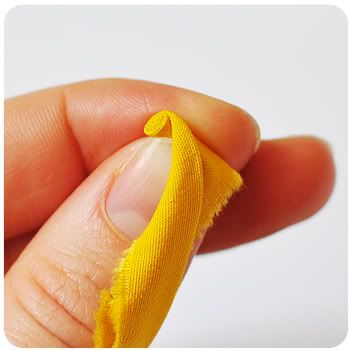

It will start to look like this. Periodically secure the layers with fabric glue as you go.


Continue rolling until you have a flower that is sized the way you like, but make sure you leave at least a 1" or 2" tail (enough to cover flower bottom).
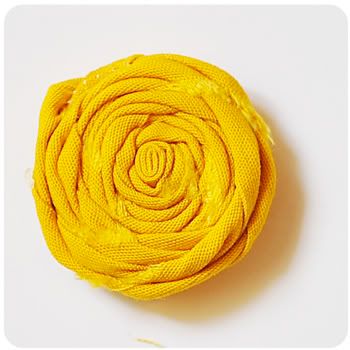

Spread glue all over the bottom side of the flower.
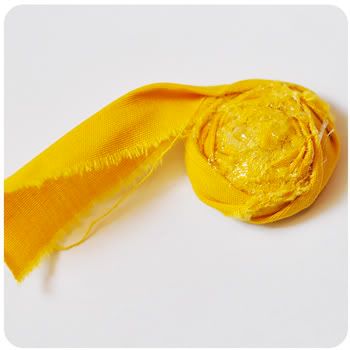

Then fold tail down to cover glue. Press flat with your fingers.


Then trim off the excess fabric.
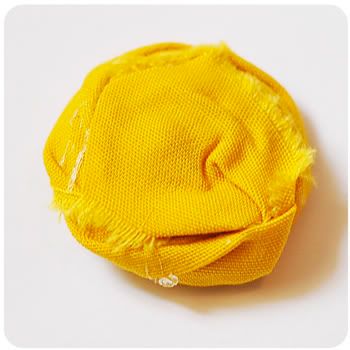

Done!

Labels: , , , , , , , , ,

45 Comments:

Blogger Jacinda said...

This would be another great use for some of the fancy elastic you gifted me for my birthday. Oh wait, I'm having a boy! What am I going to do with a boy? So confusing.

October 4, 2010 at 4:18 AM  
Blogger Itty Bitty Beasties said...

AWESOME! Thank you!!!

October 4, 2010 at 5:41 AM  
Blogger Unknown said...

I love that I don't have to sew it! Thank you! Becky*

October 4, 2010 at 5:52 AM  
Blogger Jess said...

Jacinda... you're having a boy! I know the feeling, I have a 10 month old boy and a 2 and 10 months old boy. somehow, we managed to have them on the same day, just two years apart.
boy clothes and accessories are just not as fun as girls... but they sure do look cute in a tuxedo shirt onesie :) maybe you could make one of those! (i bought mine)

October 4, 2010 at 6:05 AM  
Anonymous Anonymous said...

This is the easiest, cuty-est, yummy-est thing I've ever seen. (yes, I said cuty-est)
I'll be making like 7 today

October 4, 2010 at 6:07 AM  
Blogger Emily Frandsen said...

those are darling! and i love the yelllow!
embily@gmail.com

October 4, 2010 at 7:00 AM  
Blogger Deanna said...

This could become addictive!

October 4, 2010 at 7:02 AM  
Blogger Sara said...

I'm feeling a brooch coming on, or perhaps a hair doo-dad for me!

October 4, 2010 at 7:22 AM  
Blogger Michelle said...

How do you tear the fabric?

October 4, 2010 at 7:31 AM  
Blogger lesleyzellers said...

I love these fabric flowers! Thanks for the tutorial, I know what I'll be doing this afternoon!!

October 4, 2010 at 7:53 AM  
Blogger jillian sara said...

This makes me wish I had a baby girl. :( Maybe I can make a sweater completely covered in them!!! ugh... on second thought... maybe I can just make a headband for a friend that has a baby girl....hmmm

October 4, 2010 at 8:50 AM  
Blogger Tiffany from HOLIDAY said...

Thank you so much! I've been looking for the perfect tutorial for me and this is it! I bought fabric to make this but just wasn't finding what I wanted but this is def. it.

October 4, 2010 at 9:23 AM  
Blogger Molly Patton said...

I cannot wait to make one of these for my little girl!

October 4, 2010 at 12:50 PM  
Blogger Unknown said...

Wow! So cute! If only my little girl would actually wear a headband I would make one for her.

October 4, 2010 at 1:55 PM  
Blogger Seaweed and Raine said...

I have 2 boys Jacinda - so I totally understand! It's hard finding things to make for them to sate my creative appetite. Hey, Maybe you will come up with something totoally amazing and those of us who have boys will go "Wow! Why didn't I think of that!" lol.
As much as I love the headband - I have to wonder at putting something on the baby's head that could put pressure on their fontenelles... Any advice out there?

October 4, 2010 at 2:44 PM  
Blogger Rebecca said...

This is such a great tutorial! I've read a few of them and this one is definitely a 5 star!

October 4, 2010 at 2:46 PM  
Blogger Rebecca said...

....that sounded a little odd---thought I'd clarify----that I've read a few other tutorials on the rolled flowers from various sites....yours is absolutely great!!

October 4, 2010 at 2:47 PM  
Blogger Melissa @ Honeybee Vintage said...

I love making these:) I think my daughter has about 20 of them since I use the scraps from all my sewing projects for them! I attach hers to clips or headbands:)

October 4, 2010 at 2:52 PM  
Anonymous Anonymous said...

This is perfect! love it!

October 4, 2010 at 4:16 PM  
Blogger Jenn Doll said...

Love! I have a bunch of scraps that will work out!! Thanks!!

October 4, 2010 at 5:08 PM  
Blogger Joy said...

What a great way to use scraps...thanks for the how-to!

October 4, 2010 at 5:54 PM  
Blogger 11.10.09... said...

Neat tutorial! My cousin is having a baby shower in a few days! I need to get busy making some headbands for her new baby!

October 4, 2010 at 8:14 PM  
Blogger Aussie-merican Adventures said...

Thank you so much for the tutorial! Me and my husband were both bald babies until we were 1 or older...unfortunately our daughter has the same gene! Well-meaning but confused people tend to think that no hair means we have a boy (despite the pink shirt she is wearing)...Now we can just stick these beautiful flowers on headbands, on her clothes, on her stroller, you name it... and give her that girly look that will be sure to draw compliments! Can't wait to make one in every color!

October 4, 2010 at 8:23 PM  
Blogger craftytammie said...

so i love these flowers soooo much, i got out my scraps and a glue gun. i am now sporting two dora bandaids and a hello kitty on my wounded fingers. why can't i use a glue gun without burning the crap out of myself???

October 5, 2010 at 9:51 PM  
Blogger Danielle said...

Love them! I am off to make about a million of them from all of my scrap.

October 6, 2010 at 3:09 PM  
Anonymous Anonymous said...

Oooh! I don't have a little girl but I could make this into a head band for ME! How cute!

October 7, 2010 at 2:07 PM  
Blogger Unknown said...

A baby flower headband - no way! This is all for ME!! Love it!!!

October 7, 2010 at 6:53 PM  
Blogger Yycien Adams said...

Actually, my niece loves to wear pretty stuff in her hair, she's a big fan of hair accessories. Anyway, these flowers are beautiful. I would love to make something like these for my niece. Thank you so much for sharing this tutorial. :)

October 11, 2010 at 10:59 PM  
Blogger bikitu said...

It is beautiful! I will be making one for me for sure! Thank you for sharing.

October 14, 2010 at 10:58 AM  
Blogger Lars John Anderson said...

Isn't she the cutest baby ever?? ok so I admit I may be a little biased.. she is my first girl after three boys- I'm so excited to finally have a girl to sew for and "doll up" :)

Great blog btw.. I will be following :)

October 14, 2010 at 2:19 PM  
Blogger taylormae'd said...

what kind of fabric was used for this tutorial?

November 23, 2010 at 12:05 PM  
Blogger Unknown said...

I really see a headband in my future and the trim on my friends christmas dress for her daughter!

December 3, 2010 at 11:39 AM  
Blogger Unknown said...

I love fabric flowers and this was one of the types I was looking for a tut for. thanks!

March 8, 2011 at 7:23 PM  
Blogger Unknown said...

Stopping by to show some love from a new fan!
Check out my Etsy shop at:
http://www.etsy.com/shop/DoodleboopDesigns

March 10, 2011 at 6:34 PM  
Blogger ElleAyeBee said...

This is perfect! I am a proud aunt of a 3 week old, and want to start making headbands ASAP! One problem - where I can I get the actual band? I like the one in the photo bcause it isn't plain elastic, but it's also not to frilly. Any tips? Thanks!

March 19, 2011 at 11:39 AM  
Blogger Heidi said...

Very cute! ~Heidi

March 28, 2011 at 11:14 AM  
Blogger Unknown said...

Hi this tutorial is great I have tried making rolled up flowers but wasn't looking good but the way these are done is fantastic.Here are some of my flower headbands I made.Thank you

April 2, 2011 at 12:25 AM  
Blogger Sweet Floweret said...

I love this!
I'm launching my first linky party next tuesday. It's for projects that cost less than $10 and take less than 20-30 minutes. Would you consider linking up with me on my first linky party endeavor? Thanks!
http://sweetfloweret.blogspot.com
Tina

April 30, 2011 at 6:52 AM  
Blogger LauraLPN said...

Thanks for the tutorial, I've made at least 10 of them now. They are beautiful and are ready to be put on a ring blank and sold. Thanks again!

May 4, 2011 at 2:09 PM  
Blogger Krasimira Ganeva said...

Thanks a lot for the tutorial. I share it in my blog and link it back to you here http://krasart.com/?p=331

August 11, 2011 at 7:56 AM  
Blogger beeyutful♥ said...

I absolutely love these!
Im new to crafting and im looking forward to making these!

October 7, 2011 at 8:37 AM  
Blogger ~UnSuper Mom~ said...

So I am loving your rolled flower and trying hard to make one but mine keep coming out looking like rosettes... while very pretty its not the desired result lol.

October 17, 2011 at 5:55 AM  
Blogger Tammy M. said...

Saw someone else had the same question above...how do you tear the fabric, will it tear straight? These are SO cute!!

November 13, 2011 at 5:33 AM  
Blogger amanda said...

Thanks for the excellent step-by-step tutorial. I've been doing some sewing classes and used this tutorial for teaching. I also linked to this post from my blog to show others that couldn't make it to the class how to make these rolled flowers. Spot on directions!

awesome stuff!

November 16, 2011 at 8:34 AM  
Anonymous Anonymous said...

Very cute! Thank you! :)

November 18, 2011 at 11:33 AM  

Post a Comment

Subscribe to Post Comments [Atom]

<< Home