body { background:#fff url("http://www.blogblog.com/dots/bg_dots.gif") 50% 0; margin:0; padding:0 10px; text-align:center; font:x-small Verdana,Arial,Sans-serif; color:#333; font-size/* */:/**/small; font-size: /**/small; } /* Page Structure ----------------------------------------------- */ @media all { #content { background:url("http://www.blogblog.com/dots/bg_3dots.gif") no-repeat 250px 50px; width:700px; margin:0 auto; padding:50px 0; text-align:left; } #main { width:450px; float:right; padding:50px 0 20px; font-size:85%; } #main2 { background:url("http://www.blogblog.com/dots/bg_dots2.gif") -100px -100px; padding:20px 10px 15px; } #sidebar { width:200px; float:left; font-size:85%; padding-bottom:20px; } #sidebar2 { background:url("http://www.blogblog.com/dots/bg_dots2.gif") 150px -50px; padding:5px 10px 15px; width:200px; width/* */:/**/180px; width: /**/180px; } } @media handheld { #content { width:90%; } #main { width:100%; float:none; } #sidebar { width:100%; float:none; } #sidebar2 { width:100%; } } html>body #main, html>body #sidebar { /* We only give this fade from white to nothing to browsers that can handle 24-bit transparent PNGs */ background/* */:/**/url("http://www.blogblog.com/dots/bg_white_fade.png") repeat-x left bottom; } /* Title & Description ----------------------------------------------- */ @media all { #blog-title { margin:0 0 .5em; font:250%/1.4em Georgia,Serif; color:#353; } #blog-title a { color:#353; text-decoration:none; } #description { margin:0 0 1.75em; color:#996; } #blog-mobile-title { display:none; } #description-mobile { display:none; } } @media handheld { #blog-title { display:none; } #description { display:none; } #blog-mobile-title { display:block; margin:0 0 .5em; font:250%/1.4em Georgia,Serif; color:#353; } #blog-mobile-title a { color:#353; text-decoration:none; } #description-mobile { display:block; margin:0 0 1.75em; color:#996; } } /* Links ----------------------------------------------- */ a:link { color:#488; } a:visited { color:#885; } a:hover { color:#000; } a img { border-width:0; } /* Posts ----------------------------------------------- */ .date-header { margin:0 0 .75em; padding-bottom:.35em; border-bottom:1px dotted #9b9; font:95%/1.4em Georgia,Serif; text-transform:uppercase; letter-spacing:.3em; color:#663; } .post { margin:0 0 2.5em; line-height:1.6em; } .post-title { margin:.25em 0; font:bold 130%/1.4em Georgia,Serif; color:#333; } .post-title a, .post-title strong { background:url("http://www.blogblog.com/dots/bg_post_title.gif") no-repeat 0 .25em; display:block; color:#333; text-decoration:none; padding:0 0 1px 45px; } .post-title a:hover { color:#000; } .post p { margin:0 0 .75em; } p.post-footer { margin:0; text-align:right; } p.post-footer em { display:block; float:left; text-align:left; font-style:normal; color:#996; } a.comment-link { /* IE5.0/Win doesn't apply padding to inline elements, so we hide these two declarations from it */ background/* */:/**/url("http://www.blogblog.com/dots/icon_comment.gif") no-repeat 0 .25em; padding-left:15px; } html>body a.comment-link { /* Respecified, for IE5/Mac's benefit */ background:url("http://www.blogblog.com/dots/icon_comment.gif") no-repeat 0 .25em; padding-left:15px; } .post img { margin:0 0 5px 0; padding:4px; border:1px solid #cca; } /* Comments ----------------------------------------------- */ #comments { margin:0; } #comments h4 { margin:0 0 10px; border-top:1px dotted #9b9; padding-top:.5em; font:bold 110%/1.4em Georgia,Serif; color:#333; } #comments-block { line-height:1.6em; } .comment-poster { background:url("http://www.blogblog.com/dots/icon_comment.gif") no-repeat 2px .35em; margin:.5em 0 0; padding:0 0 0 20px; font-weight:bold; } .comment-body { margin:0; padding:0 0 0 20px; } .comment-body p { margin:0 0 .5em; } .comment-timestamp { margin:0 0 .5em; padding:0 0 .75em 20px; color:#996; } .comment-timestamp a:link { color:#996; } .deleted-comment { font-style:italic; color:gray; } .paging-control-container { float: right; margin: 0px 6px 0px 0px; font-size: 80%; } .unneeded-paging-control { visibility: hidden; } /* More Sidebar Content ----------------------------------------------- */ .sidebar-title { margin:2em 0 .75em; padding-bottom:.35em; border-bottom:1px dotted #9b9; font:95%/1.4em Georgia,Serif; text-transform:uppercase; letter-spacing:.3em; color:#663; } #sidebar p { margin:0 0 .75em; line-height:1.6em; } #sidebar ul { margin:.5em 0 1em; padding:0 0px; list-style:none; line-height:1.5em; } #sidebar ul li { background:url("http://www.blogblog.com/dots/bullet.gif") no-repeat 3px .45em; margin:0; padding:0 0 5px 15px; } #sidebar p { margin:0 0 .6em; } /* Profile ----------------------------------------------- */ .profile-datablock { margin:0 0 1em; } .profile-img { display:inline; } .profile-img img { float:left; margin:0 8px 5px 0; border:4px solid #cc9; } .profile-data { margin:0; line-height:1.5em; } .profile-data strong { display:block; } .profile-textblock { clear:left; } /* Footer ----------------------------------------------- */ #footer { clear:both; padding:15px 0 0; } #footer hr { display:none; } #footer p { margin:0; } /* Feeds ----------------------------------------------- */ #blogfeeds { } #postfeeds { padding-left: 20px }

Prudent Baby

Get sewing how to, sewing tutorials, and sewing help to learn sewing. We offer sewing tutorial for sewing moms.

Thursday, February 4, 2010

GUEST POST: DIY Baby Legwarmers from a pair of socks!


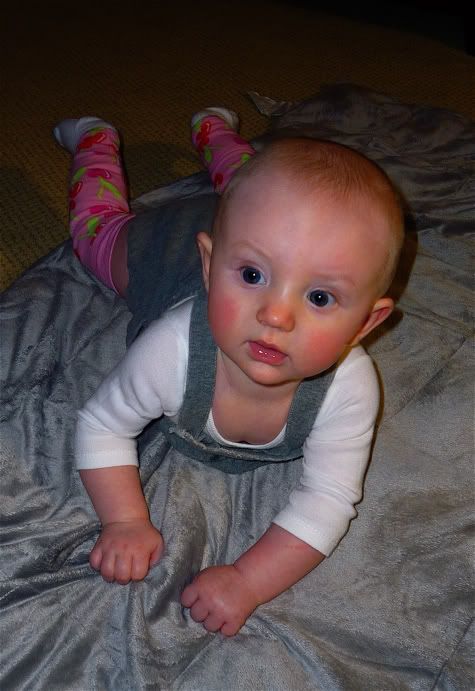
My sister-in-law Stevee sent this awesome DIY all the way from Nashville (modeled by my adorable niecey, baby Jojo!) and I had to share it with you!  Take a cute pair of ladies' socks and turn it into legwarmers for your little one in just a few minutes.  
Get the full DIY Baby Legwarmers tutorial after the jump...

DIY: Baby Legwarmers
These baby leggings are so easy to make! They are perfect for a baby learning to crawl. They help avoid little knee burns.

Supplies:
Women's knee-high socks
Scissors
Color coordinating thread

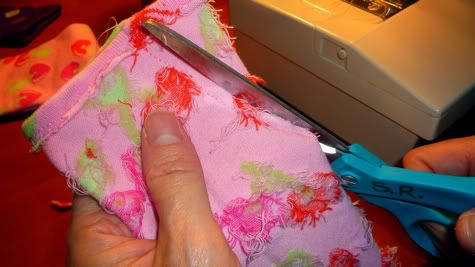
1. Get some really cute women's knee-high socks:

and cut the feet off right at the ankles:


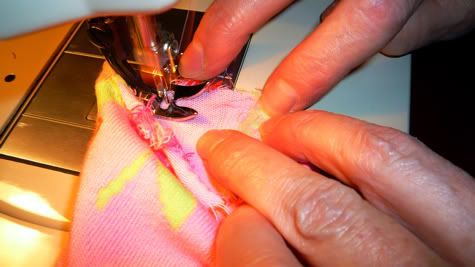
2. Sew around the cut edge:

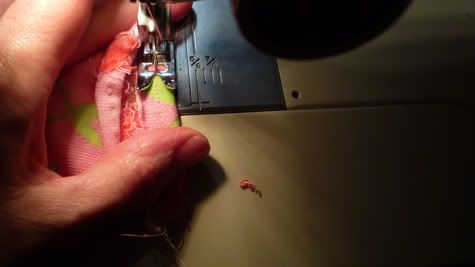
Take the end of sock and fold under where you just sewed: 

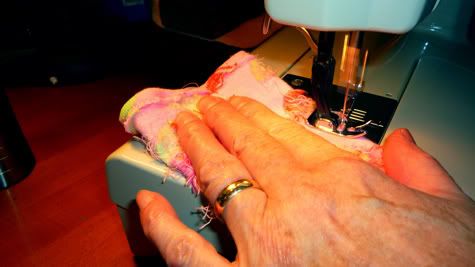
and sew a hem using color coordinating thread:

then turn the sock inside out and cut off the excess: 
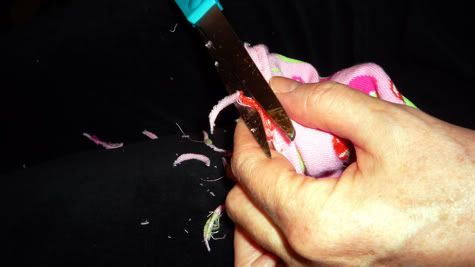
3. Take in the bottom of the sock so it is narrow enough to stay on your baby's legs. I went about two inches in and sewed about 3 to 4 inches up the sock at an angle:

Cut off the excess: 

4. Turn your handmade baby legwarmers right side out, you're done! Place on tiny baby legs!

Labels: , , , , , , , , , ,

20 Comments:

Blogger Tamara said...

The most awesome thing ever! Now all I need is a little girl!!!!;) Would boys look "cute" in these!?!?

February 4, 2010 at 3:23 PM  
Anonymous Anonymous said...

They're adorable on boys (just pick boyish colours)!

February 4, 2010 at 3:37 PM  
Blogger Jacinda said...

Argyle is really cute for boys.

February 4, 2010 at 3:41 PM  
Blogger Jaime said...

when scarlet was about 6 months old our neighbor had a baby boy and she dressed him in legwarmers all the time, she said just because he was a boy didnt mean he had to have cold legs. argyle would be so cute, especially with a onesie with a tie embroidered on it, ha! or tie dye. or just plain black.

February 4, 2010 at 3:46 PM  
Blogger Julie said...

Good gravy - I'm going to go broke with buying supplies to do all these cute ideas. ACK!

February 4, 2010 at 3:59 PM  
Anonymous lily n said...

I just want that adorable romper! Is that bought or made?

February 5, 2010 at 5:44 AM  
Blogger Unknown said...

I agree with lily n--I want to know where I can get that romper! :)

February 5, 2010 at 6:25 AM  
Blogger Jaime said...

so the thing about that romper...it's a scarlet hand me down that i bought at a boutique in soho a few years ago. the boutique was going out of business so everything was 75% off the tag price... AND IT WAS STILL $45! but it's so cute right and now TWO babies have looked adorable in it... stevee what's the brand on the tag?

February 5, 2010 at 7:53 AM  
Blogger Stevee said...

The brand of the Romper is DOU/UOD... all the tags are in Italian... I tried to google, but couldn't find it anywhere.

February 5, 2010 at 8:22 AM  
Blogger Jaime said...

guess we will have to DIY it. it really doesn't look that hard to make right?

February 5, 2010 at 8:45 AM  
Blogger Stevee said...

I can send it back to you... Little Joleen has outgrown it. If anyone could figure it out, it would be you. I would love to have a bigger version of it! It is one of my favorite rompers.

February 5, 2010 at 8:54 AM  
Anonymous Nico said...

I am very excited about the leg warmers! I found a bunch of great socks at Target yesterday for hardly any money...now I just need to find the time to make them! :)

February 7, 2010 at 6:29 AM  
Blogger Jessica said...

OK, I just found this site and am IN LOVE. My baby girl is almost 5 months old and I just saw a ton of knee-high socks on sale at Target this weekend and thought they would make cute leg warmers but didn't know if I could/ would make it work. Now I know I can and I will be going back to get them! Thank you so much!

March 21, 2010 at 6:23 PM  
Blogger The Greens said...

these are so cute. My friend just showed me this blog threw a link and I am sew excited. (sorry I had too) I love sewing and the easier the better. Love it!

April 2, 2010 at 6:05 PM  
Blogger Mallorie said...

Just made my little lady a pair!!! How do I post a pic?

June 30, 2010 at 6:53 PM  
Blogger Mariel said...

I know you posted this a while back but thanks! I just made a pair for my little one... $1!!! and with the bottoms I made Michael Jackson looking play cooking gloves. haha

October 8, 2010 at 2:05 PM  
Blogger ti_jean_54 said...

I'm going to use for Granddaughter that is that stage they take off pants every time you turn around.

October 29, 2010 at 10:04 PM  
Blogger Mad Hatter said...

Since the sock is knit and stretchy, do you avoid pulling while hemming the bottom portion?

Thanks,
Mary Ann

November 22, 2010 at 1:01 PM  
Blogger Ula said...

I make these all the time but instead of using knee-high socks I use regular women's socks. What I do is after cutting off the foot of the sock, I cut off the toes and the ankle part, fold wrong sides together to create a cuff. I place the sock inside the cuff so all the cut edges are together, sew it up, turn the cuff out and voila! it adds an extra inch or so to the regular sized socks if you can't find any knee highs.

February 14, 2011 at 10:39 AM  
Blogger Intano Family of Six said...

Did you two figure out a DIY version of that romper pictured?

April 18, 2011 at 1:08 PM  

Post a Comment

Subscribe to Post Comments [Atom]

<< Home