body { background:#fff url("http://www.blogblog.com/dots/bg_dots.gif") 50% 0; margin:0; padding:0 10px; text-align:center; font:x-small Verdana,Arial,Sans-serif; color:#333; font-size/* */:/**/small; font-size: /**/small; } /* Page Structure ----------------------------------------------- */ @media all { #content { background:url("http://www.blogblog.com/dots/bg_3dots.gif") no-repeat 250px 50px; width:700px; margin:0 auto; padding:50px 0; text-align:left; } #main { width:450px; float:right; padding:50px 0 20px; font-size:85%; } #main2 { background:url("http://www.blogblog.com/dots/bg_dots2.gif") -100px -100px; padding:20px 10px 15px; } #sidebar { width:200px; float:left; font-size:85%; padding-bottom:20px; } #sidebar2 { background:url("http://www.blogblog.com/dots/bg_dots2.gif") 150px -50px; padding:5px 10px 15px; width:200px; width/* */:/**/180px; width: /**/180px; } } @media handheld { #content { width:90%; } #main { width:100%; float:none; } #sidebar { width:100%; float:none; } #sidebar2 { width:100%; } } html>body #main, html>body #sidebar { /* We only give this fade from white to nothing to browsers that can handle 24-bit transparent PNGs */ background/* */:/**/url("http://www.blogblog.com/dots/bg_white_fade.png") repeat-x left bottom; } /* Title & Description ----------------------------------------------- */ @media all { #blog-title { margin:0 0 .5em; font:250%/1.4em Georgia,Serif; color:#353; } #blog-title a { color:#353; text-decoration:none; } #description { margin:0 0 1.75em; color:#996; } #blog-mobile-title { display:none; } #description-mobile { display:none; } } @media handheld { #blog-title { display:none; } #description { display:none; } #blog-mobile-title { display:block; margin:0 0 .5em; font:250%/1.4em Georgia,Serif; color:#353; } #blog-mobile-title a { color:#353; text-decoration:none; } #description-mobile { display:block; margin:0 0 1.75em; color:#996; } } /* Links ----------------------------------------------- */ a:link { color:#488; } a:visited { color:#885; } a:hover { color:#000; } a img { border-width:0; } /* Posts ----------------------------------------------- */ .date-header { margin:0 0 .75em; padding-bottom:.35em; border-bottom:1px dotted #9b9; font:95%/1.4em Georgia,Serif; text-transform:uppercase; letter-spacing:.3em; color:#663; } .post { margin:0 0 2.5em; line-height:1.6em; } .post-title { margin:.25em 0; font:bold 130%/1.4em Georgia,Serif; color:#333; } .post-title a, .post-title strong { background:url("http://www.blogblog.com/dots/bg_post_title.gif") no-repeat 0 .25em; display:block; color:#333; text-decoration:none; padding:0 0 1px 45px; } .post-title a:hover { color:#000; } .post p { margin:0 0 .75em; } p.post-footer { margin:0; text-align:right; } p.post-footer em { display:block; float:left; text-align:left; font-style:normal; color:#996; } a.comment-link { /* IE5.0/Win doesn't apply padding to inline elements, so we hide these two declarations from it */ background/* */:/**/url("http://www.blogblog.com/dots/icon_comment.gif") no-repeat 0 .25em; padding-left:15px; } html>body a.comment-link { /* Respecified, for IE5/Mac's benefit */ background:url("http://www.blogblog.com/dots/icon_comment.gif") no-repeat 0 .25em; padding-left:15px; } .post img { margin:0 0 5px 0; padding:4px; border:1px solid #cca; } /* Comments ----------------------------------------------- */ #comments { margin:0; } #comments h4 { margin:0 0 10px; border-top:1px dotted #9b9; padding-top:.5em; font:bold 110%/1.4em Georgia,Serif; color:#333; } #comments-block { line-height:1.6em; } .comment-poster { background:url("http://www.blogblog.com/dots/icon_comment.gif") no-repeat 2px .35em; margin:.5em 0 0; padding:0 0 0 20px; font-weight:bold; } .comment-body { margin:0; padding:0 0 0 20px; } .comment-body p { margin:0 0 .5em; } .comment-timestamp { margin:0 0 .5em; padding:0 0 .75em 20px; color:#996; } .comment-timestamp a:link { color:#996; } .deleted-comment { font-style:italic; color:gray; } .paging-control-container { float: right; margin: 0px 6px 0px 0px; font-size: 80%; } .unneeded-paging-control { visibility: hidden; } /* More Sidebar Content ----------------------------------------------- */ .sidebar-title { margin:2em 0 .75em; padding-bottom:.35em; border-bottom:1px dotted #9b9; font:95%/1.4em Georgia,Serif; text-transform:uppercase; letter-spacing:.3em; color:#663; } #sidebar p { margin:0 0 .75em; line-height:1.6em; } #sidebar ul { margin:.5em 0 1em; padding:0 0px; list-style:none; line-height:1.5em; } #sidebar ul li { background:url("http://www.blogblog.com/dots/bullet.gif") no-repeat 3px .45em; margin:0; padding:0 0 5px 15px; } #sidebar p { margin:0 0 .6em; } /* Profile ----------------------------------------------- */ .profile-datablock { margin:0 0 1em; } .profile-img { display:inline; } .profile-img img { float:left; margin:0 8px 5px 0; border:4px solid #cc9; } .profile-data { margin:0; line-height:1.5em; } .profile-data strong { display:block; } .profile-textblock { clear:left; } /* Footer ----------------------------------------------- */ #footer { clear:both; padding:15px 0 0; } #footer hr { display:none; } #footer p { margin:0; } /* Feeds ----------------------------------------------- */ #blogfeeds { } #postfeeds { padding-left: 20px }

Prudent Baby

Get sewing how to, sewing tutorials, and sewing help to learn sewing. We offer sewing tutorial for sewing moms.

Wednesday, January 27, 2010

DIY Vintage Plate Cameo Hanging

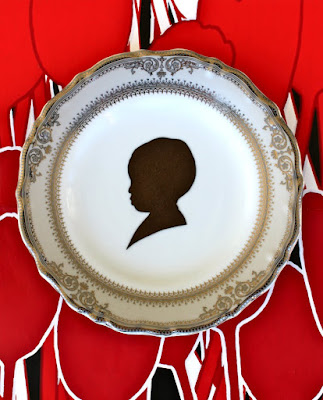
We've given you the Cameo Silhouette Plaque DIY and the Cameo Silhouettes 3 Ways DIY, but now that I'm in love with mod podge I think I've created the easiest silhouette tutorial ever.  The vintage plate makes for a beautiful frame and the whole project took about 15 minutes.  This project falls into both our Under $5 and Under an Hour categories, and I think it would make a great gift, do you agree?


Get the full Hanging Vintage Plate Cameo DIY after the jump...
DIY Cameo on a Vintage Plate


1. Assemble your materials.  You need Mod Podge (I used glossy), a sponge brush, a vintage plate (this one is actually new, i got it for $2 at a store called "BARGAINS" around the corner) and a picture of your subject.  Measure the inside of your plate and print out the image the size you would like to be.  For my salad plate I printed out my silhouette 2.5" tall.  My print out is a black silhouette because Jacinda made me one for Prudent Advice for My Baby Daughter, but if you only have an actual picture that's fine, just make sure it is a profile shot (duh) and print it out.  You can visit the DIY Cameo Silhouettes 3 Ways post here for more specific details on cutting it out.

2.  Cut out your silhouette with scissors. 

3.  If you have a laser printer you can skip this step and move to step 4.  But since you can't mod podge an inkjet print out (it will smear), trace it onto the paper you'd like to use for your cameo.  You can use a fun pattern but I went with a shiny black scrapbook paper:
Cut your silhouette out:

4. Apply a light coat of mod podge to the entire plate.  A really thin one will do, you don't want too much texture.  Center your paper cameo cut out on top and smooth any bubbles out with your fingers:
Let it dry competely, about 20 minutes.


5.  Apply another thin coat of mod podge on top:
Let it dry completely.  You're done!

Hang with a plate hangerfrom any hardware or bed/bath store.  Make a whole bunch more of your whole family!  Just don't eat off of them.  I don't think you're supposed to eat off Mod Podge.

Labels: , , , , , , , , , ,

13 Comments:

Blogger bsmithhill said...

So going to do this soon! I LOVE antique plates and now I have another use for them! Thanks.

January 27, 2010 at 1:02 PM  
Blogger Tamara said...

Just found you all yesterday! My new favorite blog!

January 27, 2010 at 2:43 PM  
Blogger yes, please said...

you are a magical unicorn of crafting. this is serious awesomeness...can't wait to make you make me one!

January 27, 2010 at 3:58 PM  
Anonymous Stevee said...

I want one of Joleen

January 27, 2010 at 4:37 PM  
Blogger Chatty Cricket said...

LOVE this idea!!!

January 27, 2010 at 5:22 PM  
Blogger Jessica said...

I can't wait to find the perfect plates. Thanks for this.

January 27, 2010 at 7:30 PM  
Blogger Jacinda said...

I can't stop thinking about finding plates to make these.

January 28, 2010 at 12:14 PM  
Blogger Kate said...

This sounds odd, but does that plate have a pattern name? I love it and would love to look for similar pieces!

January 29, 2010 at 9:15 AM  
Blogger Unknown said...

Hope you don't mind me asking, but could you tell me the source of the red and black flower print in the background of the last picture?
Many thanks,
Mandy

March 21, 2010 at 12:25 PM  
Blogger Jaime said...

hi mandy! it is a wallpaper made by a company called Twenty2. the pattern is called Promenade and the colorway is called Pin-Up and you can buy it at Walnut Wallpaper http://walnutwallpaper.com/

March 22, 2010 at 9:35 AM  
Blogger Unknown said...

Thank you so much Jaime, I will definately check them out. I neglected to say in previous post that your vintage plate looks absolutely FAB against the wallpaper! Thanks again!

March 25, 2010 at 6:53 PM  
Blogger princess granola said...

sorry but this kind of freaks me out. cameos have made me feel a little heeby-jeeby since i was a kid...my family used to give me things with them on it as a joke. a floating head on a plate. guess i could always use it for halloween.

November 1, 2010 at 11:11 AM  
Blogger Babycakes said...

I just discovered your website - this is a cute idea! I like the variation of the silhouette. I love making decoupage plates and this looks like it would be fun to try.

I wanted to let you know that I posted some decoupage plate ideas on my blog today and this was one of them. I included a link to this tutorial and your website - thank you for sharing this project :)

April 4, 2011 at 3:12 PM  

Post a Comment

Subscribe to Post Comments [Atom]

<< Home