DIY Simple Snuggly Baby Blanket
Last week our 100 degree temperatures suddenly disappeared, and now it finally feels like fall. Time to make Miss S a cozy blanket for snuggling...
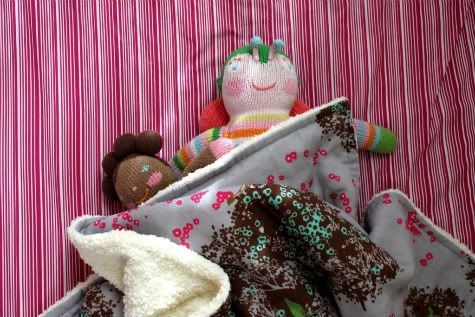
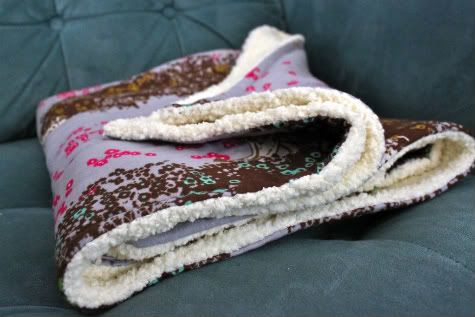
To get a custom feel without spending a bunch, use this DIY to make your bean his or her own stylish baby blanket. Use an adorable cotton fabric on one side, and compliment it with a cozy dose of snuggly softness on the other like fleece or minkee. Here's one I sent off to Miss Quinn (back before we knew she was a Miss!):
Now you try! Get the Simple Snuggly Baby Blanket DIY after the jump...
How to Sew a Simple Baby Blanket
1. Prewash, iron and cut your fabrics to your desired size, cotton for one side and minkee or something cozy on the other. I had a yard of Echino Spring in Grey Lion so I started with that. Lay your fabrics right-sides facing, smooth them nice and flat, then pin all the way around:

Then cut the excess fabric, leaving enough for a 3/4" seam allowance:

2. Next you want to sew around the perimeter with a 3/4" seam allowance, leaving a section open so you can turn your blanket inside out (depending on how thick your backing is you can decide how big your opening needs to be). I left my opening at the corner, but it's easier if you leave it in the middle of one side:

Try not to sew your hair into the blanket, because nothing disgusts Jacinda more on earth then a stray hair:

3. Snip a square out of each corner. This will allow you to get a nice flat corner when you turn your blanket inside out:

4. Turn your blanket and iron it flat, paying special attention to the edges to ensure your fabrics aren't rolling onto the wrong side. At the opening, fold the fabrics in, iron and pin in place:

5. Choose treads that coordinates or contrast, whatever your pleasure, and remember you can choose different colors for each side. Put your color for the cotton side in your spool and for the soft side in your bobbin. With your cotton side on top, with a 5/8" seam allowance sew a nice straight line all the way around your square. Remember at the corners to leave the needle in the fabric, lift the presser foot, turn your fabric and put the presser foot back down to get a nice corner:

and just sew that opening closed:

I stopped there, but you could do it one or two more times around. For added cuteness you can switch thread colors or use the same. This time go another 1/4" in (so 1/2" seam allowance).
6. Snuggle!

Labels: Baby, Bedroom, Decor, DIY, In One Evening, Kids, Sewing
posted by Jaime @ 11:01 AM
![]()

24 Comments:
Maybe I will pull this cozy blanket out right now for eating cookies and cuddling babies...
Your stray hair is disgusting. However, since Clare has pooped in the tub the last 2 times she has bathed and I've had to fish it out of the toys... with a face cloth, I'm a bit numb. I cannot muster up my usual stray-hair reaction.
I love this!
Would you happen to be able to tell me where you goT or what that tree fabric in the blanket for Quinn is called?
I found it :) http://www.etsy.com/view_listing.php?listing_id=38031805&ref=sr_gallery_10&&ga_search_query=tree+fabric&ga_search_type=supplies&ga_page=13&includes[]=tags&includes[]=title
Was the Minkee fabric difficult to work with? I've heard that it can be a pain, and messy... and that sewing machines don't like it much.
stephanie, i didnt have any problems with it. hmm.
A Walking foot helps A LOT when sewing with Minkee :)
I can hardly wait to make this blanket! I am prewashing now... and yeah I can't stand the wait. LOL!
First let me say /I am in LOVE with your site! It became my fav after looking at it just a couple times! i am addicted! Four kiddos limit my crafting time, but I want to make everything on your site! ha ha... I am just curious- on the wool looking minky you used on this blanket- what would the exact name of it be, or where did you find it? Thanks a bunch! You guys are AWESOME!! My new heroes for sure ; ) ~Melissa
melissa - i don't know! i can't remember! i think it was from joanne's but i haven't been able to find it since. i am sad because i totally love it, it's so cozy, but i don't know where to buy more!
Thanks for the quick reply! all i have been able to find online was this-
http://www.fashionfabricsclub.com/catalog_itemdetail.aspx?ItmID=MY0241-C1&source=googlebase
its a little spendy tho! Maybe i will check my joannes tonight : ) Have a good weekend!
i was on a mission to find that fabric! ha ha here it is for 11 a yard on etsy- not bad! : )
http://www.etsy.com/view_listing.php?listing_id=33774271
Jaime- I still cannot find that darn minky you used on this!! augh!! any tips? maybe i am searching online for it wrong? thanks for the help! ~Melissa
So theres no batting or anything needed in this just the two fabrics sewn together?
So how do you get the actual patterns? I can't seem to find them. Thanks.
Linda
I make my baby blankets the same way. I have used all different types of materials - Flannel, woven cotton, flannel backed satin, minky dot, fleece, other plush material (which was THE WORST to work with! It shed all over!), and even satin. My toughest one was a smooth slippery silky material on one side with Minky Dot on the other! Ugh! I regretted putting those two materials together, but it ended up being my daughters favorite, so it was worth it in the end! :) Since I have a toddler and need bigger blankets now, I never really cut the material except to trim excess from one or the other side to make them even. A yard of material makes the perfect size blanket for my little girl!
I just made this last night, and I am sooo happy with it! i sent you guys two pictures and everything... only problem, i made it for my 9 month old, and my 2 year old keeps stealing it :)
I bought a brank spank'n new sewing machine last year and was soo pumped up to learn but got discouraged rather quickly. After seeing this adorable blanky, I am dusting that puppy off and giving it another go. Wish me luck! I bought the material and getting this done over the weekend. I do have a question for you about the material though. I was at Joann's and as a newbie I am looking at material like it's from Mars. I wasn't sure if I could get just cotton for one side since it seems so thin. Would have cotton worked out ok? And flannel for the other side? I ended up getting both materials in flannel, because I just wasn't sure. Your response would be greatly appreciated. :)
monica! two cottons would definitely be too thin. two flannels might be thing, but might be a nice cozy feeling, like a swaddling blanket. minkee or fleece on one side and cotton on the other is a good weight. for the thinner fabrics, use our "beginner's baby blanket #3" tutorial to see how to add a layer of batting for a cozier blanket. good luck! so excited to hear how it turns out!
My Joann's has that minky right now! In multiple colors! ON SALE! =) It makes me happy. I shall be making this blanket in the very near future.
So simple and quick to make, this has become my go-to baby gift for friends and family! One yard is really the perfect size. I found the exact same diamond-pattern plush fabric at Joann's in the same section as the other minkee/baby flannels. I've used it with both cotton and flannel for the other side - the flannel is SO COZY and snuggly. It was recently on sale and I bought up a few yards knowing I'd be making more of these in the future. Thanks for a great tutorial!
Oh, I love this! If I wanted to quilt the two layers together for more durability, would I have to turn them right sides out, quilt, and then add the final border stitching? I realize this adds more time to the project... that I don't really have... but just in case I'd love to know!
Here is my "faux quilt" version on this simple idea. Thank you very much!
http://prettythingsbylaurah.blogspot.com/2011/01/back-to-bobbin-with-prudent-baby-sewing.html
Thanks for your tutorial. It was a great reference for adding the minkie fabric to the wee quilt I made for my little one.
http://elsiesorangebutton.com/2011/03/20/711/
Post a Comment
Subscribe to Post Comments [Atom]
<< Home