body { background:#fff url("http://www.blogblog.com/dots/bg_dots.gif") 50% 0; margin:0; padding:0 10px; text-align:center; font:x-small Verdana,Arial,Sans-serif; color:#333; font-size/* */:/**/small; font-size: /**/small; } /* Page Structure ----------------------------------------------- */ @media all { #content { background:url("http://www.blogblog.com/dots/bg_3dots.gif") no-repeat 250px 50px; width:700px; margin:0 auto; padding:50px 0; text-align:left; } #main { width:450px; float:right; padding:50px 0 20px; font-size:85%; } #main2 { background:url("http://www.blogblog.com/dots/bg_dots2.gif") -100px -100px; padding:20px 10px 15px; } #sidebar { width:200px; float:left; font-size:85%; padding-bottom:20px; } #sidebar2 { background:url("http://www.blogblog.com/dots/bg_dots2.gif") 150px -50px; padding:5px 10px 15px; width:200px; width/* */:/**/180px; width: /**/180px; } } @media handheld { #content { width:90%; } #main { width:100%; float:none; } #sidebar { width:100%; float:none; } #sidebar2 { width:100%; } } html>body #main, html>body #sidebar { /* We only give this fade from white to nothing to browsers that can handle 24-bit transparent PNGs */ background/* */:/**/url("http://www.blogblog.com/dots/bg_white_fade.png") repeat-x left bottom; } /* Title & Description ----------------------------------------------- */ @media all { #blog-title { margin:0 0 .5em; font:250%/1.4em Georgia,Serif; color:#353; } #blog-title a { color:#353; text-decoration:none; } #description { margin:0 0 1.75em; color:#996; } #blog-mobile-title { display:none; } #description-mobile { display:none; } } @media handheld { #blog-title { display:none; } #description { display:none; } #blog-mobile-title { display:block; margin:0 0 .5em; font:250%/1.4em Georgia,Serif; color:#353; } #blog-mobile-title a { color:#353; text-decoration:none; } #description-mobile { display:block; margin:0 0 1.75em; color:#996; } } /* Links ----------------------------------------------- */ a:link { color:#488; } a:visited { color:#885; } a:hover { color:#000; } a img { border-width:0; } /* Posts ----------------------------------------------- */ .date-header { margin:0 0 .75em; padding-bottom:.35em; border-bottom:1px dotted #9b9; font:95%/1.4em Georgia,Serif; text-transform:uppercase; letter-spacing:.3em; color:#663; } .post { margin:0 0 2.5em; line-height:1.6em; } .post-title { margin:.25em 0; font:bold 130%/1.4em Georgia,Serif; color:#333; } .post-title a, .post-title strong { background:url("http://www.blogblog.com/dots/bg_post_title.gif") no-repeat 0 .25em; display:block; color:#333; text-decoration:none; padding:0 0 1px 45px; } .post-title a:hover { color:#000; } .post p { margin:0 0 .75em; } p.post-footer { margin:0; text-align:right; } p.post-footer em { display:block; float:left; text-align:left; font-style:normal; color:#996; } a.comment-link { /* IE5.0/Win doesn't apply padding to inline elements, so we hide these two declarations from it */ background/* */:/**/url("http://www.blogblog.com/dots/icon_comment.gif") no-repeat 0 .25em; padding-left:15px; } html>body a.comment-link { /* Respecified, for IE5/Mac's benefit */ background:url("http://www.blogblog.com/dots/icon_comment.gif") no-repeat 0 .25em; padding-left:15px; } .post img { margin:0 0 5px 0; padding:4px; border:1px solid #cca; } /* Comments ----------------------------------------------- */ #comments { margin:0; } #comments h4 { margin:0 0 10px; border-top:1px dotted #9b9; padding-top:.5em; font:bold 110%/1.4em Georgia,Serif; color:#333; } #comments-block { line-height:1.6em; } .comment-poster { background:url("http://www.blogblog.com/dots/icon_comment.gif") no-repeat 2px .35em; margin:.5em 0 0; padding:0 0 0 20px; font-weight:bold; } .comment-body { margin:0; padding:0 0 0 20px; } .comment-body p { margin:0 0 .5em; } .comment-timestamp { margin:0 0 .5em; padding:0 0 .75em 20px; color:#996; } .comment-timestamp a:link { color:#996; } .deleted-comment { font-style:italic; color:gray; } .paging-control-container { float: right; margin: 0px 6px 0px 0px; font-size: 80%; } .unneeded-paging-control { visibility: hidden; } /* More Sidebar Content ----------------------------------------------- */ .sidebar-title { margin:2em 0 .75em; padding-bottom:.35em; border-bottom:1px dotted #9b9; font:95%/1.4em Georgia,Serif; text-transform:uppercase; letter-spacing:.3em; color:#663; } #sidebar p { margin:0 0 .75em; line-height:1.6em; } #sidebar ul { margin:.5em 0 1em; padding:0 0px; list-style:none; line-height:1.5em; } #sidebar ul li { background:url("http://www.blogblog.com/dots/bullet.gif") no-repeat 3px .45em; margin:0; padding:0 0 5px 15px; } #sidebar p { margin:0 0 .6em; } /* Profile ----------------------------------------------- */ .profile-datablock { margin:0 0 1em; } .profile-img { display:inline; } .profile-img img { float:left; margin:0 8px 5px 0; border:4px solid #cc9; } .profile-data { margin:0; line-height:1.5em; } .profile-data strong { display:block; } .profile-textblock { clear:left; } /* Footer ----------------------------------------------- */ #footer { clear:both; padding:15px 0 0; } #footer hr { display:none; } #footer p { margin:0; } /* Feeds ----------------------------------------------- */ #blogfeeds { } #postfeeds { padding-left: 20px }

Prudent Baby

Get sewing how to, sewing tutorials, and sewing help to learn sewing. We offer sewing tutorial for sewing moms.

Monday, October 12, 2009

DIY Washable Pom Pom Pillow!


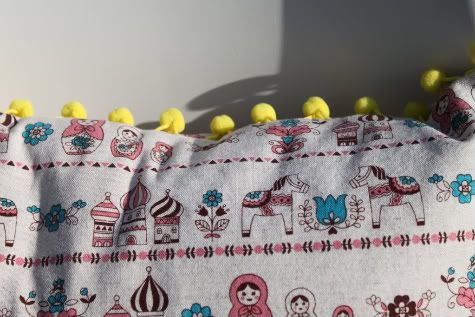
I love pom poms so much; they're just cheerful! I had some leftover from the pom pom curtains so I decided to make a pillow for Scarlet's rocking chair.  This adorable pink matryoshka fabric paired with yellow pom poms matches the color scheme of her room.  The key to this baby-friendly pillow is that I need to be able to clean anything Scarlet touches, so I made a pillow cover for an insert that's been collecting dust in the closet rather then a straight up pillow.

Get the DIY Pom Pom Pillow Tutorial after the jump...


How to Sew a Pom Pom Pillow

1. Prewash, iron and cut your fabric.   My pillow is 12"X16" and I wanted a 1/2" seam allowance on each side, so I cut the front piece 13"X17":


Because I am making a pillow cover rather then a whole pillow I cut two pieces for the back, so I can create an opening to take the insert in and out.  For my size pillow that means two 11" X 13" pieces of fabric.

2.  Hem the edges of the two back pieces that will be visible by folding them under 1/2" on the 11" (shorter) sides, ironing and straight stitching in coordinating thread:
At this point I realized that I'd cut my back pieces of fabric with the pattern facing perpendicular to the front.  That won't look nice so I have to repeat the whole process with the pattern facing the right way. So pay attention to which direction your pattern is on each side.

3. Lay your front piece right side up and pin your pom pom trim on top of it, edge of trim to edge of fabric, all the way around.  The pom poms should be on the INSIDE.
Right way:
Wrong way (I did this project the wrong way so many times, enjoy learning from my mistakes):


4. Sew the pom pom trim in place with a basting stitch (a straight stitch that is longer so not as tight), which keeps it together and makes it easier to sew the final pillow:
You might be tempted to skip this step and just pin and sew the whole pillow together at once, but with the pom pom trim I really recommend doing this first to get the best results, because later you can follow your basting line to ensure your pom poms are even on the final pillow.


5. Now it's time to pin the two back pieces to the front, right sides facing, with the pom poms inside and sew in place.  The hem that is going to show will be on the bottom piece.  So pin that one first, then pin the other one next, overlapping the first.  Follow the basting line that you made with a straight stitch.  At the corners remember to leave your needle in the fabric, lift the presser foot, pivot the fabric, return the presser foot and sew to make a nice corner.  I folded over the back piece to make an even nicer pocket.  That's a lie, I accidentally sewed one side like that and wanted to axe-chop my sewing machine but it ended up being fixable by folding it all over:

8. Snip each corner so they look sharp when you turn your pillow cover right side out:

9. Turn your pillow cover inside out and rejoice because after all that it looks awesome!
Marvel at your mad skillz that you got the pattern on the back to line up correctly:

10. Realize that the pillow insert you have is not 12"X16" but actually 12"X21".  Wonder how you can possibly be a person who writes DIYs.  Call Grandma and beg her to babysit so you can go to JoAnne's and buy a pillow insert (and more pom poms).


11. Get the pillow insert, put your pillow in it, give it to a little girl, see her smile, resolve to make pillow cover for original 12"X21" pillow insert still collecting dust in closet.


Prudent Price:
1/2 yard Japanese printed canvas from Hart's fabric: $9
12"X16" down pillow insert from West Elm: $12
1 yard Pom Pom trim from JoAnne Fabric: $2.99
Total: $24

Labels: , , , , , , ,

10 Comments:

Blogger Carleton said...

The pattern x The pom poms = Cutesplosion!

October 12, 2009 at 2:10 PM  
Blogger Anne said...

What a cute pillow!!! I posted a link to your tutorial on Craft Gossip Sewing:
http://sewing.craftgossip.com/tutorial-pillow-cover-with-pom-pom-trim/2009/10/12/

--Anne

October 12, 2009 at 6:05 PM  
Blogger Jen of MadeByGirl said...

Jaime, this looks so cute! BUT i don't know how to sew..... :( I definitely realize that making a yellow cushion would be the cheapest route....

October 13, 2009 at 1:46 PM  
Blogger Stevee said...

Your husband and daughter are so lucky to have such a crafty mommy!

October 15, 2009 at 8:29 AM  
Blogger Anna said...

love love love this pillow. i blogged you! great tutorials.
Anna
http://whatannaloves.blogspot.com/

October 21, 2009 at 4:55 PM  
Blogger Jaime said...

thanks anna, your blog is full of drool worthy stuff!!

October 22, 2009 at 9:37 AM  
Blogger Miss Ware said...

Enjoying browsing your tutorials (esp. steps 10 and 11 here) but I have noticed that you keep using 'then' when you should be using 'than'. Then is for sequences, as in Step 5, and consequences (if...then...); than is for comparisons. e.g. the intro should end 'rather than a straight up pillow'; more than..., smaller than... etc.

January 11, 2011 at 4:31 PM  
Blogger Jaime said...

HA HA Madeleine it is the bane of my existence! it's a typing quirk i can't seem to master - like i always write thnaks instead of thanks, but spell check catches that. my book editor felt the same as you, sigh.

January 11, 2011 at 4:33 PM  
Blogger Jaime said...

also i just re-read steps 10 and 11 and realized that the original 12X21 pillow insert is STILL collecting dust in the closet. double sigh.

January 11, 2011 at 4:36 PM  
Blogger pattyk999 said...

Thanks for the tutorial. Glad to know that I'm not the only one who needs at least 2 seam rippers standing by at all times! My problem is I've attempted twice to sew some pretty hard plastic dangly beaded trim (victorian like?) to my pillow. 1st time, the binding tape was peeking through and it looked messy..ripppp. Second time I sewed so far in (in order to conceal the binding tape) that the beading was no longer "dangly" but more stiff. Is there any way to machine sew this fringe while covering the binding tape and leaving it dangly and not stiff or do I need to hand sew the entire pillow closed by hand?

January 15, 2011 at 8:12 AM  

Post a Comment

Subscribe to Post Comments [Atom]

<< Home