body { background:#fff url("http://www.blogblog.com/dots/bg_dots.gif") 50% 0; margin:0; padding:0 10px; text-align:center; font:x-small Verdana,Arial,Sans-serif; color:#333; font-size/* */:/**/small; font-size: /**/small; } /* Page Structure ----------------------------------------------- */ @media all { #content { background:url("http://www.blogblog.com/dots/bg_3dots.gif") no-repeat 250px 50px; width:700px; margin:0 auto; padding:50px 0; text-align:left; } #main { width:450px; float:right; padding:50px 0 20px; font-size:85%; } #main2 { background:url("http://www.blogblog.com/dots/bg_dots2.gif") -100px -100px; padding:20px 10px 15px; } #sidebar { width:200px; float:left; font-size:85%; padding-bottom:20px; } #sidebar2 { background:url("http://www.blogblog.com/dots/bg_dots2.gif") 150px -50px; padding:5px 10px 15px; width:200px; width/* */:/**/180px; width: /**/180px; } } @media handheld { #content { width:90%; } #main { width:100%; float:none; } #sidebar { width:100%; float:none; } #sidebar2 { width:100%; } } html>body #main, html>body #sidebar { /* We only give this fade from white to nothing to browsers that can handle 24-bit transparent PNGs */ background/* */:/**/url("http://www.blogblog.com/dots/bg_white_fade.png") repeat-x left bottom; } /* Title & Description ----------------------------------------------- */ @media all { #blog-title { margin:0 0 .5em; font:250%/1.4em Georgia,Serif; color:#353; } #blog-title a { color:#353; text-decoration:none; } #description { margin:0 0 1.75em; color:#996; } #blog-mobile-title { display:none; } #description-mobile { display:none; } } @media handheld { #blog-title { display:none; } #description { display:none; } #blog-mobile-title { display:block; margin:0 0 .5em; font:250%/1.4em Georgia,Serif; color:#353; } #blog-mobile-title a { color:#353; text-decoration:none; } #description-mobile { display:block; margin:0 0 1.75em; color:#996; } } /* Links ----------------------------------------------- */ a:link { color:#488; } a:visited { color:#885; } a:hover { color:#000; } a img { border-width:0; } /* Posts ----------------------------------------------- */ .date-header { margin:0 0 .75em; padding-bottom:.35em; border-bottom:1px dotted #9b9; font:95%/1.4em Georgia,Serif; text-transform:uppercase; letter-spacing:.3em; color:#663; } .post { margin:0 0 2.5em; line-height:1.6em; } .post-title { margin:.25em 0; font:bold 130%/1.4em Georgia,Serif; color:#333; } .post-title a, .post-title strong { background:url("http://www.blogblog.com/dots/bg_post_title.gif") no-repeat 0 .25em; display:block; color:#333; text-decoration:none; padding:0 0 1px 45px; } .post-title a:hover { color:#000; } .post p { margin:0 0 .75em; } p.post-footer { margin:0; text-align:right; } p.post-footer em { display:block; float:left; text-align:left; font-style:normal; color:#996; } a.comment-link { /* IE5.0/Win doesn't apply padding to inline elements, so we hide these two declarations from it */ background/* */:/**/url("http://www.blogblog.com/dots/icon_comment.gif") no-repeat 0 .25em; padding-left:15px; } html>body a.comment-link { /* Respecified, for IE5/Mac's benefit */ background:url("http://www.blogblog.com/dots/icon_comment.gif") no-repeat 0 .25em; padding-left:15px; } .post img { margin:0 0 5px 0; padding:4px; border:1px solid #cca; } /* Comments ----------------------------------------------- */ #comments { margin:0; } #comments h4 { margin:0 0 10px; border-top:1px dotted #9b9; padding-top:.5em; font:bold 110%/1.4em Georgia,Serif; color:#333; } #comments-block { line-height:1.6em; } .comment-poster { background:url("http://www.blogblog.com/dots/icon_comment.gif") no-repeat 2px .35em; margin:.5em 0 0; padding:0 0 0 20px; font-weight:bold; } .comment-body { margin:0; padding:0 0 0 20px; } .comment-body p { margin:0 0 .5em; } .comment-timestamp { margin:0 0 .5em; padding:0 0 .75em 20px; color:#996; } .comment-timestamp a:link { color:#996; } .deleted-comment { font-style:italic; color:gray; } .paging-control-container { float: right; margin: 0px 6px 0px 0px; font-size: 80%; } .unneeded-paging-control { visibility: hidden; } /* More Sidebar Content ----------------------------------------------- */ .sidebar-title { margin:2em 0 .75em; padding-bottom:.35em; border-bottom:1px dotted #9b9; font:95%/1.4em Georgia,Serif; text-transform:uppercase; letter-spacing:.3em; color:#663; } #sidebar p { margin:0 0 .75em; line-height:1.6em; } #sidebar ul { margin:.5em 0 1em; padding:0 0px; list-style:none; line-height:1.5em; } #sidebar ul li { background:url("http://www.blogblog.com/dots/bullet.gif") no-repeat 3px .45em; margin:0; padding:0 0 5px 15px; } #sidebar p { margin:0 0 .6em; } /* Profile ----------------------------------------------- */ .profile-datablock { margin:0 0 1em; } .profile-img { display:inline; } .profile-img img { float:left; margin:0 8px 5px 0; border:4px solid #cc9; } .profile-data { margin:0; line-height:1.5em; } .profile-data strong { display:block; } .profile-textblock { clear:left; } /* Footer ----------------------------------------------- */ #footer { clear:both; padding:15px 0 0; } #footer hr { display:none; } #footer p { margin:0; } /* Feeds ----------------------------------------------- */ #blogfeeds { } #postfeeds { padding-left: 20px }

Prudent Baby

Get sewing how to, sewing tutorials, and sewing help to learn sewing. We offer sewing tutorial for sewing moms.

Friday, September 18, 2009

DIY: Pom Pom Curtains!

I came across these pom pom window panels from Pine Cone Hill while browsing through House Beautiful on a plane recently. They're so girly without being frilly - perfect for my daughter's room:


I fell in love with them instantly, but with two windows to cover I couldn't shell out the $250 for something that seemed simple enough to make on my own. So that's what I did:


Get the DIY after the jump...


I started by walking around the corner to the Linen Outlet "tent sale" (it's been going on for at least five years) to see if I could find some voile panels to simply attach the pom pom trim too, but with the dramatic height I wanted to give the windows, the pre-made panels weren't long enough. I just wanted to sew those curtains RIGHT THEN before Scarlet woke up and another curtainless weekend came to a close, so I started rummaging and scheming and happened upon this:


This swag was the perfect length to be chopped in half and it already had a hemmed edge - just perfect - so I picked up two. I had already hit up trusty Joanne Fabric for my pom pom trim; they had about nine colors to choose from, but I'm going for a yellow-gray-magenta look and the pink they offered was too pale for my tastes. I bought the whole roll (imagining future pillows and tea-towels) at only $2.99 a yard - but I see now it's even cheaper from their online store:
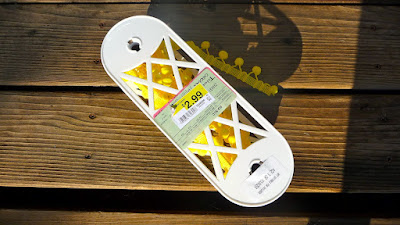


So here's the step by step on actually getting these babies made:

1. Chop the swag(s) in half. You should have two pieces, each of which now as three hemmed sides and one cut side. So that's the side we will sew into a rod pocket.

2. Measure and cut. Figure the length you want the curtains to be from rod to floor and add 3 inches, then cut your fabric pieces down along the same cut side. I think the pom poms look best just skimming the floor:


3. Time to iron. A bit tedious but must be done. Fold the cut side over one inch and iron, then fold it over again 2 inches and iron, then pin the fold in place. Don't stress about getting it just perfect - these are pom pom curtains, if they are a teensy bit uneven no one is going to know. Repeat on the other piece.

4. Get your thread ready. With this being my first shot at sewing a sheer fabric, I thought I would give invisible thread a try just to avoid any messy seams showing up on my voile. So I took out my fresh new spool and created a bobbin using my bobbin winder. Turns out you can't do that, it makes your sewing machine angry; this is what happens:


So you can either hand wind your bobbin with invisible thread, or if you are too lazy for that like me, you can use a bobbin of white thread and your spool of invisible thread so your stitches are white on the back of the curtain and invisible on top. That's what I did and you'd never know - totally can't see it.

5. Sew time! Just use your basic straight stitch across the bottom of the seam you made. If the voile pulls a little here and there it's okay, you can iron it out. Repeat on the other panel and you have your rod pockets.

6. Add the trim. I sewed the poms poms to the inside and bottom of each panel, just leaving the trim on the roll and feeding it through the machine on top of the fabric - didn't even pin it first. Make sure the trim is on the right side of the fabric and the trim is on top as you're feeding it through your machine. With the invisible thread you really don't have to worry about sewing a perfectly straight line, even in close-up you can't see it:


At the corners just remember to leave your needle in the fabric, lift the presser foot, and sew the trim into a nice corner, you may have to do it twice at each corner to get a good angle. And remember not to sew your rod pocket closed with the trim. When you get about half an inch from the ends stop sewing, cut the pom pom trim off just far enough to reach the rod pocket and fold it under and seal it with a few stitches across the top.

Iron 'em and you're done!

Prudent Price for 4 Pom Pom Panels:
store: $256 plus shipping.
DIY: swags $39.98 + pom pom trim: $44.85 + invisible thread $1.69 = $86.52

Labels: , , ,

7 Comments:

Blogger yes, please said...

yellow! pom poms! two of my favorite things together! i love these. might make some for the kitchen.

September 18, 2009 at 4:52 PM  
Blogger Carleton said...

Tiny canary eggs!

September 18, 2009 at 10:02 PM  
Blogger punktrees said...

wow sooooo cute!!!

September 21, 2009 at 3:28 PM  
Blogger Dottie said...

I am totally crushing on your site. I love pom poms and I love these curtains. I can't wait to read more of your entries!

September 29, 2009 at 8:50 AM  
Blogger amber {daisy chain} said...

I can't believe it - I am making these exact same curtain for the baby nursery - with yellow pom-poms and everything! Now I have step by step instructions, we are totally on the same page.

October 1, 2009 at 6:30 AM  
Blogger nope said...

so cute! i'm glad i read this. i've been using my invisible thread for many hand sewing projects lately, and contemplated using it in my machine. im glad i didn't :)

November 24, 2009 at 4:51 AM  
Blogger Heather said...

This is great! I already had yellow pom pom trim to add to the chenille bedspread I cut up for curtain's in my daughter's new room. I haven't finished yet, but seeing how lovely yours turned out I'm much more confident about my plan now!

February 21, 2010 at 12:08 PM  

Post a Comment

Subscribe to Post Comments [Atom]

<< Home