One Shoulder Dressy Dress

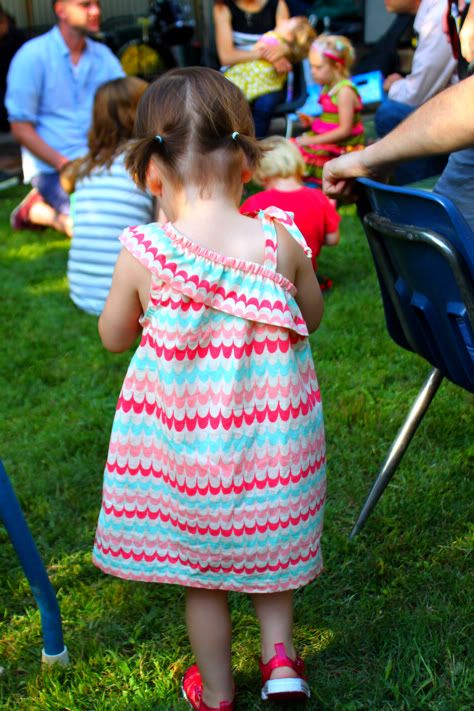
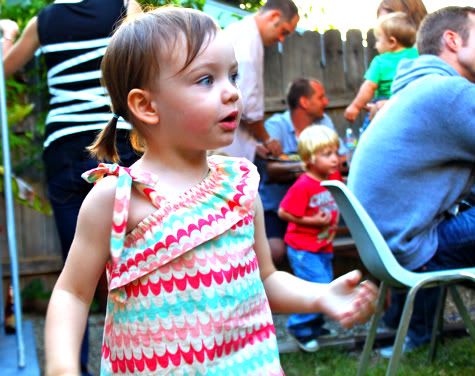
I've been hoarding this Alexander Henry Caitlin Stripe cotton I picked up from Fabricworm for a while waiting for inspiration, when it hit me that it would be a great 4th of July print! It also comes in a few other great colorways.

This one-shoulder dress is much easier to sew then it looks. It works in cotton but might be even cuter in voile or even terry cloth. So fun for summer BBQs!

OMG, I have the cutest daughter ever, except for all of your daughters of course.

I can't wait to show you how to make this dress! Get the full One Shoulder Dressy Dress tutorial after the jump...
One Shoulder Dressy Dress
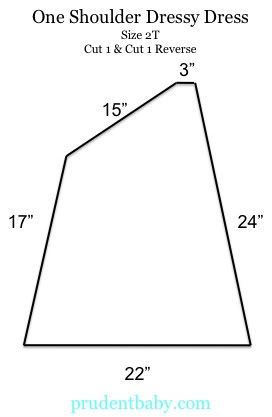
1. Cut your fabric. You'll need two strips about 18" long by 1.5 to 2" wide for the straps, another strip double the length of the angled measurement plus two inches (so for me that was 32") by 3.5" wide, and two pieces for the dress. Here are the measurements I used for my 2T.

Remember you need to cut one piece like this and one IN REVERSE. If you cut two of the same your dress will be inside out on one side.

2. First let's make the straps. Fold your strips the long way right sides faacing and sew up the sides:

Use a safety pin or loop turner to turn them right side out, then iron them flat with the seam to one side, and tie a knot on one end of each:

3. Now lay your dress pieces right sides facing:

Cut an armhole in the tall side (a j-shape, for 2T go about 6" long and 3" wide). Sew the shoulder seam and up the sides (not the armhole of course) and finish the edges by serging, sewing with a zig zag stitch or cutting with pinking shears:

4. Now take a piece of single fold bias tape and unfold it. Pin it to the right side of the dress with the edges aligned all the way around the armhole:

Sew in place along the fold:

Turn the dress inside out, fold the bias tape up, flip it to the inside, and pin in place:

Sew in place along the edge of the bias tape:

5. Now take your long ruffle piece and hem on edge by folding under 1/4" then another 3/8", ironing and sewing in place:

Turn your dress inside out (so wrong side is up) and place your straps seam side down at the spots where you want them. Lay the ruffle strip on top right side down and pin in place all the way around, beginning and ending on the non-sleeve side:

Sew the ends of the strip together right sides facing and finish the edge:

Sew the strip in place with a 1/4" seam allowance:

Flip it over the right side of the dress. So cute:

Now starting at the non-armhole side, top stitch 1/2" from the edge all the way around, leaving a hole to feed your elastic through backstitching at the beginning and end:

6. Now feed a piece of 3/8" elastic through your casing with a safety pin. Don't make it too snug, try it on your model.

Sew the elastic together flat with a zig zag, push it into the casing and sew the hole closed.

7. Now just hem your dress by folding the bottom hem in 1/4" and ironing, then another 1/2" and ironing, and sewing in place. Done!

Have a cup of horchata and call it a day.

Labels: Baby, Clothing, Gifts, In One Evening, Kids, Serging, Sewing, Under $5

41 Comments:
Such a beautiful summer dress! It seems so easy but has so much style! Love that fabric... and those piggies!
I have an almost 5 year old, size 5 - 6, how would you recommend I enlarge this pattern to fit her?
I can't wait to make this dress!!! It's so stinkin adorable!
kylie i would just measure her along the lines in the picture for the length and add about 1.5" for seam allowance, and add a few inches to the chest (top angled cut) so it can gather a bit.
dang it, very cute!! thanks for your detailed pics of the bias tape on necks and armholes - it has helped me work through some things! love the dress!
This dress is beautiful!
Since I have no children, I will try to do it for me, adapting the pattern to my body.I hope I do well, at least I'll try! Although not sew very well .... ^^
Ack!! That is so simple and fabulous!! Very Nicely Done:)
Super cute! Beautiful, thanks!!!
i read your response to kylie jane.. but would you enlarge it a bit for a bigger size? 3t or 4t?
very cute, I love your tutorials!
AWESOME
I am a little confused . When you cut out the ruffle strip you said:
double the length of the angled measurement plus two inches (so for me that was 28")
Your diagram shows the angle as 15"...wouldn't it have come out to 32" long then?? OR am I supposed to SUBTRACT 2" ?? Help please. I want to make this for my girls and would hate to mess it up.
Amy
amy i am laughing so hard because i woke up this morning thinking that exact thing. i have no idea why. i was like, i think i wrote the wrong number in my post, must get out of bed and fix that, but then my daughter was like "i need food" so i just got to the computer and saw your note, HA. fixing now, thank you!!
Jaime,
I went to bed confused and thought I forgot how to add. Then I thought I wasn't adding seam allowances...It was a rough night for us all. LOL
Thanks for easing my mind a bit!
Amy
OMG... this is like the cutest dress ever! I looove the bright colors and patterns!
I love it!! I linked to your tutorial over at Craft Gossip Sewing:
http://sewing.craftgossip.com/tutorial-one-shoulder-ruffle-dress-for-toddler-girls/2010/07/08/
--Anne
I think this is so adorable! My daughter would looks so cute it in. I will feature this at somedaycrafts.blogspot.com today! Grab my 'featured" button.
I LOVE this dress! I saw this post yesterday and already finished 2 this afternoon. Great tutorial and very unique style. I put my versions up on my blog
http://zaaberry.blogspot.com/2010/07/i-love-blogosphere.html
Thanks for sharing this!
Ruby
ruby!! that was fast! soooo cute!!
Any tips on making this 18/24 months? Any suggestions helpfull!!! I'm dying to make this for my girl. :)
That little dress is absolutely fantastic!
so cute!!! I will link your tutorial up to my blog. free tutorials on there to share.
http://callmecraftymomma.blogspot.com/
Phew! I'm so glad I found your blog because I have decided to make my daughter's clothes for the next year and at a tall 16 mo. she does perfectly into all your tutorial sizes...yes, as I don't excel at math! Thanks for sharing your creations!
This dress is SO cute!!! I wanna make for my girl right now! Thanks for sharing :)
I love this also and would like to make this for my little girl's first birthday in a few weeks but she will only be in size 13 months.. any suggestions on how to adapt the pattern?
Thanks in advance!
I just finished making a modified version of this dress. I made a top instead, because my daughter wasn't walking yet...although by the time I finished she totally was! :) I have to admit I am still totally confused about the ruffle/elastic part. Since it's 2in longer, I didn't know where to pin it to the dress and how to sew it on. (BTW I'm a novice, this is my first garment ever). Anyways, I ended up trimming it down and just have less of a gather, still totally cute. Thanks for the tutorial!
Thank you for the inspiration! I've been looking for a design to use some cute purple Halloween fabric on, and my daughter is just going to love it! We live in Florida so the weather's still perfect for this. lol Thanks again.
Thank's for the tutorial. I have done it also for my daughter.. i didn't put the elastic part, because i really confused with the tutorial..Well this is my first trial. The dress is so cute and very 'jungle'....
click to my link.. http://miaach.blogspot.com/2010/12/one-shoulder-dress.html
You are flippin' amazing! I swear I've been looking for toddler dress tutorials all night and you have the BEST ones! Thank you so much for your amazing tutorials. I can't wait to make a few of them!
oh i love this, i'm going to make one right now with my juicy lemon fabric :)
xo christina
[www.littlewellies.com]
This is the most adorable dress! I have a 2 1/2 yr old and 4 1/2 yr old and have been too scared to try making them anything. THIS is what broke me. I just read the tutorial and I'm starting tomorrow. So stinking cute! Can't wait to try my hand at this. You make it look soooo easy! I must admit- bias tape is the thing that has me scared the most. tips?
I've fallen in love with your blog and all your great tutorials. I've posted this one on my blog, The Handmade Experiment in a Must Make Monday post - http://wp.me/pkcUM-DO
This comment has been removed by the author.
Your little girl looks JUST like Dakota Fanning...so pretty!
literally just bought and washed and dried and even ironed some fabric just for this dress. i hope i dont mess it up or give it up and not finish.
So glad you made this tutorial!! I saw a dress just like this at the Gap(except it was green knit) and loved it but not the $30 price tag for my 2 year old!! I will definitely be making this for the summer!
Than you so much for this idea! I had to tweak mine just a bit, it never comes out just right does it?! But thank you!
Where can i find the pattern? i says after the jump???
I can't get it to jump to the pattern. HELP!! I want to make this so bad!!
Hi...I absolutely love this dress, it is so darling and I wanted to make it for my daughter, but I can't seem to get the angles right. Would you be able to help me out with the angles? Mahalo in advance...u'i
Made this dress tonight and i came out awesome. I absolutely love it!!!!
Post a Comment
Subscribe to Post Comments [Atom]
<< Home