How to Sew a Capelet, with Pattern!
Capelets are sort of magical - like a cross between a costume and actual clothing. So your little princess can feel like she's playing dress up while actually being dressed. At least I think so, which is why a capelet was my first thought upon beholding this most magical princess collection of fabrics ever.
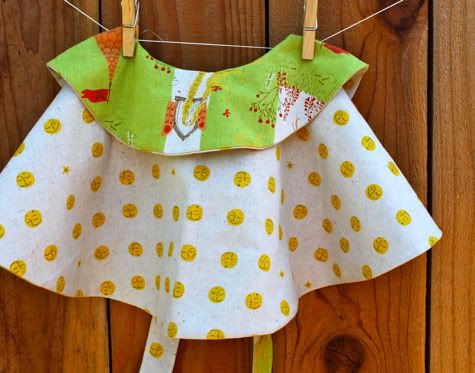
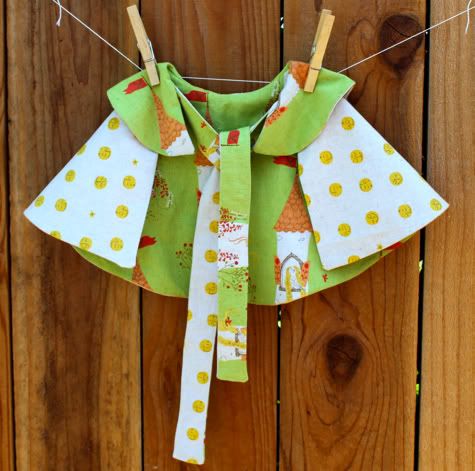
The new Heather Ross Far Far Away 2 fabric has had Jacinda and I biting the insides of our cheeks with anticipation since we got a sneak peek at Quilt Market. Soooo of course when Fabricworm got the first shipment in, we went batty! The whole collection features our favorite fairytale heroines looking sweet yet non-frilly. This capelet features Rapunzel fabric on one side and Moon and Stars on the other, both available at our beloved Fabricworm now (but it's going to sell out superfast so go, go, go)!
But back to the capelet. This is NOT a complicated project and can be customized in so many ways. It is reversible, too. Oh, and you can also use the collar pattern to make a cape for a boy.

I promise your princess will adore it. Or if, like me, you have a non-princessy daughter who prefers squashing bugs and climbing walls, she will also adore it.
Get the full How to Sew a Capelet Tutorial after the jump...
And remember to leave a comment on this or any post this week and you might win 1/2 yard of nicey Jane oilcloth, get the details here.
How to Sew a Capelet
with free downloadable collar pattern.
1. First download and cut out our Capelet collar pattern:
Prudent Baby Capelet Collar
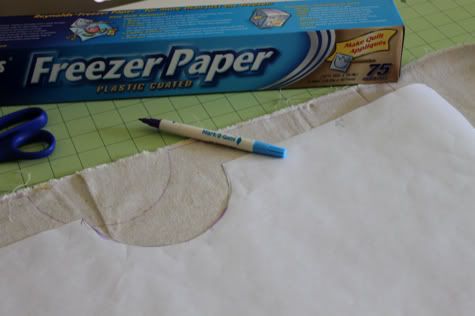
2. Now make yourself a pattern for the cape. You can draw directly on your fabric but I used freezer paper because I couldn't bear the thought of any possible mistakes being made using my beautiful fabric. You need to draw two half circles. The best method is to tie a string around a pencil and pull it taught and drag it in a circle. For my 2T child I drew the smaller circle with a 3" radius, and the larger with an 11.5" radius.

Now trace and cut out one piece in Fabric A and another in Fabric B.
3. Trace the capelet collar pattern onto your fabric and cut out one in Fabric A and another in Fabric B. The radius of the inner circle here is also 3" to match the shape above. If you are making a bigger or smaller cape, you will want to adjust accordingly. However, since the capelet has ties, it is going to fit a huge range of neck sizes, so you may just want to leave it as is, or change the length of the cape and the thickness of the collar rather than the neck measurements. Up to you.

4. Cut four strips of fabric (2 in each fabric) 2" wide by 18" long for the ties.

5. Pin your two collar pieces right sides facing and sew around the outside- so along one straight edge, around the curve, and down the other straight edge with a scant 1/4" inseam:

Turn the collar right side out, push out the edges and iron it flat:

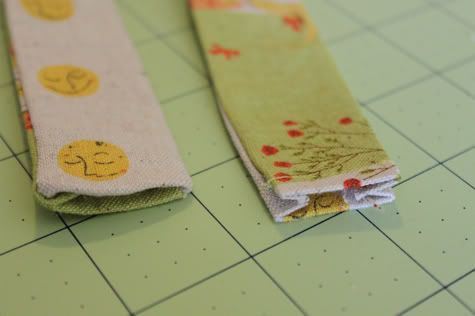
7. Now take the two cape pieces and pin them right sides facing, then sew along one straight edge, around the big curve, and down the other straight edge (so now just the small circle edge is open):

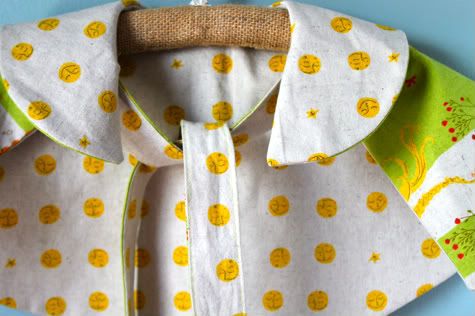
8. Leave your cape inside out and the collar right side out. Insert the collar into the cape so all the unfinished edges are aligned and pin along those curves. If you want yours to have contrasting cape and collar fabric like mine, you'll pin Fabric A of the collar facing Fabric A of the cape. If you want your capelet to appear all the same pattern on each side, then pin contrasting fabrics facing.
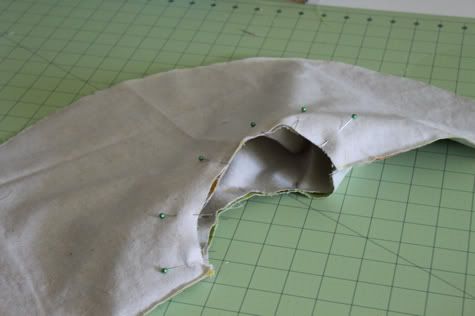
Sew around the edge, leaving a hole for turning, back stitching at the beginning and end:

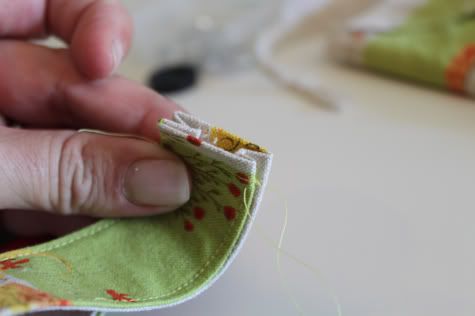
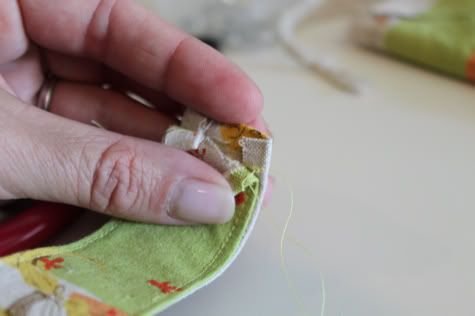
Trim the corners. Reach in through the hole and turn the whole thing right side out. Push the edges out and iron flat.

It looks awesome! But you still have your hole:

Slip stitch it closed:

9. Now let's add straps. You can do this a million ways, with ribbon, grommets, leather strips, a buckle of some sort, anything. I went with fabric ties. Here is how i did it. On one end of each fabric strip, fold over 1/4" and sew in place:
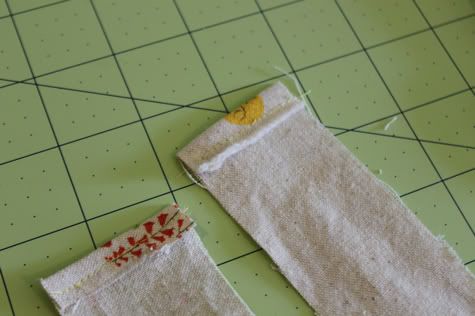
Lay two contrasting strips together right sides facing with the sewn edges aligned:

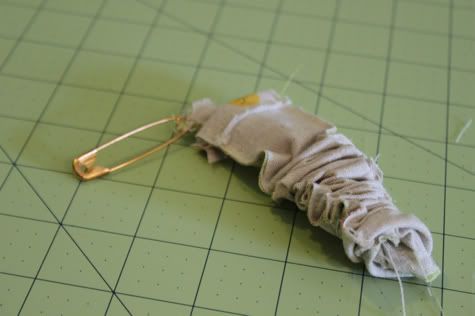
Sew up each long side with a straight stitch. Attach a safety pin to the non-sewn side:

Push the safety pin back through the strap and gently work the fabric until it turns:
There you go:

Iron it with the seams to the sides. At the un-sewn end, push the fabric in. On the sewn edge, iron the sides in along the seam lines:
Top stitch the long sides and across the unsewn end. Don't sew above your stitch line on the sewn end:

This is what i mean by that:
You want to be able to pull the sides apart 1/4" like this:
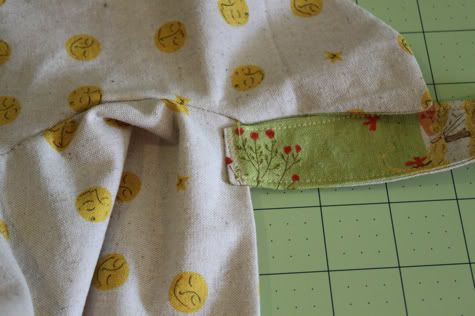
On the cape just below the collar, attach the strap facing whichever way you prefer (i coordinated with the top of the collar):

Here is what it looks like from the other side:

Sew in place with a small zig zag stitch:
Now you're done!!
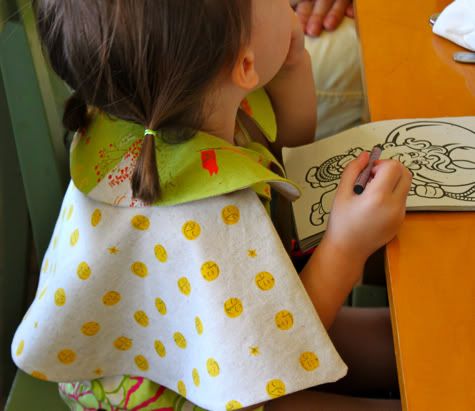
Are you proud? Because I feel proud. This is really my first attempt at meeting one of my parenting goals, which is to make princess stuff that is less pink-glitter-barfy. Mission accomplished?? maybe???

She has been wearing it everywhere even though it is 90 degrees outside. Good sign, right? Or sign of princess obsession yet to come?

Labels: Accessories, Clothing, Gifts, Hot Mess Mommy, In One Evening, Kids, Sewing, Templates, The Season of Cozy
posted by Jaime @ 3:30 AM
![]()

32 Comments:
Looks awesome, especially with that fabric!
Thanks for the pattern. :D
www.modelmumma.blogspot.com
I always love your patterns, I have so many of your projects saved in my "awesome projects" folder I just don't have a printer, how sad is that! Thank you for the awesome tutorial
tfcurve.blogspot.com
this is BEAUTIFUL!!!!!
I love the idea of less glittery-pink stuff in the house, and I'm sure Daddy will too! Our princess refuses to ever wear pants and tops because "Cinderella doesn't wear pants!" Can't wait to try out this pattern. On an unrelated note, thanks for pushing me to finally try bias tape. I've now mastered the armholes use as well as the binding use and am sort of addicted. It is so much less bulky than turned-topstitched or using facings.
So cute!! And so practical, too! This would be great for little church dresses! There's always such contrast between the hot weather outside and the cold air-conditioned inside of a church service...
I linked to your tutorial on Craft Gossip Sewing:
http://sewing.craftgossip.com/free-pattern-cute-cute-capelet-for-little-girls/2010/07/19/
(link will go live at 10:50 am CST)
--Anne
I am overwhelmed by the cuteness. This is gorgeous! Great gift idea because the size is flexible.
Oh my goodness! We are going to Disneyland in Sept and this will be PERFECT! My daughter is really into the frills right now...but also loves bugs:) Thanks!
I'm pretty sure I'm going to have to make this for my nieces and will modify it for my boy. (I'm working on several pairs of pants right now from your tutorial.) Love your blog!
This is adorable! And I love the idea of making a cape for a boy. I love making handmade presents but always find it trickier to find things for boys so this is great! Love all your tutorials, thanks for sharing!
love this capelet!!! simply adorable and perfect for any little girl!
I. LOVE. this!!!!!!!!!!!!!!!!!!!!
Can't wait to make one!!!
This comment has been removed by the author.
This is too adorable. I can hardly wait to make it for my princess. Just wondering how much fabric is I would need to get?
I love this! I kinda want one for me :)
Yes, mission accomplished!
I love your tutorials...even thought my little munchkin is only 11months, i can use your tutorials to fit her...I guess she is not so little. She does love to eat!
Thanks for the tutorial.
Adorable! I finally tackled the task of fixing my printer that has been giving me problems for months...just to print this pattern!
Drat! The Moon and Stars fabric is already out of stock. The caplet is freaking darling. I would make one for myself but somehow a caplet on a glasses-wearing rotund mama just sounds...creepy weird like a crazy Harry Potter fan or something.
Can't wait to make one of these for my little prince and princess!
Love it! How adorable. My daughter is indeed a little princess, and she would just love one of these. Thanks for the great tutorial!
This is adorable! This pattern would work with the many options of Halloween costumes as well, for a boy or a girl. I love it, love it, love it!
Bethany
I can't wait to make this! My daughter has recently developed a grand appreciation for capes making them out of blankets, towels,and bibs. This will look adorable on her and even more adorable once she chases down the dog and ties it around his neck =-) I guess I'll have to make two!
What a cute project! I suppose my six month old is a little young for a capelet just yet eh?
I also wanted to say thanks for your links to Fabricworm. Once I got over my fabric-gasm I just HAD to put in an order!
Thanks again for the inspiration I tried this one out and love it!
http://letsgoflyakiteuptothehighestheight.blogspot.com/2010/08/angelina-ballerina-capelet.html
Thanks for the idea. My kids are always putting dress up cloths on for public. This is a happy medium I think we can be happy with.
I have two questions: 1) How much fabric do we need? 2) how long is the cape you made, (or how old is the model?,who is super-cute, by the way!) And one comment: wouldn't it be a lot easier to put the ties in before you sew around the cape, then just turn them to the right side when you turn the cape part?
Thank you!
This looks irresistible, and fun!
I can see all the possibilities
and variations.
Excuse me... I am off to dig through my stash!
Blondi Knits - yes you are right about the straps, you could totally do it that way. i didn't decide what kind of attachment i wanted to do until AFTER i had assembled it so i did it in that order, but the other way would work as well! though I do think it is sturdier this way...
Thanks for this tutorial! I am intimidated by sewing projects- however this was the perfect addition to my daughters halloween costume & I am proud to say I made one!!!! & I'm very excited it came out so cute! so kudos to you this was very easy to follow and complete!
Thanks! I used your instructions to make a 'red riding hood' cape for my daughter... just changed the collar to a hood and she is a happy girl!
http://sewhappytocraft.blogspot.com/2010/09/kcwc-day-3.html
AH-HA! Thanks! I was looking for something that would show just how to make the capelet part to make one for my daughters Easter dress. We are using a dark brown fake fur and brown satin, to go with a sparkly pink satin dress!
What a gorgeous capelet! Thanks so much for the tutorial! How much fabric is needed?
Lynne
Post a Comment
Subscribe to Post Comments [Atom]
<< Home