body { background:#fff url("http://www.blogblog.com/dots/bg_dots.gif") 50% 0; margin:0; padding:0 10px; text-align:center; font:x-small Verdana,Arial,Sans-serif; color:#333; font-size/* */:/**/small; font-size: /**/small; } /* Page Structure ----------------------------------------------- */ @media all { #content { background:url("http://www.blogblog.com/dots/bg_3dots.gif") no-repeat 250px 50px; width:700px; margin:0 auto; padding:50px 0; text-align:left; } #main { width:450px; float:right; padding:50px 0 20px; font-size:85%; } #main2 { background:url("http://www.blogblog.com/dots/bg_dots2.gif") -100px -100px; padding:20px 10px 15px; } #sidebar { width:200px; float:left; font-size:85%; padding-bottom:20px; } #sidebar2 { background:url("http://www.blogblog.com/dots/bg_dots2.gif") 150px -50px; padding:5px 10px 15px; width:200px; width/* */:/**/180px; width: /**/180px; } } @media handheld { #content { width:90%; } #main { width:100%; float:none; } #sidebar { width:100%; float:none; } #sidebar2 { width:100%; } } html>body #main, html>body #sidebar { /* We only give this fade from white to nothing to browsers that can handle 24-bit transparent PNGs */ background/* */:/**/url("http://www.blogblog.com/dots/bg_white_fade.png") repeat-x left bottom; } /* Title & Description ----------------------------------------------- */ @media all { #blog-title { margin:0 0 .5em; font:250%/1.4em Georgia,Serif; color:#353; } #blog-title a { color:#353; text-decoration:none; } #description { margin:0 0 1.75em; color:#996; } #blog-mobile-title { display:none; } #description-mobile { display:none; } } @media handheld { #blog-title { display:none; } #description { display:none; } #blog-mobile-title { display:block; margin:0 0 .5em; font:250%/1.4em Georgia,Serif; color:#353; } #blog-mobile-title a { color:#353; text-decoration:none; } #description-mobile { display:block; margin:0 0 1.75em; color:#996; } } /* Links ----------------------------------------------- */ a:link { color:#488; } a:visited { color:#885; } a:hover { color:#000; } a img { border-width:0; } /* Posts ----------------------------------------------- */ .date-header { margin:0 0 .75em; padding-bottom:.35em; border-bottom:1px dotted #9b9; font:95%/1.4em Georgia,Serif; text-transform:uppercase; letter-spacing:.3em; color:#663; } .post { margin:0 0 2.5em; line-height:1.6em; } .post-title { margin:.25em 0; font:bold 130%/1.4em Georgia,Serif; color:#333; } .post-title a, .post-title strong { background:url("http://www.blogblog.com/dots/bg_post_title.gif") no-repeat 0 .25em; display:block; color:#333; text-decoration:none; padding:0 0 1px 45px; } .post-title a:hover { color:#000; } .post p { margin:0 0 .75em; } p.post-footer { margin:0; text-align:right; } p.post-footer em { display:block; float:left; text-align:left; font-style:normal; color:#996; } a.comment-link { /* IE5.0/Win doesn't apply padding to inline elements, so we hide these two declarations from it */ background/* */:/**/url("http://www.blogblog.com/dots/icon_comment.gif") no-repeat 0 .25em; padding-left:15px; } html>body a.comment-link { /* Respecified, for IE5/Mac's benefit */ background:url("http://www.blogblog.com/dots/icon_comment.gif") no-repeat 0 .25em; padding-left:15px; } .post img { margin:0 0 5px 0; padding:4px; border:1px solid #cca; } /* Comments ----------------------------------------------- */ #comments { margin:0; } #comments h4 { margin:0 0 10px; border-top:1px dotted #9b9; padding-top:.5em; font:bold 110%/1.4em Georgia,Serif; color:#333; } #comments-block { line-height:1.6em; } .comment-poster { background:url("http://www.blogblog.com/dots/icon_comment.gif") no-repeat 2px .35em; margin:.5em 0 0; padding:0 0 0 20px; font-weight:bold; } .comment-body { margin:0; padding:0 0 0 20px; } .comment-body p { margin:0 0 .5em; } .comment-timestamp { margin:0 0 .5em; padding:0 0 .75em 20px; color:#996; } .comment-timestamp a:link { color:#996; } .deleted-comment { font-style:italic; color:gray; } .paging-control-container { float: right; margin: 0px 6px 0px 0px; font-size: 80%; } .unneeded-paging-control { visibility: hidden; } /* More Sidebar Content ----------------------------------------------- */ .sidebar-title { margin:2em 0 .75em; padding-bottom:.35em; border-bottom:1px dotted #9b9; font:95%/1.4em Georgia,Serif; text-transform:uppercase; letter-spacing:.3em; color:#663; } #sidebar p { margin:0 0 .75em; line-height:1.6em; } #sidebar ul { margin:.5em 0 1em; padding:0 0px; list-style:none; line-height:1.5em; } #sidebar ul li { background:url("http://www.blogblog.com/dots/bullet.gif") no-repeat 3px .45em; margin:0; padding:0 0 5px 15px; } #sidebar p { margin:0 0 .6em; } /* Profile ----------------------------------------------- */ .profile-datablock { margin:0 0 1em; } .profile-img { display:inline; } .profile-img img { float:left; margin:0 8px 5px 0; border:4px solid #cc9; } .profile-data { margin:0; line-height:1.5em; } .profile-data strong { display:block; } .profile-textblock { clear:left; } /* Footer ----------------------------------------------- */ #footer { clear:both; padding:15px 0 0; } #footer hr { display:none; } #footer p { margin:0; } /* Feeds ----------------------------------------------- */ #blogfeeds { } #postfeeds { padding-left: 20px }

Prudent Baby

Get sewing how to, sewing tutorials, and sewing help to learn sewing. We offer sewing tutorial for sewing moms.

Tuesday, June 1, 2010

DIY Yarn Sun Wall Art
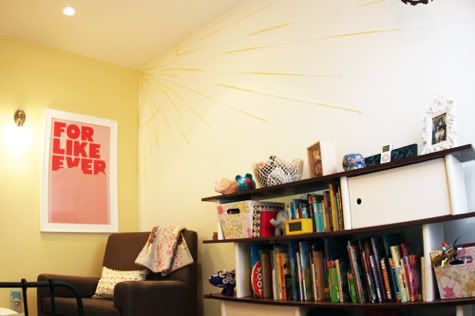

Here's a no-skills-required way to decorate a wall with just yarn and some pins. Perhaps I should have made it a color you can actually see in a photograph, oops. We love LELLOW over here, what can I say...

I originally made this last winter for the fabulous La Petite Mag, now
get the full Yarn Sun Wall Art DIY after the jump...

DIY Yarn Wall Art

You'll need a skein of yarn, some pins, and a pencil.

1.  Start with a blank wall:


2. Put a pin or nail in the corner (nails are easier on you, pins are easier on the wall, i used pins) and tie a string to it. Tie a pencil to the other side of the string and pull it taut to lightly draw a semi-circle:


3. Attach pins along your semi circle at even distances apart:

Erase your pencil line.

4. Weave your yarn around the corner pin, out to a pin on the semi circle, and back to your corner pin. Repeat until complete:


5. Wrap the yarn down along the pins and back to create the edge of your sun:


6. Attach pins on the other side of the wall to create your rays. Wrap the yarn around the circle edge pins, out around a ray pin and back to the circle edge:

At the semi circle, just wrap around the starting pin and move to the next pin:


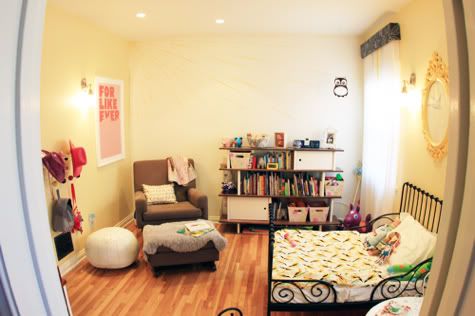
Tie off when you're done. Complete! Scarlet loves her sun so much. I promise it's more visible in person.
Labels: , , , , , ,

11 Comments:

Blogger Amy said...

I love this idea! Brilliant!

June 1, 2010 at 6:05 AM  
Blogger Jacinda said...

I actually love the tone-on-tone of the yellow sun on yellow wall. It's like an interesting texture but not too busy. Beautiful!

June 1, 2010 at 6:22 AM  
Blogger Melissa @ Honeybee Vintage said...

Um...so I LOVE that bed!! Where did you get it? My daughter is about ready to move into a bigger bed. SO adorable!

June 1, 2010 at 8:16 AM  
Blogger Jaime said...

honey scrap it's from IKEA and i LOVE it. it's an extendable bed, so a weird size, I'm going to post a DIY on making sheets for it soon. it grows from this size to a twin. love it.

June 1, 2010 at 9:01 AM  
Blogger Melissa @ Honeybee Vintage said...

Thanks! Just found it on their website...seriously taking my hubby and our tiny SUV to haul it home this weekend:)

June 1, 2010 at 1:00 PM  
Blogger becky said...

I saw this back in the winter when you first posted it on la petite mag and went straight out and got some yarn for my daughters room. Now if I can only find the time to finish the fabric animal decals for the walls her room may be finished by the time she goes off to college.

June 1, 2010 at 1:26 PM  
Blogger alix said...

Wow, that's the coolest thing ever. Also, I totally thought you were calling someone "honey scrap" as a term of endearment....hee!


(cute name, Ms HoneyScrap!)

Alix from ModernKiddo.com

June 2, 2010 at 3:23 PM  
Blogger Casey said...

fabulous idea!! I'm buying some yarn to do this tomorrow, I have a great spot to do this!

June 2, 2010 at 6:54 PM  
Blogger Melanie said...

I saw this on your blog two days ago and cannot stop thinking about. Even last night at 4am, when I had that dreaded pregnanct insomnia, I just thought about this and how and if I will put it in the new combined girls nursery.

You are brilliant! Thanks for posting.

I wonder if you could somehow make clouds too?? I can't imagine how with the soft curves but I'll keep thinking.

June 3, 2010 at 7:27 AM  
Blogger Stephanie said...

could you tell me about the "for like ever" print?

June 3, 2010 at 1:55 PM  
Blogger Heather said...

I'd also like to know about the "For like ever" print.

AND, I'm thinking about getting two extendable beds for my girls, who will be sharing a TINY 8x10 room. Are they well-made & sturdy? Are they as wide as a twin bed? I saw that you mentioned a sheet tutorial for them...I'd definitely love to see that!
Thanks!

September 28, 2010 at 9:36 AM  

Post a Comment

Subscribe to Post Comments [Atom]

<< Home