body { background:#fff url("http://www.blogblog.com/dots/bg_dots.gif") 50% 0; margin:0; padding:0 10px; text-align:center; font:x-small Verdana,Arial,Sans-serif; color:#333; font-size/* */:/**/small; font-size: /**/small; } /* Page Structure ----------------------------------------------- */ @media all { #content { background:url("http://www.blogblog.com/dots/bg_3dots.gif") no-repeat 250px 50px; width:700px; margin:0 auto; padding:50px 0; text-align:left; } #main { width:450px; float:right; padding:50px 0 20px; font-size:85%; } #main2 { background:url("http://www.blogblog.com/dots/bg_dots2.gif") -100px -100px; padding:20px 10px 15px; } #sidebar { width:200px; float:left; font-size:85%; padding-bottom:20px; } #sidebar2 { background:url("http://www.blogblog.com/dots/bg_dots2.gif") 150px -50px; padding:5px 10px 15px; width:200px; width/* */:/**/180px; width: /**/180px; } } @media handheld { #content { width:90%; } #main { width:100%; float:none; } #sidebar { width:100%; float:none; } #sidebar2 { width:100%; } } html>body #main, html>body #sidebar { /* We only give this fade from white to nothing to browsers that can handle 24-bit transparent PNGs */ background/* */:/**/url("http://www.blogblog.com/dots/bg_white_fade.png") repeat-x left bottom; } /* Title & Description ----------------------------------------------- */ @media all { #blog-title { margin:0 0 .5em; font:250%/1.4em Georgia,Serif; color:#353; } #blog-title a { color:#353; text-decoration:none; } #description { margin:0 0 1.75em; color:#996; } #blog-mobile-title { display:none; } #description-mobile { display:none; } } @media handheld { #blog-title { display:none; } #description { display:none; } #blog-mobile-title { display:block; margin:0 0 .5em; font:250%/1.4em Georgia,Serif; color:#353; } #blog-mobile-title a { color:#353; text-decoration:none; } #description-mobile { display:block; margin:0 0 1.75em; color:#996; } } /* Links ----------------------------------------------- */ a:link { color:#488; } a:visited { color:#885; } a:hover { color:#000; } a img { border-width:0; } /* Posts ----------------------------------------------- */ .date-header { margin:0 0 .75em; padding-bottom:.35em; border-bottom:1px dotted #9b9; font:95%/1.4em Georgia,Serif; text-transform:uppercase; letter-spacing:.3em; color:#663; } .post { margin:0 0 2.5em; line-height:1.6em; } .post-title { margin:.25em 0; font:bold 130%/1.4em Georgia,Serif; color:#333; } .post-title a, .post-title strong { background:url("http://www.blogblog.com/dots/bg_post_title.gif") no-repeat 0 .25em; display:block; color:#333; text-decoration:none; padding:0 0 1px 45px; } .post-title a:hover { color:#000; } .post p { margin:0 0 .75em; } p.post-footer { margin:0; text-align:right; } p.post-footer em { display:block; float:left; text-align:left; font-style:normal; color:#996; } a.comment-link { /* IE5.0/Win doesn't apply padding to inline elements, so we hide these two declarations from it */ background/* */:/**/url("http://www.blogblog.com/dots/icon_comment.gif") no-repeat 0 .25em; padding-left:15px; } html>body a.comment-link { /* Respecified, for IE5/Mac's benefit */ background:url("http://www.blogblog.com/dots/icon_comment.gif") no-repeat 0 .25em; padding-left:15px; } .post img { margin:0 0 5px 0; padding:4px; border:1px solid #cca; } /* Comments ----------------------------------------------- */ #comments { margin:0; } #comments h4 { margin:0 0 10px; border-top:1px dotted #9b9; padding-top:.5em; font:bold 110%/1.4em Georgia,Serif; color:#333; } #comments-block { line-height:1.6em; } .comment-poster { background:url("http://www.blogblog.com/dots/icon_comment.gif") no-repeat 2px .35em; margin:.5em 0 0; padding:0 0 0 20px; font-weight:bold; } .comment-body { margin:0; padding:0 0 0 20px; } .comment-body p { margin:0 0 .5em; } .comment-timestamp { margin:0 0 .5em; padding:0 0 .75em 20px; color:#996; } .comment-timestamp a:link { color:#996; } .deleted-comment { font-style:italic; color:gray; } .paging-control-container { float: right; margin: 0px 6px 0px 0px; font-size: 80%; } .unneeded-paging-control { visibility: hidden; } /* More Sidebar Content ----------------------------------------------- */ .sidebar-title { margin:2em 0 .75em; padding-bottom:.35em; border-bottom:1px dotted #9b9; font:95%/1.4em Georgia,Serif; text-transform:uppercase; letter-spacing:.3em; color:#663; } #sidebar p { margin:0 0 .75em; line-height:1.6em; } #sidebar ul { margin:.5em 0 1em; padding:0 0px; list-style:none; line-height:1.5em; } #sidebar ul li { background:url("http://www.blogblog.com/dots/bullet.gif") no-repeat 3px .45em; margin:0; padding:0 0 5px 15px; } #sidebar p { margin:0 0 .6em; } /* Profile ----------------------------------------------- */ .profile-datablock { margin:0 0 1em; } .profile-img { display:inline; } .profile-img img { float:left; margin:0 8px 5px 0; border:4px solid #cc9; } .profile-data { margin:0; line-height:1.5em; } .profile-data strong { display:block; } .profile-textblock { clear:left; } /* Footer ----------------------------------------------- */ #footer { clear:both; padding:15px 0 0; } #footer hr { display:none; } #footer p { margin:0; } /* Feeds ----------------------------------------------- */ #blogfeeds { } #postfeeds { padding-left: 20px }

Prudent Baby

Get sewing how to, sewing tutorials, and sewing help to learn sewing. We offer sewing tutorial for sewing moms.

Monday, March 29, 2010

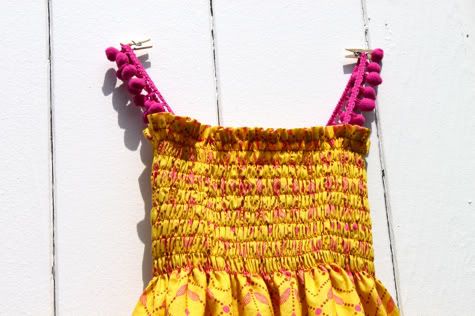
Smocked Sundress with Pom Poms Pattern


I'm so thrilled some of you are finally able to shirr thanks to the little trick I shared with the Sweet Shirred Summer Dress Pattern.  I'm having so much fun shirring my heart out, I hope you are too!

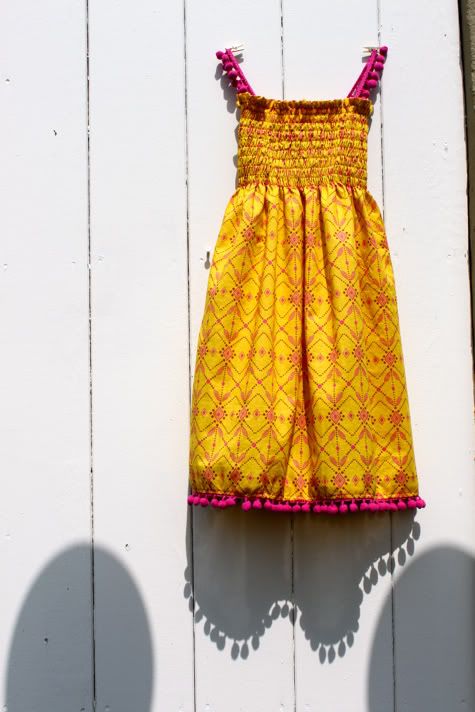
Here's a take on the traditional smocked dress for summer, made with another gorgeous voile from City Craft which is available online here.  Get the full DIY Smocked Sundress Pattern after the jump...

Smocked Sundress Free Pattern


1.  You'll need 3/4 yard pre-washed lightweight cotton (i used a voile), some elastic thread, and some pom pom fringe.  You can cut the fabric down to the appropriate size, the smocking is very forgiving.  Mine is for my freakishly tall two year old.  You want the width about 1.5-2 times the chest measurement of the wearer.  Just add 1" to the length and 1/2" to the width for the seams/hems.
Photobucket

2.  Along a long end of your fabric fold 1/4" and iron, another 1/4" and iron, and sew in place to create the hem at the top of your dress:
Photobucket

3.  Now time to shirr!  For tips on shirring read this post.  So load your bobbin with elastic thread and your spool with regular thread.  I used a contrasting color just to be different.  We are going to sew our lines of shirring all the way across the whole panel 5/8" apart starting 5/8" after our hem line.  Here is the first line of shirring:
Photobucket
the second:
Photobucket
the third:
Photobucket
and i did 9 lines for my two year old.  Do as many as you like!
Photobucket

4.  Now fold your shirred panel in half, right sides facing, trying to make the shirring line up and sew together with a straight stitch:
Photobucket
Finish the seam by serging, sewing with a zig zag or overlock stitch, or cutting with pinking shears:
Photobucket

5.  Now for the hem.  You can just do a traditional hem, but I wanted to add some pom poms for a little flair.  I serged the unfinished edge, but you can just iron it in 1/4" all the way around to start:
Photobucket
Sew your trim facing upward to the front of the dress:
Photobucket
Now flip the trim under the dress and iron (and pin if you want, i was in too much of a rush):
Photobucket
Then top stitch it in place.  You're trimmed hem is done!
Photobucket

6.  Now for your straps.  You can make some traditional straps out of your dress fabric, or use ribbon or bias tape or what have you, but i wanted pom poms because i love them.  Line up your dress so the seam is in the middle of the back.  Measure two inches away from the seam on each side and pin your straps:
Photobucket
Ideally you want to seam-rip your original top hem and slide the strap under it, then fold it back over and sew in place so you don't get double-sewing lines, but you don't have to:
Photobucket
Repeat to attach the straps to the front of the dress (maybe after trying it on your model to be sure they are the right length).  Done!
Photobucket
What do you think?  Are the pom poms too much?

Labels: , , , , , , , ,

19 Comments:

Anonymous Anonymous said...

I really like the style and the colors!!!

March 29, 2010 at 4:27 AM  
Blogger Jessica@SewHomegrown said...

This is beautiful! I am loving voile at the moment and have some scraps from a skirt I am making for myself- this would be the perfect thing to do with them! I LOVE the pom poms - they make the dress :)

March 29, 2010 at 6:19 AM  
Blogger Jacinda said...

This dress is so beautiful that I actually want Summer to come. I would brave 110 degree temps for this dress. That's how much I love it.

March 29, 2010 at 7:01 AM  
Blogger Meg said...

This dress is so adorable. I love the colours and the pom poms :)

March 29, 2010 at 7:09 AM  
Blogger meg duerksen said...

i LOVE the pom pom straps! i am totally doing that with my annie's new dress...it's has a halter tie neck that she hates...so i told her i'd sew on straps. she will LOVE the pom poms!

March 29, 2010 at 7:09 AM  
Blogger Crafterella said...

Wow, the pom poms are great, what a super idea and a great way to add some uniqueness to an already adorable dress!

March 29, 2010 at 9:14 AM  
Anonymous Anonymous said...

did someone say hand-me-down? LOVE it.

March 29, 2010 at 10:28 AM  
Blogger Tegan | Celebrate Twelve13 said...

That is SO cute! I have a little boy, but someday, maybe, I'll have an excuse to make that. LOVE the pom poms!

March 29, 2010 at 10:29 AM  
Blogger Unknown said...

Spring has come for sure!

March 29, 2010 at 10:35 AM  
Blogger marlo noël said...

jaime, that dress is amazing, and the colors are gorgeous. you're giving me inspiration to sew again.

March 29, 2010 at 2:02 PM  
Blogger Cate Brickell said...

wow, so simple, even I could do it! the colours are awesome, it wouldn't be the same dress without the pom pom trim... I'm wondering if I can convince my girls, big and small, that they really need one of these dresses ~lol~

March 29, 2010 at 4:19 PM  
Blogger Casey said...

the pom poms are not too much! I love this so much! I hope to try this out this summer

March 31, 2010 at 8:43 AM  
Blogger Anne said...

love love LOVE those pom pom fringe straps!!! I linked to your tutorial on Craft Gossip Sewing:
http://sewing.craftgossip.com/cool-idea-pom-pom-fringe-for-sundress-straps/2010/04/01/

--Anne

April 1, 2010 at 6:42 AM  
Blogger Kelsey said...

THANK YOU, THANK YOU! I made myself an Easter dress with shirring at the top, and I love it - so much better then anything I could have bought. So, I'll say it again: Thank you! :-D

April 1, 2010 at 9:30 AM  
Blogger Laura said...

Pompoms too much??? What? The more the better, I say. This is adorable!

April 1, 2010 at 8:57 PM  
Blogger Mandy Beyeler said...

LOVE the pom poms - never too much!

If you'd like, I'd love to have you link up at my Tuesday link-up party, www.craftedition.blogspot.com

April 2, 2010 at 5:38 AM  
Blogger Unknown said...

LOVE the pom poms, definitely not too much. and your shirring tutorial made all the difference for me (I have a drop in bobbin too). I am forever grateful, though my husband is not too sure about this discovery because all I want to do is shir and shir some more. :)

April 5, 2010 at 4:00 PM  
Blogger Sarah said...

PomPoms are NEVER too much! :) Love it! THANKS!

April 11, 2010 at 11:41 AM  
Blogger Jeanine The Crafting Fiend said...

I know this is an old post - but I want to make this dress for me! I LOVE the pompom trim!

July 7, 2011 at 11:08 AM  

Post a Comment

Subscribe to Post Comments [Atom]

<< Home