body { background:#fff url("http://www.blogblog.com/dots/bg_dots.gif") 50% 0; margin:0; padding:0 10px; text-align:center; font:x-small Verdana,Arial,Sans-serif; color:#333; font-size/* */:/**/small; font-size: /**/small; } /* Page Structure ----------------------------------------------- */ @media all { #content { background:url("http://www.blogblog.com/dots/bg_3dots.gif") no-repeat 250px 50px; width:700px; margin:0 auto; padding:50px 0; text-align:left; } #main { width:450px; float:right; padding:50px 0 20px; font-size:85%; } #main2 { background:url("http://www.blogblog.com/dots/bg_dots2.gif") -100px -100px; padding:20px 10px 15px; } #sidebar { width:200px; float:left; font-size:85%; padding-bottom:20px; } #sidebar2 { background:url("http://www.blogblog.com/dots/bg_dots2.gif") 150px -50px; padding:5px 10px 15px; width:200px; width/* */:/**/180px; width: /**/180px; } } @media handheld { #content { width:90%; } #main { width:100%; float:none; } #sidebar { width:100%; float:none; } #sidebar2 { width:100%; } } html>body #main, html>body #sidebar { /* We only give this fade from white to nothing to browsers that can handle 24-bit transparent PNGs */ background/* */:/**/url("http://www.blogblog.com/dots/bg_white_fade.png") repeat-x left bottom; } /* Title & Description ----------------------------------------------- */ @media all { #blog-title { margin:0 0 .5em; font:250%/1.4em Georgia,Serif; color:#353; } #blog-title a { color:#353; text-decoration:none; } #description { margin:0 0 1.75em; color:#996; } #blog-mobile-title { display:none; } #description-mobile { display:none; } } @media handheld { #blog-title { display:none; } #description { display:none; } #blog-mobile-title { display:block; margin:0 0 .5em; font:250%/1.4em Georgia,Serif; color:#353; } #blog-mobile-title a { color:#353; text-decoration:none; } #description-mobile { display:block; margin:0 0 1.75em; color:#996; } } /* Links ----------------------------------------------- */ a:link { color:#488; } a:visited { color:#885; } a:hover { color:#000; } a img { border-width:0; } /* Posts ----------------------------------------------- */ .date-header { margin:0 0 .75em; padding-bottom:.35em; border-bottom:1px dotted #9b9; font:95%/1.4em Georgia,Serif; text-transform:uppercase; letter-spacing:.3em; color:#663; } .post { margin:0 0 2.5em; line-height:1.6em; } .post-title { margin:.25em 0; font:bold 130%/1.4em Georgia,Serif; color:#333; } .post-title a, .post-title strong { background:url("http://www.blogblog.com/dots/bg_post_title.gif") no-repeat 0 .25em; display:block; color:#333; text-decoration:none; padding:0 0 1px 45px; } .post-title a:hover { color:#000; } .post p { margin:0 0 .75em; } p.post-footer { margin:0; text-align:right; } p.post-footer em { display:block; float:left; text-align:left; font-style:normal; color:#996; } a.comment-link { /* IE5.0/Win doesn't apply padding to inline elements, so we hide these two declarations from it */ background/* */:/**/url("http://www.blogblog.com/dots/icon_comment.gif") no-repeat 0 .25em; padding-left:15px; } html>body a.comment-link { /* Respecified, for IE5/Mac's benefit */ background:url("http://www.blogblog.com/dots/icon_comment.gif") no-repeat 0 .25em; padding-left:15px; } .post img { margin:0 0 5px 0; padding:4px; border:1px solid #cca; } /* Comments ----------------------------------------------- */ #comments { margin:0; } #comments h4 { margin:0 0 10px; border-top:1px dotted #9b9; padding-top:.5em; font:bold 110%/1.4em Georgia,Serif; color:#333; } #comments-block { line-height:1.6em; } .comment-poster { background:url("http://www.blogblog.com/dots/icon_comment.gif") no-repeat 2px .35em; margin:.5em 0 0; padding:0 0 0 20px; font-weight:bold; } .comment-body { margin:0; padding:0 0 0 20px; } .comment-body p { margin:0 0 .5em; } .comment-timestamp { margin:0 0 .5em; padding:0 0 .75em 20px; color:#996; } .comment-timestamp a:link { color:#996; } .deleted-comment { font-style:italic; color:gray; } .paging-control-container { float: right; margin: 0px 6px 0px 0px; font-size: 80%; } .unneeded-paging-control { visibility: hidden; } /* More Sidebar Content ----------------------------------------------- */ .sidebar-title { margin:2em 0 .75em; padding-bottom:.35em; border-bottom:1px dotted #9b9; font:95%/1.4em Georgia,Serif; text-transform:uppercase; letter-spacing:.3em; color:#663; } #sidebar p { margin:0 0 .75em; line-height:1.6em; } #sidebar ul { margin:.5em 0 1em; padding:0 0px; list-style:none; line-height:1.5em; } #sidebar ul li { background:url("http://www.blogblog.com/dots/bullet.gif") no-repeat 3px .45em; margin:0; padding:0 0 5px 15px; } #sidebar p { margin:0 0 .6em; } /* Profile ----------------------------------------------- */ .profile-datablock { margin:0 0 1em; } .profile-img { display:inline; } .profile-img img { float:left; margin:0 8px 5px 0; border:4px solid #cc9; } .profile-data { margin:0; line-height:1.5em; } .profile-data strong { display:block; } .profile-textblock { clear:left; } /* Footer ----------------------------------------------- */ #footer { clear:both; padding:15px 0 0; } #footer hr { display:none; } #footer p { margin:0; } /* Feeds ----------------------------------------------- */ #blogfeeds { } #postfeeds { padding-left: 20px }

Prudent Baby

Get sewing how to, sewing tutorials, and sewing help to learn sewing. We offer sewing tutorial for sewing moms.

Friday, March 19, 2010

Hipster Swing Dress for Baby
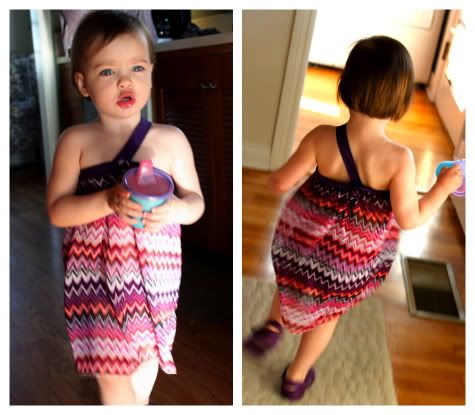


Sew a little summer dress for the sweetest girl in your life...
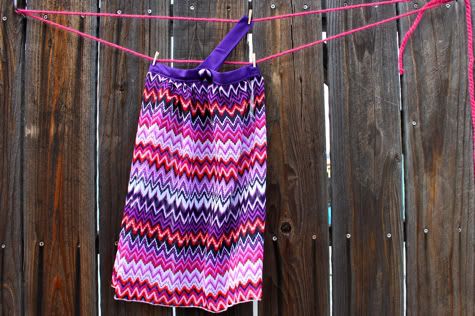


Get the full Toddler Swing Dress Pattern after the jump...

Hipster Baby Swing Dress Pattern


1.  Wash, iron and cut your fabric.  I used a rayon blend but a voile or gauze would work as well, just make it something light and swingy.  You'll also need some double-fold bias tape/ quilt binding and a bit of single fold bias tape.  You want to cut your fabric the length you desire from armpit to below-the-knee plus 1" and the width the chest measurement times 1.5 plus 1".  For my size 2T girl I cut my fabric 19"X33".  For extra cuteness (or if your fabric is super sheer) you could double it up so you have two layers, maybe make the top one shorter, in that case cut a second piece.
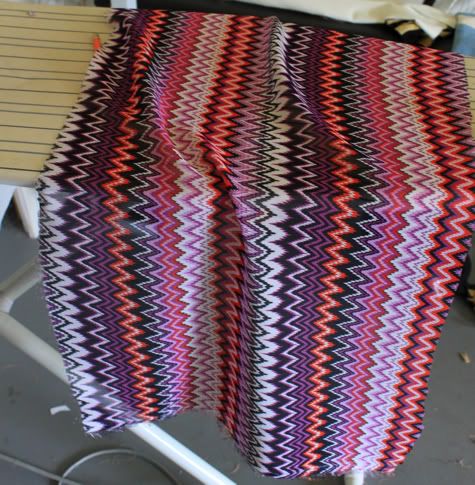

2.  Sew with a basting stitch along one long side, then pull the bias thread and gently ruffle the top until it is your chest measurement, in my case 22".
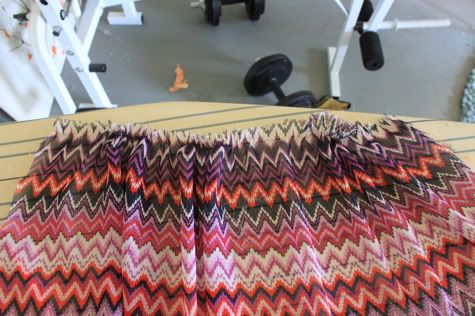

3.  Fold your fabric in half with right sides facing so two short sides line up, and sew them together with a straight stitch.
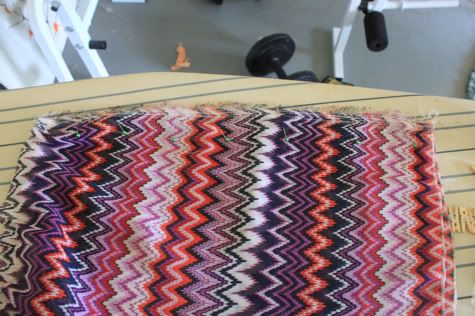
Finish the seamed edge by serging, sewing with a zig zag or overlock stitch, or just cutting with pinking shears:
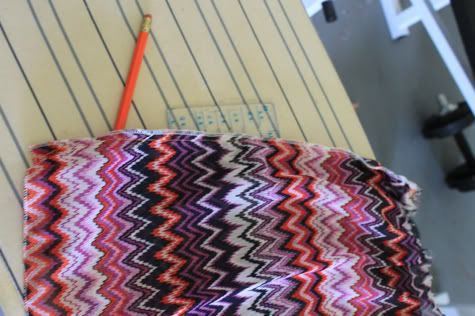

4.  Hem the bottom.  I serged a rolled hem, but you can sew a regular hem.


5.  Grab your double-fold bias tape.  Note one side is just a little teensy bit shorter then the other, that's the side you want on top.
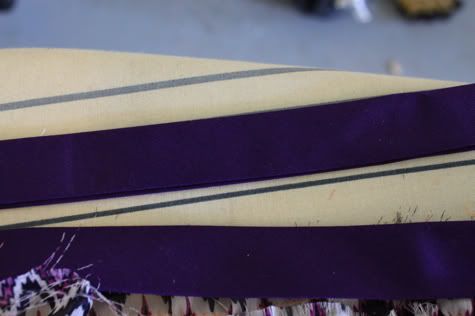
Unfold it and starting in the middle of the back of your dress, pin it to the top of your dress on the right side, with the edge lined up to the edge of the fabric.  Slip the end of the bias tape into the start of it so it overlaps:

Sew in place along the fold:
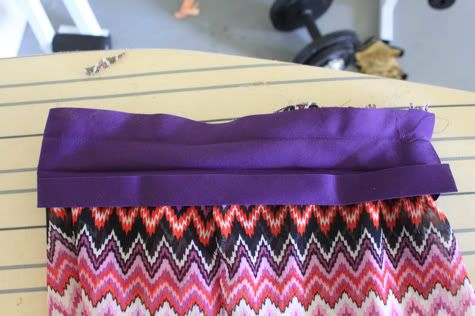
Now fold the bias tape over the top of the dress and pin in place:

Sew along the edge of the tape with coordinating thread, thereby closing your unfinished edges within the tape:
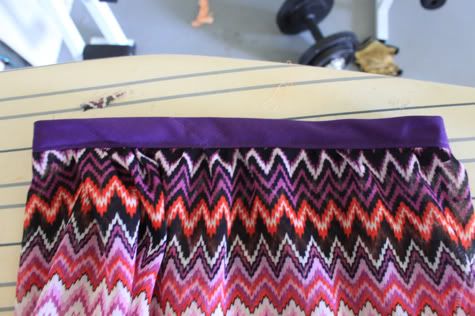

6.  Now we want the child to be able to get the dress on and off, so at the middle of the back, cut a slit about 3" like so:

Open a piece of single fold bias tape and pin it with the edges aligning to the edge of the slit on the right side of the dress, it will form a "u" shape:

At the top of the dress fold the bias tape towards the inside and pin:
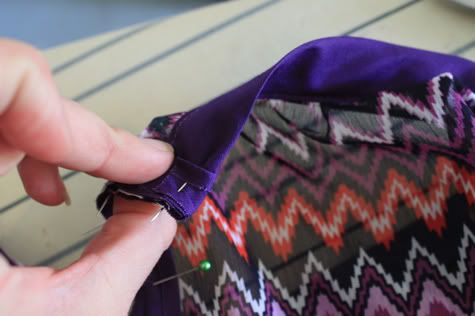
Sew in place along the fold, keeping the needle down at the corner and pivoting the fabric:

At the top edges you are going through a lot of layers so just go slowly.  Here's what it will look like:
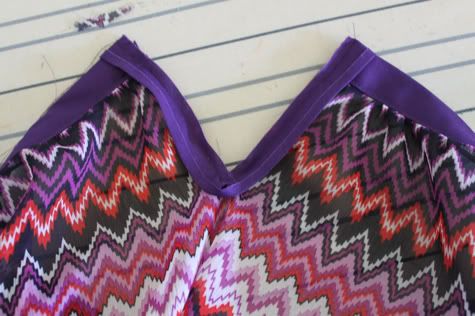
Now fold the bias tape back up and flip it all the way to the inside of the dress and pin in place (this view is of the inside of the dress):
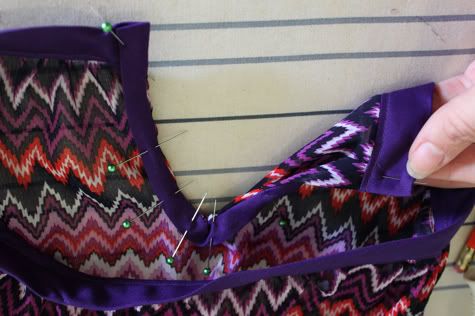
Turn the dress inside out and sew it on along the inside edge of the bias tape.  Then hand sew a snap to the top.  You could sew a few snaps so it can grow as baby grows.
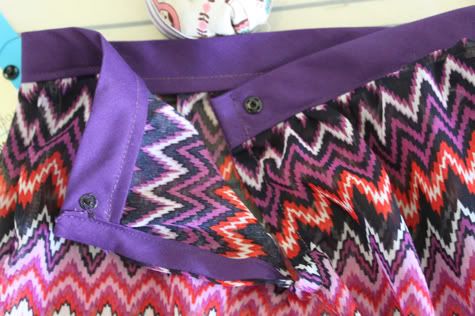
To hide the stitches from your snaps, hand sew a decorative button to the outside.  I made a fabric covered button in the same fabric as the dress:


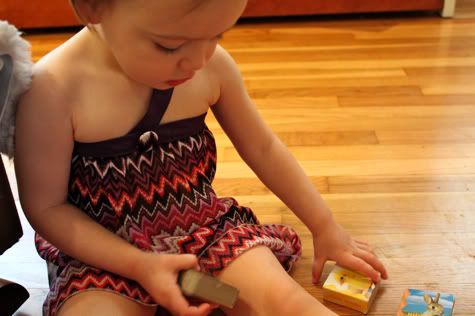
7.  For the strap I decided to be funky and go assymetrical but you don't have too.  You could do a halter or two straps or whatever your pleasure.  I just sewed another piece of single fold bias tape together along the edge and then sewed it along the original seam line on the inside of the front and back of the dress like so:

Then I added another decorative button to the front of the dress:


Scarlet says "MOMMY MAKE-A ME DAT!" :)
Labels: , , , , , ,

8 Comments:

Blogger Unknown said...

Love this! Not only for my girls, but for myself!!!

The fabric is gorgeous...where did you get it?
Thanks!

March 19, 2010 at 11:02 AM  
Blogger Jacinda said...

Who is that supermodel?!? with big girl hair!?!?
Steph is right, I want this too!

March 19, 2010 at 11:26 AM  
Blogger Rachel@oneprettything.com said...

That is way cute! I would wear that myself. Thanks so much, I'll be linking.

March 19, 2010 at 12:11 PM  
Blogger Delia said...

Super cute. I love it. It would make a nice blouse too for me! :)

March 19, 2010 at 1:04 PM  
Blogger Stevee said...

Little S is so gorgeous! She looks just like her mommy! I LOVE this dress! I want a mini one for jojo...

March 19, 2010 at 7:25 PM  
Blogger Anne said...

That is such a cute dress!! And an even cuter little model!! I linked to your tutorial on Craft Gossip Sewing:
http://sewing.craftgossip.com/tutorial-toddler-swing-dress/2010/03/20/

--Anne

March 20, 2010 at 7:01 AM  
Blogger Jaimie said...

THIS IS SOOOO CUTE!

March 24, 2010 at 6:52 PM  
Blogger Alicia for Isabelle said...

I have to say I LOVE ALL the wonderful baby clothing patterns you all have on this site. Y'all are WONDERFUL! I LOVE YOU!!!!! These outifts are amazing! I hope I can make them work at all much less do them justice!

July 22, 2011 at 12:35 AM  

Post a Comment

Subscribe to Post Comments [Atom]

<< Home