body { background:#fff url("http://www.blogblog.com/dots/bg_dots.gif") 50% 0; margin:0; padding:0 10px; text-align:center; font:x-small Verdana,Arial,Sans-serif; color:#333; font-size/* */:/**/small; font-size: /**/small; } /* Page Structure ----------------------------------------------- */ @media all { #content { background:url("http://www.blogblog.com/dots/bg_3dots.gif") no-repeat 250px 50px; width:700px; margin:0 auto; padding:50px 0; text-align:left; } #main { width:450px; float:right; padding:50px 0 20px; font-size:85%; } #main2 { background:url("http://www.blogblog.com/dots/bg_dots2.gif") -100px -100px; padding:20px 10px 15px; } #sidebar { width:200px; float:left; font-size:85%; padding-bottom:20px; } #sidebar2 { background:url("http://www.blogblog.com/dots/bg_dots2.gif") 150px -50px; padding:5px 10px 15px; width:200px; width/* */:/**/180px; width: /**/180px; } } @media handheld { #content { width:90%; } #main { width:100%; float:none; } #sidebar { width:100%; float:none; } #sidebar2 { width:100%; } } html>body #main, html>body #sidebar { /* We only give this fade from white to nothing to browsers that can handle 24-bit transparent PNGs */ background/* */:/**/url("http://www.blogblog.com/dots/bg_white_fade.png") repeat-x left bottom; } /* Title & Description ----------------------------------------------- */ @media all { #blog-title { margin:0 0 .5em; font:250%/1.4em Georgia,Serif; color:#353; } #blog-title a { color:#353; text-decoration:none; } #description { margin:0 0 1.75em; color:#996; } #blog-mobile-title { display:none; } #description-mobile { display:none; } } @media handheld { #blog-title { display:none; } #description { display:none; } #blog-mobile-title { display:block; margin:0 0 .5em; font:250%/1.4em Georgia,Serif; color:#353; } #blog-mobile-title a { color:#353; text-decoration:none; } #description-mobile { display:block; margin:0 0 1.75em; color:#996; } } /* Links ----------------------------------------------- */ a:link { color:#488; } a:visited { color:#885; } a:hover { color:#000; } a img { border-width:0; } /* Posts ----------------------------------------------- */ .date-header { margin:0 0 .75em; padding-bottom:.35em; border-bottom:1px dotted #9b9; font:95%/1.4em Georgia,Serif; text-transform:uppercase; letter-spacing:.3em; color:#663; } .post { margin:0 0 2.5em; line-height:1.6em; } .post-title { margin:.25em 0; font:bold 130%/1.4em Georgia,Serif; color:#333; } .post-title a, .post-title strong { background:url("http://www.blogblog.com/dots/bg_post_title.gif") no-repeat 0 .25em; display:block; color:#333; text-decoration:none; padding:0 0 1px 45px; } .post-title a:hover { color:#000; } .post p { margin:0 0 .75em; } p.post-footer { margin:0; text-align:right; } p.post-footer em { display:block; float:left; text-align:left; font-style:normal; color:#996; } a.comment-link { /* IE5.0/Win doesn't apply padding to inline elements, so we hide these two declarations from it */ background/* */:/**/url("http://www.blogblog.com/dots/icon_comment.gif") no-repeat 0 .25em; padding-left:15px; } html>body a.comment-link { /* Respecified, for IE5/Mac's benefit */ background:url("http://www.blogblog.com/dots/icon_comment.gif") no-repeat 0 .25em; padding-left:15px; } .post img { margin:0 0 5px 0; padding:4px; border:1px solid #cca; } /* Comments ----------------------------------------------- */ #comments { margin:0; } #comments h4 { margin:0 0 10px; border-top:1px dotted #9b9; padding-top:.5em; font:bold 110%/1.4em Georgia,Serif; color:#333; } #comments-block { line-height:1.6em; } .comment-poster { background:url("http://www.blogblog.com/dots/icon_comment.gif") no-repeat 2px .35em; margin:.5em 0 0; padding:0 0 0 20px; font-weight:bold; } .comment-body { margin:0; padding:0 0 0 20px; } .comment-body p { margin:0 0 .5em; } .comment-timestamp { margin:0 0 .5em; padding:0 0 .75em 20px; color:#996; } .comment-timestamp a:link { color:#996; } .deleted-comment { font-style:italic; color:gray; } .paging-control-container { float: right; margin: 0px 6px 0px 0px; font-size: 80%; } .unneeded-paging-control { visibility: hidden; } /* More Sidebar Content ----------------------------------------------- */ .sidebar-title { margin:2em 0 .75em; padding-bottom:.35em; border-bottom:1px dotted #9b9; font:95%/1.4em Georgia,Serif; text-transform:uppercase; letter-spacing:.3em; color:#663; } #sidebar p { margin:0 0 .75em; line-height:1.6em; } #sidebar ul { margin:.5em 0 1em; padding:0 0px; list-style:none; line-height:1.5em; } #sidebar ul li { background:url("http://www.blogblog.com/dots/bullet.gif") no-repeat 3px .45em; margin:0; padding:0 0 5px 15px; } #sidebar p { margin:0 0 .6em; } /* Profile ----------------------------------------------- */ .profile-datablock { margin:0 0 1em; } .profile-img { display:inline; } .profile-img img { float:left; margin:0 8px 5px 0; border:4px solid #cc9; } .profile-data { margin:0; line-height:1.5em; } .profile-data strong { display:block; } .profile-textblock { clear:left; } /* Footer ----------------------------------------------- */ #footer { clear:both; padding:15px 0 0; } #footer hr { display:none; } #footer p { margin:0; } /* Feeds ----------------------------------------------- */ #blogfeeds { } #postfeeds { padding-left: 20px }

Prudent Baby

Get sewing how to, sewing tutorials, and sewing help to learn sewing. We offer sewing tutorial for sewing moms.

Thursday, February 4, 2010

Ruffle Heart T-Shirt


Scarlet loved this plain purple t-shirt, but she is freakishly tall, so alas it had grown too short.  I thought I'd add a ruffle to lengthen it and a little heart for some valentine's day cuteness.
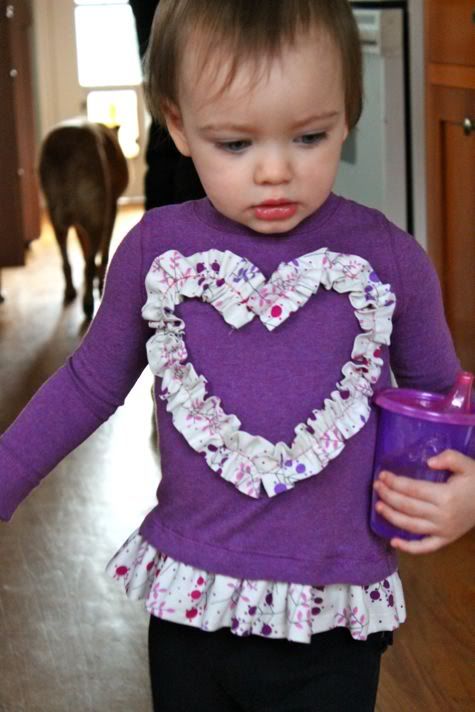
Super simple, get the Ruffle Tee how-to after the jump...
Ruffle Heart T Shirt Tutorial

Grab an old (or new) t-shirt:


Cut some fabric strips.  Make them double the length you want them to be when ruffled, as well as double the width.  For the bottom I used one piece 44" X 6" and for the heart I used two pieces 30" X 4".


Fold them in half lengthwise, right sides facing and sew with 1/4" seam allowance:


Don't finish the side edges of the bigger piece, but for your heart pieces you can iron and hem or serge:


Turn them inside out and iron the heart pieces with the seam to the back and the base piece with the seam to one edge.  On the heart pieces, try to keep the seam just off center, this will help you when ruffling:


Set your machine to a basting stitch (a straight stitch as wide as it will go) and sew a line right down the middle of the heart pieces just to the side of the seam:


Pull on the bobbin thread and gently push the fabric to ruffle it.  Don't pull too hard or it will break and you'll have to start over.


Fold your t-shirt in half and pin one side of your heart on, folding the ends under a tiny bit:


Sew in place:


Then pin the other side on and sew in place:


Now baste the top edge of your bottom ruffle, pull the bobbin thread and ruffle. Turn your t-shirt inside out and starting at one side seam, pin your ruffle along the bottom edge, lining up with the previous hem in the shirt:


When you get back to where you started you'll have flaps like this:


Pin them together, sew straight up on the wrong sides, and cut with pinking shears or serge the edge:


Turn your shirt right side out so you can see the original seam line:


Sew your ruffle in place in coordinating thread.  I was out of purple thread so I used invisible thread and it worked out really well.  You're done!


Labels: , , , , , , , , , ,

6 Comments:

Anonymous Stevee said...

I LOVE this top!! Such a great idea!

February 4, 2010 at 12:04 PM  
Blogger Jacinda said...

That ruffling technique is so cool! I need to try it! I want to put ruffles on everything. Such a cute shirt for V-day!

February 5, 2010 at 7:07 AM  
Blogger kelly said...

i almost bought that very fabric the other day :)

February 5, 2010 at 5:56 PM  
Blogger Angie - treasuresfortots@gmail.com said...

Love it! Come link your cute tute at my party: Thursday's Treasures!!
http://treasuresfortots.blogspot.com/2010/02/thursdays-treasures-week-9.html

February 11, 2010 at 6:12 PM  
Blogger Blessings Granted said...

Do you need a ruffle foot for this? As soon as I figure out my new machine I got for Christmas (a lot fancier than my old one), I want to tackle a modified version of this project. I want to do the same idea, but do it as an initial shirt for my daughter.

January 22, 2011 at 7:16 AM  
Blogger ecreech81 said...

Yes what foot to use?

March 13, 2011 at 12:31 PM  

Post a Comment

Subscribe to Post Comments [Atom]

<< Home