body { background:#fff url("http://www.blogblog.com/dots/bg_dots.gif") 50% 0; margin:0; padding:0 10px; text-align:center; font:x-small Verdana,Arial,Sans-serif; color:#333; font-size/* */:/**/small; font-size: /**/small; } /* Page Structure ----------------------------------------------- */ @media all { #content { background:url("http://www.blogblog.com/dots/bg_3dots.gif") no-repeat 250px 50px; width:700px; margin:0 auto; padding:50px 0; text-align:left; } #main { width:450px; float:right; padding:50px 0 20px; font-size:85%; } #main2 { background:url("http://www.blogblog.com/dots/bg_dots2.gif") -100px -100px; padding:20px 10px 15px; } #sidebar { width:200px; float:left; font-size:85%; padding-bottom:20px; } #sidebar2 { background:url("http://www.blogblog.com/dots/bg_dots2.gif") 150px -50px; padding:5px 10px 15px; width:200px; width/* */:/**/180px; width: /**/180px; } } @media handheld { #content { width:90%; } #main { width:100%; float:none; } #sidebar { width:100%; float:none; } #sidebar2 { width:100%; } } html>body #main, html>body #sidebar { /* We only give this fade from white to nothing to browsers that can handle 24-bit transparent PNGs */ background/* */:/**/url("http://www.blogblog.com/dots/bg_white_fade.png") repeat-x left bottom; } /* Title & Description ----------------------------------------------- */ @media all { #blog-title { margin:0 0 .5em; font:250%/1.4em Georgia,Serif; color:#353; } #blog-title a { color:#353; text-decoration:none; } #description { margin:0 0 1.75em; color:#996; } #blog-mobile-title { display:none; } #description-mobile { display:none; } } @media handheld { #blog-title { display:none; } #description { display:none; } #blog-mobile-title { display:block; margin:0 0 .5em; font:250%/1.4em Georgia,Serif; color:#353; } #blog-mobile-title a { color:#353; text-decoration:none; } #description-mobile { display:block; margin:0 0 1.75em; color:#996; } } /* Links ----------------------------------------------- */ a:link { color:#488; } a:visited { color:#885; } a:hover { color:#000; } a img { border-width:0; } /* Posts ----------------------------------------------- */ .date-header { margin:0 0 .75em; padding-bottom:.35em; border-bottom:1px dotted #9b9; font:95%/1.4em Georgia,Serif; text-transform:uppercase; letter-spacing:.3em; color:#663; } .post { margin:0 0 2.5em; line-height:1.6em; } .post-title { margin:.25em 0; font:bold 130%/1.4em Georgia,Serif; color:#333; } .post-title a, .post-title strong { background:url("http://www.blogblog.com/dots/bg_post_title.gif") no-repeat 0 .25em; display:block; color:#333; text-decoration:none; padding:0 0 1px 45px; } .post-title a:hover { color:#000; } .post p { margin:0 0 .75em; } p.post-footer { margin:0; text-align:right; } p.post-footer em { display:block; float:left; text-align:left; font-style:normal; color:#996; } a.comment-link { /* IE5.0/Win doesn't apply padding to inline elements, so we hide these two declarations from it */ background/* */:/**/url("http://www.blogblog.com/dots/icon_comment.gif") no-repeat 0 .25em; padding-left:15px; } html>body a.comment-link { /* Respecified, for IE5/Mac's benefit */ background:url("http://www.blogblog.com/dots/icon_comment.gif") no-repeat 0 .25em; padding-left:15px; } .post img { margin:0 0 5px 0; padding:4px; border:1px solid #cca; } /* Comments ----------------------------------------------- */ #comments { margin:0; } #comments h4 { margin:0 0 10px; border-top:1px dotted #9b9; padding-top:.5em; font:bold 110%/1.4em Georgia,Serif; color:#333; } #comments-block { line-height:1.6em; } .comment-poster { background:url("http://www.blogblog.com/dots/icon_comment.gif") no-repeat 2px .35em; margin:.5em 0 0; padding:0 0 0 20px; font-weight:bold; } .comment-body { margin:0; padding:0 0 0 20px; } .comment-body p { margin:0 0 .5em; } .comment-timestamp { margin:0 0 .5em; padding:0 0 .75em 20px; color:#996; } .comment-timestamp a:link { color:#996; } .deleted-comment { font-style:italic; color:gray; } .paging-control-container { float: right; margin: 0px 6px 0px 0px; font-size: 80%; } .unneeded-paging-control { visibility: hidden; } /* More Sidebar Content ----------------------------------------------- */ .sidebar-title { margin:2em 0 .75em; padding-bottom:.35em; border-bottom:1px dotted #9b9; font:95%/1.4em Georgia,Serif; text-transform:uppercase; letter-spacing:.3em; color:#663; } #sidebar p { margin:0 0 .75em; line-height:1.6em; } #sidebar ul { margin:.5em 0 1em; padding:0 0px; list-style:none; line-height:1.5em; } #sidebar ul li { background:url("http://www.blogblog.com/dots/bullet.gif") no-repeat 3px .45em; margin:0; padding:0 0 5px 15px; } #sidebar p { margin:0 0 .6em; } /* Profile ----------------------------------------------- */ .profile-datablock { margin:0 0 1em; } .profile-img { display:inline; } .profile-img img { float:left; margin:0 8px 5px 0; border:4px solid #cc9; } .profile-data { margin:0; line-height:1.5em; } .profile-data strong { display:block; } .profile-textblock { clear:left; } /* Footer ----------------------------------------------- */ #footer { clear:both; padding:15px 0 0; } #footer hr { display:none; } #footer p { margin:0; } /* Feeds ----------------------------------------------- */ #blogfeeds { } #postfeeds { padding-left: 20px }

Prudent Baby

Get sewing how to, sewing tutorials, and sewing help to learn sewing. We offer sewing tutorial for sewing moms.

Thursday, January 21, 2010

DIY Matryoshka & Owl Coasters


I know DIY mod podge coasters have been done a million times, but I needed some new coasters so I thought I'd share. Maybe you haven't tried it yet, if not you really should.  These are SO easy and so professional-looking that they make an ideal gift, and they cost less then $5 for a whole set.  You just need some cheap tiles, some paper, a little felt and mod podge.  Get the full DIY after the jump...


DIY Mod Podge Coaster Tutorial

1.  Purchase some tiles.  I bought six of the cheapest tiles I could find in glossy white, it was under $2.


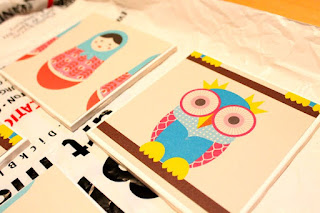
2.  Trace your tiles onto your paper.  I used these cute matryoshka and owl wrapping papers I found at the art supply store, but you can use any paper other than something printed on your inkjet printer (it will get all smeary):

Cut out the squares with an exacto knife about 1/8" to 1/4" smaller then your square on each side, depending on how much tile you'd like to see as a border:


3.  Doing one tile at a time, apply a light coat of Mod Podge(i used glossy) with a sponge brush, then center your paper on top.  Use your fingers to press the paper nice and flat.  Don't lift it up once you get it on or it will rip and be a big ole mess.


Let them dry for 20 minutes.

4.  While they are drying, cut out six squares of felt for the bottom of your coasters:


5.  With your sponge brush apply another light coat of mod podge to each tile.  Let the coat dry for twenty minutes.  Repeat this process five or six times.


6.  When your tiles are dry, turn them over and glue the felt squares to the back.  I used rubber cementbut I think tacky glue would work.  You could also use those felt dots that normally go on the bottom of furniture legs, or cork:


7.  You can use your coasters the next day but don't put anything hot on them for a month, that's how long it takes the mod podge to fully cure.  If you apply a sealant you can use them sooner as per the directions on the sealant, I used Polyurethane Spray:


You're done!  Drink up!

Labels: , , , , , , ,

32 Comments:

Anonymous Mrs. Priss said...

Ohhhh my. I need need neeeeeeed to make those matryoshka ones. What an awesome gift those would make!

January 21, 2010 at 9:36 AM  
Anonymous Mrs. Priss said...

No, like I'm seriously obsessing over the cuteness of those. I'm on the hunt for that paper, lol

January 21, 2010 at 9:36 AM  
Blogger Unknown said...

These are beautiful! And would make an amazing housewarming gift.

January 21, 2010 at 9:48 AM  
Blogger Jaime said...

mrs. priss i will see if i can dig up the manufacturer! i'll call the store and post it shortly...

January 21, 2010 at 10:02 AM  
Blogger Jaime said...

OK, i found it. it's made by a company called Nineteen Seventy Three and you can buy it online...BUT it's in the UK... http://www.nineteenseventythree.com/

I found a really cute matryoshka paper (possibly cuter?) on etsy though..here...
http://www.etsy.com/view_listing.php?ref=vt_related_1&listing_id=15804368

January 21, 2010 at 10:20 AM  
Blogger Jaime said...

oh and P.S. I bought it at Blick art supply but they don't have it on their website.

January 21, 2010 at 10:28 AM  
Anonymous Anonymous said...

Could you use scrapbook paper to make these?

January 21, 2010 at 10:31 AM  
Blogger Jaime said...

yes!

January 21, 2010 at 10:35 AM  
Anonymous Anonymous said...

woo hoo now I am excited

January 21, 2010 at 10:38 AM  
Blogger yes, please said...

love love love!! want the matryoshka ones.

January 21, 2010 at 10:52 AM  
Blogger Jacinda said...

I LOVE them so much! I think Mod Podge might be the best craft supply ever.

January 21, 2010 at 11:14 AM  
Blogger Jaimie said...

Cute! Where oh where do you buy tiles? Home Depot?

January 21, 2010 at 1:09 PM  
Blogger Jaime said...

i picked them up at some random tile warehouse i happened to drive by. just went in and said, can i buy some of your cheapest tiles for a craft project, and they said sure! but i'm sure you can get some at home depot too.

January 21, 2010 at 3:12 PM  
Blogger Dawn said...

Do you think there is a way to do these with photos?

January 21, 2010 at 5:45 PM  
Blogger Unknown said...

These are quite delightful! I posted a link to them on my blog today. :D

January 22, 2010 at 6:02 AM  
Anonymous Claire said...

Great tutorial! I can't wait to make these. There is some beautiful paper at my local craft store, but I have never had a reason to buy some. Now I do! Thanks!

January 22, 2010 at 1:50 PM  
Blogger melissa said...

I haven't tried decoupage for years - these look like a great re-introduction to Mod Podge.

I loved these so much I linked to your post on my blog, hope you don't mind!


http://undomesticmumma.blogspot.com

thanks, melissa

January 23, 2010 at 2:10 AM  
Anonymous Helen said...

What timing!
Im in the process of re-doing my kitchen and Im trying to make a custom window sill. I have the ceramic tiles and Im using very old german chocolate candy bar wrappers for my graphics. Problem is, I cant seem to apply any Modge Podge without leaving fine texture lines. Does it come in a spray? Can I dilute it and spray it? Id really love for these to come out as smoothly as possible.
Thanks in advance!

January 23, 2010 at 6:54 PM  
Blogger Jaime said...

helen, hi! so i know exactly what you are talking about and here is my suggestion, i haven't tried it though i've heard it works: use the "hard coat" formula mod podge and then sand it down after. but our friend amy at ModPodgeRocks.blogspot.com can probably answer this question for you even better because she is a mod podge expert...i'd check out her site and give her an email. she might even already have a post on it.

January 24, 2010 at 2:00 PM  
Blogger Jaime said...

Helen - Amy from ModPodgeRocks has an answer for you:

I just saw the comment and there is a solution to her problem!  She just needs to wet sand (very lightly) between coats.  That will get rid of the lines.  She can get something to wet sand at Home Depot, and she just needs a *very* fine grit.  After she's done she can also seal with clear acrylic spray.  It's going to be great!

yay!

February 3, 2010 at 11:57 AM  
Anonymous Anonymous said...

I buy cheap white tiles at Home Depot for coasters and trivets. Instead of felt, I buy a role of cork with contact paper backing and cut pieces to fit. The contact paper sticks to the tile backs just fine, so there's no need for messy glue.

February 25, 2010 at 6:37 PM  
Blogger Sara said...

I just made some coasters inspired by this DIY and blogged about it at the following link.

http://kenagy.blogspot.com/2010/05/coasters.html

I think I've seen that matrushka paper at the Paper Source but couldn't find it on their online store.

May 10, 2010 at 6:04 AM  
Blogger Tethered2Home said...

This is darling! Will have to give it a go!

July 14, 2010 at 4:35 AM  
Blogger kBr said...

i love love love love these! I'm gonna try this out!

August 10, 2010 at 10:10 AM  
Blogger Happy Homemaker And Momma said...

Wow-that would make a great gift!!! Amazing!!!

September 26, 2010 at 4:41 AM  
Blogger Unknown said...

I just tried these with scrapbook paper and a couple of them seem to be pulling up around the edges. Do I need to use more Mod Podge? I've never used this before and kind of guessed on the amount.

December 9, 2010 at 9:01 AM  
Blogger Jaime said...

yeah you probably just need a little more and to press it down firmly and let it dry all the way before adding a layer on top!

December 9, 2010 at 9:03 AM  
Blogger Unknown said...

Thanks I'll try that! Now, how do I get my 1 year old and 2 year old to take a nap at the same time so I can finish them? :)

December 10, 2010 at 2:23 PM  
Blogger Denise said...

Hi I'm trying this project out today, and I'm wondering if the modge podge is waterproof enough to handle the condensation of cold drinks? Or should I just go ahead with the polyurethane sealant? Thanks!!

January 1, 2011 at 8:56 PM  
Blogger Caryn said...

both of those papers can be found at paper source, or on their website! i love them and will be using the owls for this project!

June 2, 2011 at 6:13 PM  
Blogger Lydia said...

These are so amazing, I have made a ton already using this DIY :)
I posted some on my blog (tohavemoxie.blogspot.com) and I am linking back to you!

July 20, 2011 at 7:11 AM  
Blogger maria said...

I tried this but upon applying a layer of diluted glue ( saw this wanna be tip of Modge Podge on Pintrest) it started to bubble. I didn't know what to do so I stopped before ruining all my tiles. Any advice?
Thanks!

October 2, 2011 at 6:35 PM  

Post a Comment

Subscribe to Post Comments [Atom]

<< Home