body { background:#fff url("http://www.blogblog.com/dots/bg_dots.gif") 50% 0; margin:0; padding:0 10px; text-align:center; font:x-small Verdana,Arial,Sans-serif; color:#333; font-size/* */:/**/small; font-size: /**/small; } /* Page Structure ----------------------------------------------- */ @media all { #content { background:url("http://www.blogblog.com/dots/bg_3dots.gif") no-repeat 250px 50px; width:700px; margin:0 auto; padding:50px 0; text-align:left; } #main { width:450px; float:right; padding:50px 0 20px; font-size:85%; } #main2 { background:url("http://www.blogblog.com/dots/bg_dots2.gif") -100px -100px; padding:20px 10px 15px; } #sidebar { width:200px; float:left; font-size:85%; padding-bottom:20px; } #sidebar2 { background:url("http://www.blogblog.com/dots/bg_dots2.gif") 150px -50px; padding:5px 10px 15px; width:200px; width/* */:/**/180px; width: /**/180px; } } @media handheld { #content { width:90%; } #main { width:100%; float:none; } #sidebar { width:100%; float:none; } #sidebar2 { width:100%; } } html>body #main, html>body #sidebar { /* We only give this fade from white to nothing to browsers that can handle 24-bit transparent PNGs */ background/* */:/**/url("http://www.blogblog.com/dots/bg_white_fade.png") repeat-x left bottom; } /* Title & Description ----------------------------------------------- */ @media all { #blog-title { margin:0 0 .5em; font:250%/1.4em Georgia,Serif; color:#353; } #blog-title a { color:#353; text-decoration:none; } #description { margin:0 0 1.75em; color:#996; } #blog-mobile-title { display:none; } #description-mobile { display:none; } } @media handheld { #blog-title { display:none; } #description { display:none; } #blog-mobile-title { display:block; margin:0 0 .5em; font:250%/1.4em Georgia,Serif; color:#353; } #blog-mobile-title a { color:#353; text-decoration:none; } #description-mobile { display:block; margin:0 0 1.75em; color:#996; } } /* Links ----------------------------------------------- */ a:link { color:#488; } a:visited { color:#885; } a:hover { color:#000; } a img { border-width:0; } /* Posts ----------------------------------------------- */ .date-header { margin:0 0 .75em; padding-bottom:.35em; border-bottom:1px dotted #9b9; font:95%/1.4em Georgia,Serif; text-transform:uppercase; letter-spacing:.3em; color:#663; } .post { margin:0 0 2.5em; line-height:1.6em; } .post-title { margin:.25em 0; font:bold 130%/1.4em Georgia,Serif; color:#333; } .post-title a, .post-title strong { background:url("http://www.blogblog.com/dots/bg_post_title.gif") no-repeat 0 .25em; display:block; color:#333; text-decoration:none; padding:0 0 1px 45px; } .post-title a:hover { color:#000; } .post p { margin:0 0 .75em; } p.post-footer { margin:0; text-align:right; } p.post-footer em { display:block; float:left; text-align:left; font-style:normal; color:#996; } a.comment-link { /* IE5.0/Win doesn't apply padding to inline elements, so we hide these two declarations from it */ background/* */:/**/url("http://www.blogblog.com/dots/icon_comment.gif") no-repeat 0 .25em; padding-left:15px; } html>body a.comment-link { /* Respecified, for IE5/Mac's benefit */ background:url("http://www.blogblog.com/dots/icon_comment.gif") no-repeat 0 .25em; padding-left:15px; } .post img { margin:0 0 5px 0; padding:4px; border:1px solid #cca; } /* Comments ----------------------------------------------- */ #comments { margin:0; } #comments h4 { margin:0 0 10px; border-top:1px dotted #9b9; padding-top:.5em; font:bold 110%/1.4em Georgia,Serif; color:#333; } #comments-block { line-height:1.6em; } .comment-poster { background:url("http://www.blogblog.com/dots/icon_comment.gif") no-repeat 2px .35em; margin:.5em 0 0; padding:0 0 0 20px; font-weight:bold; } .comment-body { margin:0; padding:0 0 0 20px; } .comment-body p { margin:0 0 .5em; } .comment-timestamp { margin:0 0 .5em; padding:0 0 .75em 20px; color:#996; } .comment-timestamp a:link { color:#996; } .deleted-comment { font-style:italic; color:gray; } .paging-control-container { float: right; margin: 0px 6px 0px 0px; font-size: 80%; } .unneeded-paging-control { visibility: hidden; } /* More Sidebar Content ----------------------------------------------- */ .sidebar-title { margin:2em 0 .75em; padding-bottom:.35em; border-bottom:1px dotted #9b9; font:95%/1.4em Georgia,Serif; text-transform:uppercase; letter-spacing:.3em; color:#663; } #sidebar p { margin:0 0 .75em; line-height:1.6em; } #sidebar ul { margin:.5em 0 1em; padding:0 0px; list-style:none; line-height:1.5em; } #sidebar ul li { background:url("http://www.blogblog.com/dots/bullet.gif") no-repeat 3px .45em; margin:0; padding:0 0 5px 15px; } #sidebar p { margin:0 0 .6em; } /* Profile ----------------------------------------------- */ .profile-datablock { margin:0 0 1em; } .profile-img { display:inline; } .profile-img img { float:left; margin:0 8px 5px 0; border:4px solid #cc9; } .profile-data { margin:0; line-height:1.5em; } .profile-data strong { display:block; } .profile-textblock { clear:left; } /* Footer ----------------------------------------------- */ #footer { clear:both; padding:15px 0 0; } #footer hr { display:none; } #footer p { margin:0; } /* Feeds ----------------------------------------------- */ #blogfeeds { } #postfeeds { padding-left: 20px }

Prudent Baby

Get sewing how to, sewing tutorials, and sewing help to learn sewing. We offer sewing tutorial for sewing moms.

Monday, December 14, 2009

Handmade Hanukkah Day 4: Mom & Daughter Ruffly Aprons


Scarlet loves to make pretend food in her play kitchen while I cook, so I thought wearing these ruffly aprons would be a nice little treat while we make latkes!  And while I was at it I made an extra set as a Christmas gift.

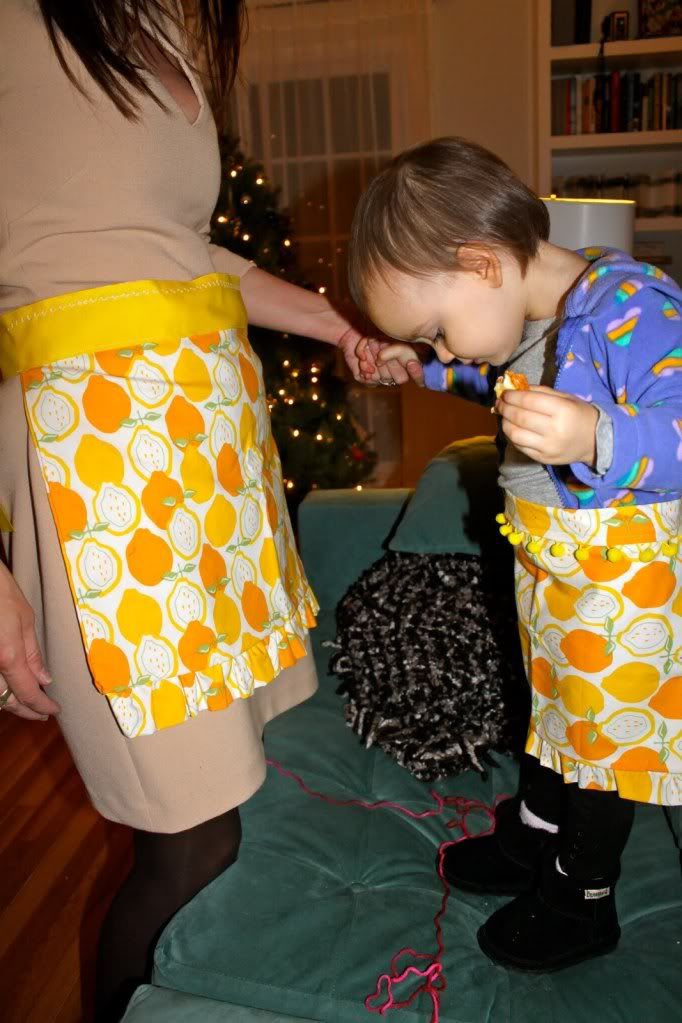
Each one had different embellishments like grosgrain ribbons or pom poms, get the full DIY apron how-to after the jump!


Mother & Daughter Ruffled Apron Tutorial

1.  Wash, dry, iron and cut your fabric.  You need two rectangles for the front and back of your apron, so hold a measuring tape up to yourself and your girl and see how wide and long you want them, and add 1/2".  I made mine 18" wide and 16" long so I cut my fabric 18.5"X16.5".  So if you're 6' and 104 pounds like me that should fit you.  Kidding.  Then you'll need a piece double the length and 3"-4" wide for the ruffle and another just like that for the sash, or some ribbon.


2. Let's make the ruffles.  Take your long skinny piece and fold it in half with wrong sides facing and iron:
Sew with a basting stitch (a straight stitch set as wide as your machine will allow):
Pull on the top thread and push on the fabric (gently) to gather the ruffle:
Looky there!
You want to finish the ends of your ruffle so first make sure it is gathered to the proper length by laying it against your apron front fabric.  When you have it gathered to the proper length fold the edges in and sew closed.

3.  Now take one of your front apron piece and lay it right side up.  Pin your ruffle on top with the ruffle facing to the inside.  Try to make sure your ruffling is evenly distributed.  Sew it on with a basting stitch, just inside of the stitch on your ruffle.

4.  Now lay the other piece of apron fabric on top right sides facing (so you have a ruffle sandwich) and pin in place:
Then sew with a straight stitch along the line you basted and up both perpendicular sides.  So three sides are sewn and the side opposite the ruffle is left open.  Trim your edges and clip the corners:
Turn inside out, look how cute your ruffles are!

5.  Now it's time to make your sash.  I did it a few different ways.
Version 1:
For a fabric sash, take your other long skinny piece of fabric and fold the edges in 1/4" and iron, then fold in half and iron like so:
 
Center it around the open top of your apron (fold the sash in half and the apron in half to find the centers) and pin in place:
Fold the ends of the sash in, iron and pin like so:
Sew in place with edge stitch in coordinating thread along the edge of the seam all the way from one corner, across the apron front to the other corner.

All done with version one!

Version 2:
Create your sash by folding, ironing and pinning same as above, but add a cute trim.  I used leftover pom poms from the pom pom pillow:
Sew in place and voila:

Version 3:
Cut a length of grosgrain ribbon and pin it to the top edge of the BACK of your apron with right side UP (my ribbon is the same on both sides, but if yours isn't this is important).  Pin it about 1/4" into your fabric so the bulk of the ribbon is not on top of your fabric:
Sew it in place.  i didn't have any yellow thread so I decided to go with the contrasting white and use a fancy flower shaped stitch my machine has:
Now fold it over to the front of your apron and pin it in place, so the line you just sewed is now at the top of your apron:
Sew the bottom edge in place.  Done:

Hang them all next to each other and think how cute it will be when all the Curtis ladies are in the kitchen wearing them together!

Labels: , , , , , , , ,

6 Comments:

Blogger Anne said...

What a sweet project!! I featured your apron tutorial on Craft Gossip Sewing:
http://sewing.craftgossip.com/tutorial-matching-ruffle-aprons-for-mom-and-daughter/2009/12/14/

--Anne

December 14, 2009 at 7:12 PM  
Blogger Jacinda said...

That is so sweet. Look at Scarlet loving to match her mama!!

December 14, 2009 at 10:55 PM  
Blogger asia said...

so cute! love this project... if only i had the courage to break in my sewing machine

December 14, 2009 at 11:21 PM  
Blogger Miri said...

Adorable aprons!

I love that you're doing a Handmade Hanukkah series! Last year I posted two Hanukkah stitcheries and a gift bag pattern-you can access them on my side board-but I didn't do anything this year.

December 15, 2009 at 6:12 AM  
Anonymous Kathie said...

Sweet...but I'd do a full-length apron for my pot-bellied little one -- much of what she drops lands on her shirt!

December 15, 2009 at 12:10 PM  
Blogger Erika Mulvenna said...

I love these aprons! Thanks so much for the tutorial!

December 15, 2009 at 7:06 PM  

Post a Comment

Subscribe to Post Comments [Atom]

<< Home