body { background:#fff url("http://www.blogblog.com/dots/bg_dots.gif") 50% 0; margin:0; padding:0 10px; text-align:center; font:x-small Verdana,Arial,Sans-serif; color:#333; font-size/* */:/**/small; font-size: /**/small; } /* Page Structure ----------------------------------------------- */ @media all { #content { background:url("http://www.blogblog.com/dots/bg_3dots.gif") no-repeat 250px 50px; width:700px; margin:0 auto; padding:50px 0; text-align:left; } #main { width:450px; float:right; padding:50px 0 20px; font-size:85%; } #main2 { background:url("http://www.blogblog.com/dots/bg_dots2.gif") -100px -100px; padding:20px 10px 15px; } #sidebar { width:200px; float:left; font-size:85%; padding-bottom:20px; } #sidebar2 { background:url("http://www.blogblog.com/dots/bg_dots2.gif") 150px -50px; padding:5px 10px 15px; width:200px; width/* */:/**/180px; width: /**/180px; } } @media handheld { #content { width:90%; } #main { width:100%; float:none; } #sidebar { width:100%; float:none; } #sidebar2 { width:100%; } } html>body #main, html>body #sidebar { /* We only give this fade from white to nothing to browsers that can handle 24-bit transparent PNGs */ background/* */:/**/url("http://www.blogblog.com/dots/bg_white_fade.png") repeat-x left bottom; } /* Title & Description ----------------------------------------------- */ @media all { #blog-title { margin:0 0 .5em; font:250%/1.4em Georgia,Serif; color:#353; } #blog-title a { color:#353; text-decoration:none; } #description { margin:0 0 1.75em; color:#996; } #blog-mobile-title { display:none; } #description-mobile { display:none; } } @media handheld { #blog-title { display:none; } #description { display:none; } #blog-mobile-title { display:block; margin:0 0 .5em; font:250%/1.4em Georgia,Serif; color:#353; } #blog-mobile-title a { color:#353; text-decoration:none; } #description-mobile { display:block; margin:0 0 1.75em; color:#996; } } /* Links ----------------------------------------------- */ a:link { color:#488; } a:visited { color:#885; } a:hover { color:#000; } a img { border-width:0; } /* Posts ----------------------------------------------- */ .date-header { margin:0 0 .75em; padding-bottom:.35em; border-bottom:1px dotted #9b9; font:95%/1.4em Georgia,Serif; text-transform:uppercase; letter-spacing:.3em; color:#663; } .post { margin:0 0 2.5em; line-height:1.6em; } .post-title { margin:.25em 0; font:bold 130%/1.4em Georgia,Serif; color:#333; } .post-title a, .post-title strong { background:url("http://www.blogblog.com/dots/bg_post_title.gif") no-repeat 0 .25em; display:block; color:#333; text-decoration:none; padding:0 0 1px 45px; } .post-title a:hover { color:#000; } .post p { margin:0 0 .75em; } p.post-footer { margin:0; text-align:right; } p.post-footer em { display:block; float:left; text-align:left; font-style:normal; color:#996; } a.comment-link { /* IE5.0/Win doesn't apply padding to inline elements, so we hide these two declarations from it */ background/* */:/**/url("http://www.blogblog.com/dots/icon_comment.gif") no-repeat 0 .25em; padding-left:15px; } html>body a.comment-link { /* Respecified, for IE5/Mac's benefit */ background:url("http://www.blogblog.com/dots/icon_comment.gif") no-repeat 0 .25em; padding-left:15px; } .post img { margin:0 0 5px 0; padding:4px; border:1px solid #cca; } /* Comments ----------------------------------------------- */ #comments { margin:0; } #comments h4 { margin:0 0 10px; border-top:1px dotted #9b9; padding-top:.5em; font:bold 110%/1.4em Georgia,Serif; color:#333; } #comments-block { line-height:1.6em; } .comment-poster { background:url("http://www.blogblog.com/dots/icon_comment.gif") no-repeat 2px .35em; margin:.5em 0 0; padding:0 0 0 20px; font-weight:bold; } .comment-body { margin:0; padding:0 0 0 20px; } .comment-body p { margin:0 0 .5em; } .comment-timestamp { margin:0 0 .5em; padding:0 0 .75em 20px; color:#996; } .comment-timestamp a:link { color:#996; } .deleted-comment { font-style:italic; color:gray; } .paging-control-container { float: right; margin: 0px 6px 0px 0px; font-size: 80%; } .unneeded-paging-control { visibility: hidden; } /* More Sidebar Content ----------------------------------------------- */ .sidebar-title { margin:2em 0 .75em; padding-bottom:.35em; border-bottom:1px dotted #9b9; font:95%/1.4em Georgia,Serif; text-transform:uppercase; letter-spacing:.3em; color:#663; } #sidebar p { margin:0 0 .75em; line-height:1.6em; } #sidebar ul { margin:.5em 0 1em; padding:0 0px; list-style:none; line-height:1.5em; } #sidebar ul li { background:url("http://www.blogblog.com/dots/bullet.gif") no-repeat 3px .45em; margin:0; padding:0 0 5px 15px; } #sidebar p { margin:0 0 .6em; } /* Profile ----------------------------------------------- */ .profile-datablock { margin:0 0 1em; } .profile-img { display:inline; } .profile-img img { float:left; margin:0 8px 5px 0; border:4px solid #cc9; } .profile-data { margin:0; line-height:1.5em; } .profile-data strong { display:block; } .profile-textblock { clear:left; } /* Footer ----------------------------------------------- */ #footer { clear:both; padding:15px 0 0; } #footer hr { display:none; } #footer p { margin:0; } /* Feeds ----------------------------------------------- */ #blogfeeds { } #postfeeds { padding-left: 20px }

Prudent Baby

Get sewing how to, sewing tutorials, and sewing help to learn sewing. We offer sewing tutorial for sewing moms.

Monday, December 28, 2009

DIY Pocket Bib

Photobucket
Here is a super simple baby bib how-to.  You don't even need a pattern, just trace an old bib.  I like bibs with pockets to catch stray dribbles so I added one here.  You can even make this bib reversible if you want.  Get the how-to after the jump...

And thanks for the posts Craft Gossip and One Pretty Thing!

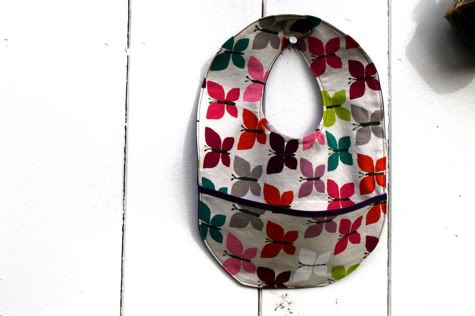
1.  Wash, iron and cut your fabric.  I used Alexander Henry Canyon Flutter in Pink (still available here) and some purple cotton from International Silks and Woolens. You can make your whole bib one fabric but I like to use two complimentary fabrics.  Fold a piece of fabric in half and do the same with an old bib, then trace the bib onto your fabric with a fabric marker.  Do it about 1/4" or 1/2" bigger all the way around to allow for your seam:

Now take the piece you just cut and trace it onto your other fabric and cut:
Now you want to cut your pockets, so trace along the bottom of your bib for the curve then cut straight across.  Do this on both fabrics, so you have two pocket pieces and two bib pieces, like so:
 

2.  Now we want to finish the top edge of our pocket, so place your two pockets pieces together wrong sides facing, and fold, iron, and pin a piece of bias tape to the top edge:
Sew in place:

3.  Now to sew our bib together.  Lay your front bib piece right side up, then lay your pocket on top the way you want it to appear on the finished bib.  I put all my butterflies on one side because I did not make this bib reversible, but it would have been cute to have the pocket purple on this side.  You decide:
Now lay the back piece of your bib on top, right side down, so your pocket is sandwiched in the middle, and pin in place:
Sew it together, leaving a hole for turning (backstitch at beginning and end):
See there's the hole for turning:

4.  Turn your bib right side out and iron it nice and flat, then top stitch all the way around, which will close your turning hole.  If you want to make your bib reversible, only top stitch around the top, not around the pocket.  That way you can turn the pocket to the other side.

5.  Sew velcro to the top.  I like to put the soft part of the velcro facing the baby so there's no chance of scratchiness on their soft baby neck:
Done!
Tune in tomorrow and I'll show you how to make the matching burp cloth so you have a nice gift set.

Labels: , , , , , ,

14 Comments:

Anonymous Anonymous said...

OK, you two are driving me nuts....where do you get all the extra time and energy??? Want to come to RI and help me pack up, move and then decorate!??

December 28, 2009 at 5:19 PM  
Blogger Anne said...

Great tutorial! I featured it on Craft Gossip Sewing:
http://sewing.craftgossip.com/tutorial-pocket-bib-for-baby/2009/12/28/

--Anne

December 28, 2009 at 5:52 PM  
Blogger Rachel@oneprettything.com said...

I love it! Easy and so useful. Thanks so much for sharing, I'll be linking.

December 29, 2009 at 11:50 AM  
Blogger Carleton said...

Can I get one in an XXL for when Lobsterfest rolls around?

December 29, 2009 at 11:57 AM  
Blogger Jaime said...

i think the husband bib is totally going on the list. think of all the money we'd save on stain-out!

December 29, 2009 at 2:56 PM  
Anonymous carrie Ellis said...

Thanks for sharing the tutorial. I really like the butterfly fabric - do you recall what line/manufacturer it is from?

December 29, 2009 at 7:31 PM  
Blogger Jaime said...

carrie - it's alexander henry canyon flutter in pink - there's a link to it in step 1 up there. it's even prettier in person!

December 30, 2009 at 8:42 AM  
Blogger Unknown said...

I loved this tutorial. Thanks for sharing. Here is a link to the bibs I made! http://www.amysbrain.com/baby-bibs/
I can't wait to make more!

January 23, 2010 at 4:39 AM  
Blogger Sarah F said...

thank you, so helpful! i'm a sewing novice and i like your simple instructions. i'll be making these and the burp cloths for gifts and my own new one on the way!

February 12, 2010 at 10:47 PM  
Blogger Ashley said...

added a link for these tutorials to my blog. made both the bib and burp cloth. mine turned out great!! thanks for posting these tutorials. very easy to follow. great pix. =]

April 12, 2010 at 10:00 PM  
Blogger Unknown said...

I will definitely be making one or two of these! Great tutorial!!!

April 17, 2010 at 4:16 PM  
Blogger Unknown said...

I think these are great.. instead of doing reversible bibs, I've been doing the minky fabric on the back side.. I really like how soft it makes them and the mommies love them too!

-Sylvia
Antique Jewelry

November 8, 2010 at 1:06 PM  
Blogger Pretty Things by Laura H said...

I made some of these for my daughter with an adorable girly jungle print I found at Joann's.
Just follow this link to see pictures. Thanks! :)

http://prettythingsbylaurah.blogspot.com/2011/01/back-to-bobbin-with-prudent-baby-sewing.html

January 18, 2011 at 4:08 PM  
Blogger Krasimira Ganeva said...

Great tutorial! I post it in my blog and link it back to you here : http://krasart.com/?p=338

August 12, 2011 at 12:48 PM  

Post a Comment

Subscribe to Post Comments [Atom]

<< Home