body { background:#fff url("http://www.blogblog.com/dots/bg_dots.gif") 50% 0; margin:0; padding:0 10px; text-align:center; font:x-small Verdana,Arial,Sans-serif; color:#333; font-size/* */:/**/small; font-size: /**/small; } /* Page Structure ----------------------------------------------- */ @media all { #content { background:url("http://www.blogblog.com/dots/bg_3dots.gif") no-repeat 250px 50px; width:700px; margin:0 auto; padding:50px 0; text-align:left; } #main { width:450px; float:right; padding:50px 0 20px; font-size:85%; } #main2 { background:url("http://www.blogblog.com/dots/bg_dots2.gif") -100px -100px; padding:20px 10px 15px; } #sidebar { width:200px; float:left; font-size:85%; padding-bottom:20px; } #sidebar2 { background:url("http://www.blogblog.com/dots/bg_dots2.gif") 150px -50px; padding:5px 10px 15px; width:200px; width/* */:/**/180px; width: /**/180px; } } @media handheld { #content { width:90%; } #main { width:100%; float:none; } #sidebar { width:100%; float:none; } #sidebar2 { width:100%; } } html>body #main, html>body #sidebar { /* We only give this fade from white to nothing to browsers that can handle 24-bit transparent PNGs */ background/* */:/**/url("http://www.blogblog.com/dots/bg_white_fade.png") repeat-x left bottom; } /* Title & Description ----------------------------------------------- */ @media all { #blog-title { margin:0 0 .5em; font:250%/1.4em Georgia,Serif; color:#353; } #blog-title a { color:#353; text-decoration:none; } #description { margin:0 0 1.75em; color:#996; } #blog-mobile-title { display:none; } #description-mobile { display:none; } } @media handheld { #blog-title { display:none; } #description { display:none; } #blog-mobile-title { display:block; margin:0 0 .5em; font:250%/1.4em Georgia,Serif; color:#353; } #blog-mobile-title a { color:#353; text-decoration:none; } #description-mobile { display:block; margin:0 0 1.75em; color:#996; } } /* Links ----------------------------------------------- */ a:link { color:#488; } a:visited { color:#885; } a:hover { color:#000; } a img { border-width:0; } /* Posts ----------------------------------------------- */ .date-header { margin:0 0 .75em; padding-bottom:.35em; border-bottom:1px dotted #9b9; font:95%/1.4em Georgia,Serif; text-transform:uppercase; letter-spacing:.3em; color:#663; } .post { margin:0 0 2.5em; line-height:1.6em; } .post-title { margin:.25em 0; font:bold 130%/1.4em Georgia,Serif; color:#333; } .post-title a, .post-title strong { background:url("http://www.blogblog.com/dots/bg_post_title.gif") no-repeat 0 .25em; display:block; color:#333; text-decoration:none; padding:0 0 1px 45px; } .post-title a:hover { color:#000; } .post p { margin:0 0 .75em; } p.post-footer { margin:0; text-align:right; } p.post-footer em { display:block; float:left; text-align:left; font-style:normal; color:#996; } a.comment-link { /* IE5.0/Win doesn't apply padding to inline elements, so we hide these two declarations from it */ background/* */:/**/url("http://www.blogblog.com/dots/icon_comment.gif") no-repeat 0 .25em; padding-left:15px; } html>body a.comment-link { /* Respecified, for IE5/Mac's benefit */ background:url("http://www.blogblog.com/dots/icon_comment.gif") no-repeat 0 .25em; padding-left:15px; } .post img { margin:0 0 5px 0; padding:4px; border:1px solid #cca; } /* Comments ----------------------------------------------- */ #comments { margin:0; } #comments h4 { margin:0 0 10px; border-top:1px dotted #9b9; padding-top:.5em; font:bold 110%/1.4em Georgia,Serif; color:#333; } #comments-block { line-height:1.6em; } .comment-poster { background:url("http://www.blogblog.com/dots/icon_comment.gif") no-repeat 2px .35em; margin:.5em 0 0; padding:0 0 0 20px; font-weight:bold; } .comment-body { margin:0; padding:0 0 0 20px; } .comment-body p { margin:0 0 .5em; } .comment-timestamp { margin:0 0 .5em; padding:0 0 .75em 20px; color:#996; } .comment-timestamp a:link { color:#996; } .deleted-comment { font-style:italic; color:gray; } .paging-control-container { float: right; margin: 0px 6px 0px 0px; font-size: 80%; } .unneeded-paging-control { visibility: hidden; } /* More Sidebar Content ----------------------------------------------- */ .sidebar-title { margin:2em 0 .75em; padding-bottom:.35em; border-bottom:1px dotted #9b9; font:95%/1.4em Georgia,Serif; text-transform:uppercase; letter-spacing:.3em; color:#663; } #sidebar p { margin:0 0 .75em; line-height:1.6em; } #sidebar ul { margin:.5em 0 1em; padding:0 0px; list-style:none; line-height:1.5em; } #sidebar ul li { background:url("http://www.blogblog.com/dots/bullet.gif") no-repeat 3px .45em; margin:0; padding:0 0 5px 15px; } #sidebar p { margin:0 0 .6em; } /* Profile ----------------------------------------------- */ .profile-datablock { margin:0 0 1em; } .profile-img { display:inline; } .profile-img img { float:left; margin:0 8px 5px 0; border:4px solid #cc9; } .profile-data { margin:0; line-height:1.5em; } .profile-data strong { display:block; } .profile-textblock { clear:left; } /* Footer ----------------------------------------------- */ #footer { clear:both; padding:15px 0 0; } #footer hr { display:none; } #footer p { margin:0; } /* Feeds ----------------------------------------------- */ #blogfeeds { } #postfeeds { padding-left: 20px }

Prudent Baby

Get sewing how to, sewing tutorials, and sewing help to learn sewing. We offer sewing tutorial for sewing moms.

Tuesday, December 29, 2009

DIY Burp Cloth How-to
Photobucket
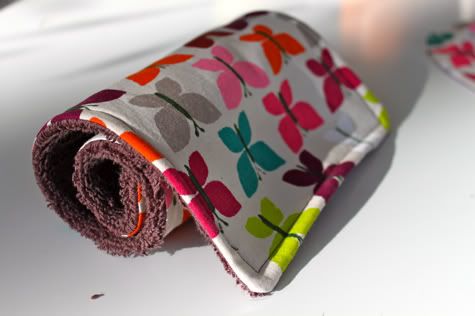
Yesterday we made a Pocket Bib and today we are making a matching terry burp cloth so we have a DIY bib & burp cloth gift set.  This burp cloth is wildly simple.

I used a terry hand towel but you could use any fabric you prefer.  Get the full burp cloth tutorial after the jump...
And thanks for the post Craft Gossip!


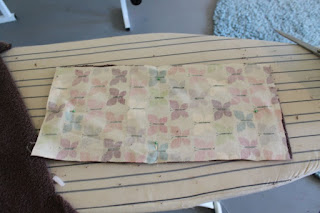
1. Wash, iron and cut your fabric.  I used the same Alexander Henry Canyon flutter in pink that i used for the pocket bib and a terry hand towel.  You can make it any size you like, just add 1/2" for the seam allowance.  I cut my fabric 18" X 8".


2. Pin your fabrics together right sides facing:

3.  Sew them together with 1/4" seam allowance, leaving a hole for turning and back stitching at the beginning and end:

4.  Trim the edges, clip the corners and turn it right side out, then iron it nice and flat:

5.  Top stitch around the edge, closing the turning hole as you go:

Voila!
Package it up with a matching bib and you've got an adorable gift set in under an hour for under $5!

Labels: , , , , , ,

15 Comments:

Blogger Abby said...

I can't sew very well, but I think I can handle this. I just won't let anyone look at my crooked stitches too closely, right?!

December 29, 2009 at 2:02 PM  
Blogger Jacinda said...

so pretty!

December 29, 2009 at 2:36 PM  
Blogger Anne said...

I love the idea for using a handtowel for the backing! The brightly colored terry cloth gives it a high-end boutiquey look.

I featured your tutorial on Craft Gossip Sewing:
http://sewing.craftgossip.com/tutorial-terry-cloth-burp-cloth/2009/12/30/

--Anne

December 30, 2009 at 6:40 AM  
Anonymous Anonymous said...

This is much better than another method I was thinking of. And I can get all the materials at the thrift store! Thanks for sharing :)

January 2, 2010 at 9:21 AM  
Blogger Natalia from Piece N Quilt said...

This is a darling idea! Thank you so much for sharing! I'm going to link to it on my blog http://sewwhattoday.blogspot.com

January 4, 2010 at 8:15 AM  
Blogger melanie said...

I made one! It turned out cute, but the edges are wavy. How did you get yours so straight? My seams were sewn straight and I ironed it well.

January 13, 2010 at 6:47 PM  
Anonymous Anonymous said...

what kind of fabric is that?

February 16, 2010 at 11:37 AM  
Blogger emi said...

lovely. i made one using a monogrammed handtowel. thanks for the tutorial!

March 2, 2010 at 2:54 PM  
Blogger sarah said...

Do these have issues in the wash without putting extra stitching in the middle somewhere to keep the two pieces from pulling away from each other?

April 30, 2010 at 11:46 AM  
Blogger Sarah said...

I LOVE that fabric... where did you get it?

June 27, 2010 at 12:58 PM  
Blogger Kelly said...

OOOOOO!!! It looks so easy!! I have to try this!!!!!!
Thank you so much!!!!
Baby girl is due in 2 weeks so I better get movin'

July 5, 2010 at 3:34 PM  
Blogger redmenace said...

I love this. I must be nesting because I just made 6 of these! Thank you. xoxoxox

August 10, 2010 at 4:10 PM  
Blogger Sara said...

I made a pile of burp cloths and personalized them with my Silhouette Machine. It's going to make a great shower gift.

http://saraandspice.blogspot.com/2011/02/what-better-way-to-start-day-than-with.html

February 18, 2011 at 9:35 AM  
Blogger Meg @ The Crunchy Conservative said...

This will be my first baby project!! 7 months to go...

April 5, 2011 at 8:24 AM  
Blogger Tiffany said...

Here is my finished project :)

July 20, 2011 at 6:57 AM  

Post a Comment

Subscribe to Post Comments [Atom]

<< Home