DIY Changing Pad Cover Tutorial
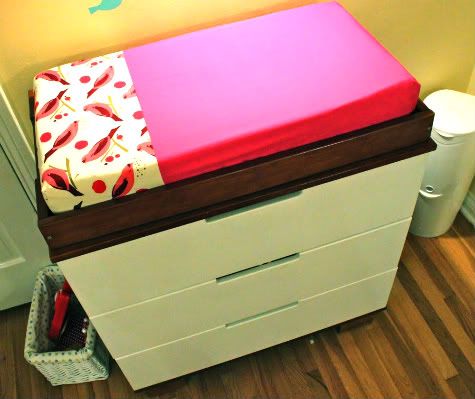
So changing pad covers get filthy, that doesn't mean they can't be cute. Just put the adorable fabric up where the baby's head goes.

And thanks for the post OhDeeDoh!
How To Sew a Changing Pad Cover
This changing pad cover fits a standard changing pad (32"L X 16"W X 3-4"H)
1. Wash, iron and cut your fabric. I used a pink cotton (though you might prefer a minkee or fleece) and Alexander Henry Bird Seed in pink (get it here).
My cover uses two different fabrics, but if you want to make a changing pad cover out of all one fabric, then just cut one piece 48"X32".
If you want to use two fabrics like me, you'll need two pieces:


My cover uses two different fabrics, but if you want to make a changing pad cover out of all one fabric, then just cut one piece 48"X32".
If you want to use two fabrics like me, you'll need two pieces:
Accent Fabric: 17.5" X 32"
Main Fabric: 30.5" X 32"

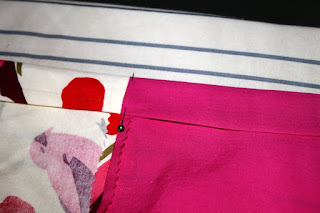
2. Lay your fabrics together along the 32" sides with right sides facing and sew, then trim your seam with pinking shears:

3. Now you have one big piece. Fold it in half lengthwise:

then again widthwise:

Now draw an 8" square at the outside corner (the one with no folds) like so:

Cut that baby out:

Now you have an item that looks like this:

4. Now bring the two sides of a square together, right sides facing:

and sew them together. repeat on all four corners. when you're done your changing pad cover will look something like this:

5. Now on the inside edge that's raw, fold it over 1/2" or so and iron, all the way around. Then fold it another inch, iron and pin in place. You are creating a tube for your elastic. Try to iron and pin the seam between the two fabrics open:

do this all the way around the inside edge of your changing pad cover:

6. Starting next to a corner, sew it in place at the edge of the seam, leaving a hole at the corner to feed your elastic through, backstitching at beginning and end:

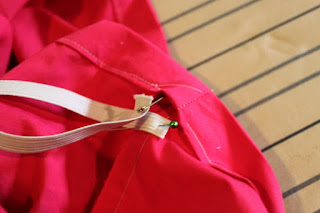
7. Cut a 36" piece of elastic, 5/8" thickness or smaller (i used 3/8"):

Attach a safety pin to one side and attach the other side to the changing pad cover with a pin and feed the elastic through the tube:

When you pull it out, sew the two sides together with a stretch stitch or with a straight stitch shaped like a box with an X in the middle:

And then sew the hole closed:

You're done! It should look like this from the bottom:

And like this from the top:

Labels: Baby, Bedroom, Decor, DIY, Gifts, In One Evening, Sewing
posted by Jaime @ 6:00 AM
![]()

41 Comments:
This is gorgeous! I recieved the same bird fabric in teal and orange as a Christmas gift from my Mother-in-law.
PS. You are totally picking up the slack for me with all of these amazing new DIYs. You are the best blog partner ever.
love the changing pad cover and the dresser it sits on, is it from ikea? Anyway, I'm going to be a follower now, you have such cute stuff. Too bad I'm pretty much done on the changing table phase, but it doesn't stop me from making baby gifts!! :)
thanks anna! the dresser/changing table is from Walmart!
Fabulous cover! I love it when simple projects yield such stylish results!
I featured your tutorial on Craft Gossip Sewing:
http://sewing.craftgossip.com/tutorial-sew-a-new-changing-pad-cover/2009/12/31/
--Anne
I want to make one for Joleen's nursery! So adorbale!
Perfect! Off to make one now.
I just bought a changing pad at Target the other day and was thinking about the best way to cover the ugly white plastic. Thanks so much for this easy and beautiful tutorial!
nikki! i want to see a picture!!
Does anyone know if this pattern needs to be modified for a contoured changing pad? Thanks! Looks great!
I just made this last night and your tutorial was so great and easy to follow! Thanks so much! It turned out really cute!
johnsenthree.blogspot.com
I'd also like to know if this pattern needs to be modified for a contoured change pad. Anyone?
hey there! the changing pad in this tutorial actually is contoured! so no, doesn't need to be modified, unless yours is especially thick, then you'd just need to add however many inches thicket it is all the way around, and the same number of inches to the squares you cut out at the corners. hope that answers your question!
I finally got around to posting a picture and linking your tutorial. Thanks so much for all your great ideas and tutorials! There are so many more that I plan on using, especially with the huge project of decorating our new nursery!
Thanks!
Socktopus Creations
I totally want to make some of these, but first, a quick question: when you sew the two fabrics together, how big is the seam allowance you used before trimming with the pinking shears?
hi colleen! just 1/4"
Thanks so much for this great tutorial! I featured it on my blog, miymdiary.blogspot.com this week because it's soooo incredibly brilliant. thanks again!
hi, I want to share this with a sewing friend of mine to make me a changing pad cover. Forgive my ignorance, but my changing pad is 17X33. What size fabric should I buy if I want one entire piece of fabric for the cover?
ss-one piece 49"x33" will do it!
This comment has been removed by the author.
yaaaaay, i just got a changing pad finally. baby macy was always in some other place then her own room to play and sleep. no longer. except right now while she drifts off on my lap. back to the point ive been wanting to make one of these. i just made the snappy toddler shirt for my 7 month old. shes very tall so it turned out great,
Just made two of these. Thanks for the fabulous tutorial! Room is almost complete. Yay!
I did't even own a sewing machine but I just HAD to try this!
Worked out beautifully. Thanks so much!
Here's a link to my post:
http://www.chiccheapnursery.com/2010/do-it-yourself/diy-changing-pad-cover-crib-sheet-tutorial/
I just made a cover up for my neighbor and have some fabric left over. I'm going to give at a shot. I've never done anything with elastic, so wish me luck. Her babies room is zebra and pink.
Tiphanie
Thanks for posting this! Your tutorial was easy to follow and the cover came out perfect for my changing pad. I used a large piece of fleece that I had left over from making nursing pads. I'm going to get some more fleece and make a second one. I used a 1/4" elastic because that's what I had on hand but I wish I bought something wider because the ends were so hard to sew together!
Thanks so much for the tutorial. I used some leftover flanelette for the main part and cut up a towel for the top. I will have to make a 2nd one for when this one is in the laundry!
Do you do anything to allow the safety strap to come through? My changing pad has a safety strap to keep the baby safe.
on our changing pad the straps wrap around from underneath, but if you wanted to add a hole, i recommend doing a buttonhole!
This comment has been removed by the author.
love it..thank u!
I just made one with a brown minky fabric and it only took 20 minutes during nap time! Thanks for the pattern, even a little accomplishment makes me feel like i've conquered the world with a 6 week old to take care of.
Love this Idea! Making one on tuesday :)
Thank you so much for this tutorial. I used it to make one for my new baby and blogged about it (and linked back to your site) http://daniellebartran.blogspot.com/2011/02/baby-projects-changing-pad-cover.html
This comment has been removed by the author.
Nevermind my previous comment- I figured it out once I got to that step while making it. :)
Love this! Exactly what I was looking for! Thanks so much for all the wonderful ideas on this blog - I use it all the time!
This is perfect! I have a friend who wants me to make a changing table cover but I have never made one and wasn't sure how to do it. It's the same as making a crib sheet, just smaller. Thank you
It worked! I just finished mine. Thanks so much for sharing the tutorial. I can't wait to make another one for backup.
Thank you!!! This finally got me off my butt to use extra fabric I'd bought for my son's bedding. I even had extra flannel to make diaper wipes. Two covers in less than an hour and that match his things perfectly. I didn't iron though...just basted it down since I am lazy and thread is cheap :p. YOU ROCK!!!
This comment has been removed by the author.
This comment has been removed by the author.
Post a Comment
Subscribe to Post Comments [Atom]
<< Home