body { background:#fff url("http://www.blogblog.com/dots/bg_dots.gif") 50% 0; margin:0; padding:0 10px; text-align:center; font:x-small Verdana,Arial,Sans-serif; color:#333; font-size/* */:/**/small; font-size: /**/small; } /* Page Structure ----------------------------------------------- */ @media all { #content { background:url("http://www.blogblog.com/dots/bg_3dots.gif") no-repeat 250px 50px; width:700px; margin:0 auto; padding:50px 0; text-align:left; } #main { width:450px; float:right; padding:50px 0 20px; font-size:85%; } #main2 { background:url("http://www.blogblog.com/dots/bg_dots2.gif") -100px -100px; padding:20px 10px 15px; } #sidebar { width:200px; float:left; font-size:85%; padding-bottom:20px; } #sidebar2 { background:url("http://www.blogblog.com/dots/bg_dots2.gif") 150px -50px; padding:5px 10px 15px; width:200px; width/* */:/**/180px; width: /**/180px; } } @media handheld { #content { width:90%; } #main { width:100%; float:none; } #sidebar { width:100%; float:none; } #sidebar2 { width:100%; } } html>body #main, html>body #sidebar { /* We only give this fade from white to nothing to browsers that can handle 24-bit transparent PNGs */ background/* */:/**/url("http://www.blogblog.com/dots/bg_white_fade.png") repeat-x left bottom; } /* Title & Description ----------------------------------------------- */ @media all { #blog-title { margin:0 0 .5em; font:250%/1.4em Georgia,Serif; color:#353; } #blog-title a { color:#353; text-decoration:none; } #description { margin:0 0 1.75em; color:#996; } #blog-mobile-title { display:none; } #description-mobile { display:none; } } @media handheld { #blog-title { display:none; } #description { display:none; } #blog-mobile-title { display:block; margin:0 0 .5em; font:250%/1.4em Georgia,Serif; color:#353; } #blog-mobile-title a { color:#353; text-decoration:none; } #description-mobile { display:block; margin:0 0 1.75em; color:#996; } } /* Links ----------------------------------------------- */ a:link { color:#488; } a:visited { color:#885; } a:hover { color:#000; } a img { border-width:0; } /* Posts ----------------------------------------------- */ .date-header { margin:0 0 .75em; padding-bottom:.35em; border-bottom:1px dotted #9b9; font:95%/1.4em Georgia,Serif; text-transform:uppercase; letter-spacing:.3em; color:#663; } .post { margin:0 0 2.5em; line-height:1.6em; } .post-title { margin:.25em 0; font:bold 130%/1.4em Georgia,Serif; color:#333; } .post-title a, .post-title strong { background:url("http://www.blogblog.com/dots/bg_post_title.gif") no-repeat 0 .25em; display:block; color:#333; text-decoration:none; padding:0 0 1px 45px; } .post-title a:hover { color:#000; } .post p { margin:0 0 .75em; } p.post-footer { margin:0; text-align:right; } p.post-footer em { display:block; float:left; text-align:left; font-style:normal; color:#996; } a.comment-link { /* IE5.0/Win doesn't apply padding to inline elements, so we hide these two declarations from it */ background/* */:/**/url("http://www.blogblog.com/dots/icon_comment.gif") no-repeat 0 .25em; padding-left:15px; } html>body a.comment-link { /* Respecified, for IE5/Mac's benefit */ background:url("http://www.blogblog.com/dots/icon_comment.gif") no-repeat 0 .25em; padding-left:15px; } .post img { margin:0 0 5px 0; padding:4px; border:1px solid #cca; } /* Comments ----------------------------------------------- */ #comments { margin:0; } #comments h4 { margin:0 0 10px; border-top:1px dotted #9b9; padding-top:.5em; font:bold 110%/1.4em Georgia,Serif; color:#333; } #comments-block { line-height:1.6em; } .comment-poster { background:url("http://www.blogblog.com/dots/icon_comment.gif") no-repeat 2px .35em; margin:.5em 0 0; padding:0 0 0 20px; font-weight:bold; } .comment-body { margin:0; padding:0 0 0 20px; } .comment-body p { margin:0 0 .5em; } .comment-timestamp { margin:0 0 .5em; padding:0 0 .75em 20px; color:#996; } .comment-timestamp a:link { color:#996; } .deleted-comment { font-style:italic; color:gray; } .paging-control-container { float: right; margin: 0px 6px 0px 0px; font-size: 80%; } .unneeded-paging-control { visibility: hidden; } /* More Sidebar Content ----------------------------------------------- */ .sidebar-title { margin:2em 0 .75em; padding-bottom:.35em; border-bottom:1px dotted #9b9; font:95%/1.4em Georgia,Serif; text-transform:uppercase; letter-spacing:.3em; color:#663; } #sidebar p { margin:0 0 .75em; line-height:1.6em; } #sidebar ul { margin:.5em 0 1em; padding:0 0px; list-style:none; line-height:1.5em; } #sidebar ul li { background:url("http://www.blogblog.com/dots/bullet.gif") no-repeat 3px .45em; margin:0; padding:0 0 5px 15px; } #sidebar p { margin:0 0 .6em; } /* Profile ----------------------------------------------- */ .profile-datablock { margin:0 0 1em; } .profile-img { display:inline; } .profile-img img { float:left; margin:0 8px 5px 0; border:4px solid #cc9; } .profile-data { margin:0; line-height:1.5em; } .profile-data strong { display:block; } .profile-textblock { clear:left; } /* Footer ----------------------------------------------- */ #footer { clear:both; padding:15px 0 0; } #footer hr { display:none; } #footer p { margin:0; } /* Feeds ----------------------------------------------- */ #blogfeeds { } #postfeeds { padding-left: 20px }

Prudent Baby

Get sewing how to, sewing tutorials, and sewing help to learn sewing. We offer sewing tutorial for sewing moms.

Friday, November 20, 2009

DIY Silky Baby Blanket


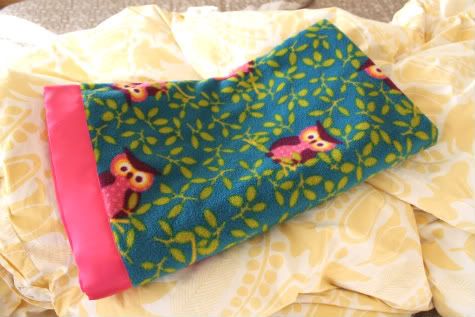
My daughter has one favorite blanket that she insists on sleeping with every night, but after two years it's a little stained and run-down.  What she seems to love about it is the soft coziness on one side and cool silkiness on the other.  It was a fancy, generous gift (thanks Stella!) so instead of buying a new one, I was hoping to be able to replace it by making one myself.  Did I succeed?  Let's see what Scarlet thinks...

It's a simple two sided blanket, but adding satin binding is a little tricky, learn how to sew a Silky Baby Blanket after the jump...

DIY Silky Baby Blanket with Mitered Corners

1. Pre-wash and cut your fabrics.  I used a cute owl fleece I found at JoAnne's and some pink poly-satin.  I cut my blanket to 43"X36" which is sort of random but it worked.  Pin them together wrong-sides facing:


2.  Sew all the way around with a straight stitch.  At the corners leave your needle in the fabric, lift the presser foot, pivot your fabric and continue sewing:

3.  Serge your edges or cut with pinking shears:

4.  Now we want to attach our Satin Blanket Binding.  First unfold it from the package and iron it so it's nice and flat.  Notice that one side is slightly shorter then the other.  The short side is the one you want on top as you sew:
Then fold one side in (like you're making a paper airplane):
Then the other so you have a nice point, and iron it:

5.  Now pin that to the middle of one side of your blanket, and pin the binding to the edge of that side:
Now don't sew the triangle down, just sew the binding on at the base all the way to the corner with a zig zag stitch (2.5 stitch length and 3.5 width worked for me).

6.  Now you want to make a mitered corner.  Here's how you do it.  Open the binding up and turn the corner, laying one side under the blanket with your blanket to the edge.  Sometimes it helps to pin the back of the binding to the blanket since it's so silky it can slip.
Fold the binding back over the blanket:

Create a nice sharp corner and pin in place.  You want to be sure your corner lines up on both sides so you can catch it all with one row of stitches:

Sew the corner seam with a zig zag stitch.  Then sew the binding onto the rest of that blanket side with a zig zag stitch.  FYI, because you are sewing with the slightly shorter side on top you will catch the bottom of the binding as well.  Just be careful as you pin to keep it centered and flat.  Sew all the way to the edge again and repeat this step until you have sewed on all four sides.  When you reach your starting point, cut your binding just long enough to slip under the original triangle you made and sew that down (i forget to take a picture sorry).

Hope and pray your daughter finds it as alluring as her favorite blanky.  Rejoice when you realize she DOES!  And it cost so much less then a store-bought version!

Prudent Price:
One Yard Owl Fleece from JoAnne's (with some to spare) $7.99
One Yard Poly Satin On Sale $2.99
One Package 2 inch satin blanket binding: $5.23
Total: $16.21

Labels: , , , , , , ,

5 Comments:

Anonymous Mel said...

This is adorable and inspiring, as always!

November 20, 2009 at 12:54 PM  
Blogger Anne said...

Love it!! Linked to your tutorial on Craft Gossip Sewing:
http://sewing.craftgossip.com/tutorial-soft-baby-blanket-with-silky-binding/2009/11/29/

--Anne

November 29, 2009 at 6:10 AM  
Blogger Kristin Sellars said...

Thanks for your tutorial! It totally helped me with the binding :)

March 11, 2010 at 8:19 PM  
Anonymous Anonymous said...

This looks perfect! I am going to try it for a baby gift!

July 19, 2010 at 5:33 AM  
Blogger Jennie said...

Thank you for this tutorial. I just used it to make a blanket for my baby son - first time using quilt binding and it turned out pretty well. :)

September 17, 2011 at 3:20 PM  

Post a Comment

Subscribe to Post Comments [Atom]

<< Home