body { background:#fff url("http://www.blogblog.com/dots/bg_dots.gif") 50% 0; margin:0; padding:0 10px; text-align:center; font:x-small Verdana,Arial,Sans-serif; color:#333; font-size/* */:/**/small; font-size: /**/small; } /* Page Structure ----------------------------------------------- */ @media all { #content { background:url("http://www.blogblog.com/dots/bg_3dots.gif") no-repeat 250px 50px; width:700px; margin:0 auto; padding:50px 0; text-align:left; } #main { width:450px; float:right; padding:50px 0 20px; font-size:85%; } #main2 { background:url("http://www.blogblog.com/dots/bg_dots2.gif") -100px -100px; padding:20px 10px 15px; } #sidebar { width:200px; float:left; font-size:85%; padding-bottom:20px; } #sidebar2 { background:url("http://www.blogblog.com/dots/bg_dots2.gif") 150px -50px; padding:5px 10px 15px; width:200px; width/* */:/**/180px; width: /**/180px; } } @media handheld { #content { width:90%; } #main { width:100%; float:none; } #sidebar { width:100%; float:none; } #sidebar2 { width:100%; } } html>body #main, html>body #sidebar { /* We only give this fade from white to nothing to browsers that can handle 24-bit transparent PNGs */ background/* */:/**/url("http://www.blogblog.com/dots/bg_white_fade.png") repeat-x left bottom; } /* Title & Description ----------------------------------------------- */ @media all { #blog-title { margin:0 0 .5em; font:250%/1.4em Georgia,Serif; color:#353; } #blog-title a { color:#353; text-decoration:none; } #description { margin:0 0 1.75em; color:#996; } #blog-mobile-title { display:none; } #description-mobile { display:none; } } @media handheld { #blog-title { display:none; } #description { display:none; } #blog-mobile-title { display:block; margin:0 0 .5em; font:250%/1.4em Georgia,Serif; color:#353; } #blog-mobile-title a { color:#353; text-decoration:none; } #description-mobile { display:block; margin:0 0 1.75em; color:#996; } } /* Links ----------------------------------------------- */ a:link { color:#488; } a:visited { color:#885; } a:hover { color:#000; } a img { border-width:0; } /* Posts ----------------------------------------------- */ .date-header { margin:0 0 .75em; padding-bottom:.35em; border-bottom:1px dotted #9b9; font:95%/1.4em Georgia,Serif; text-transform:uppercase; letter-spacing:.3em; color:#663; } .post { margin:0 0 2.5em; line-height:1.6em; } .post-title { margin:.25em 0; font:bold 130%/1.4em Georgia,Serif; color:#333; } .post-title a, .post-title strong { background:url("http://www.blogblog.com/dots/bg_post_title.gif") no-repeat 0 .25em; display:block; color:#333; text-decoration:none; padding:0 0 1px 45px; } .post-title a:hover { color:#000; } .post p { margin:0 0 .75em; } p.post-footer { margin:0; text-align:right; } p.post-footer em { display:block; float:left; text-align:left; font-style:normal; color:#996; } a.comment-link { /* IE5.0/Win doesn't apply padding to inline elements, so we hide these two declarations from it */ background/* */:/**/url("http://www.blogblog.com/dots/icon_comment.gif") no-repeat 0 .25em; padding-left:15px; } html>body a.comment-link { /* Respecified, for IE5/Mac's benefit */ background:url("http://www.blogblog.com/dots/icon_comment.gif") no-repeat 0 .25em; padding-left:15px; } .post img { margin:0 0 5px 0; padding:4px; border:1px solid #cca; } /* Comments ----------------------------------------------- */ #comments { margin:0; } #comments h4 { margin:0 0 10px; border-top:1px dotted #9b9; padding-top:.5em; font:bold 110%/1.4em Georgia,Serif; color:#333; } #comments-block { line-height:1.6em; } .comment-poster { background:url("http://www.blogblog.com/dots/icon_comment.gif") no-repeat 2px .35em; margin:.5em 0 0; padding:0 0 0 20px; font-weight:bold; } .comment-body { margin:0; padding:0 0 0 20px; } .comment-body p { margin:0 0 .5em; } .comment-timestamp { margin:0 0 .5em; padding:0 0 .75em 20px; color:#996; } .comment-timestamp a:link { color:#996; } .deleted-comment { font-style:italic; color:gray; } .paging-control-container { float: right; margin: 0px 6px 0px 0px; font-size: 80%; } .unneeded-paging-control { visibility: hidden; } /* More Sidebar Content ----------------------------------------------- */ .sidebar-title { margin:2em 0 .75em; padding-bottom:.35em; border-bottom:1px dotted #9b9; font:95%/1.4em Georgia,Serif; text-transform:uppercase; letter-spacing:.3em; color:#663; } #sidebar p { margin:0 0 .75em; line-height:1.6em; } #sidebar ul { margin:.5em 0 1em; padding:0 0px; list-style:none; line-height:1.5em; } #sidebar ul li { background:url("http://www.blogblog.com/dots/bullet.gif") no-repeat 3px .45em; margin:0; padding:0 0 5px 15px; } #sidebar p { margin:0 0 .6em; } /* Profile ----------------------------------------------- */ .profile-datablock { margin:0 0 1em; } .profile-img { display:inline; } .profile-img img { float:left; margin:0 8px 5px 0; border:4px solid #cc9; } .profile-data { margin:0; line-height:1.5em; } .profile-data strong { display:block; } .profile-textblock { clear:left; } /* Footer ----------------------------------------------- */ #footer { clear:both; padding:15px 0 0; } #footer hr { display:none; } #footer p { margin:0; } /* Feeds ----------------------------------------------- */ #blogfeeds { } #postfeeds { padding-left: 20px }

Prudent Baby

Get sewing how to, sewing tutorials, and sewing help to learn sewing. We offer sewing tutorial for sewing moms.

Monday, November 2, 2009

DIY Cozy Hanging Yarn Lamp


So there has been a tragedy in the Prudent Baby LA Office.  My sewing machine died a slow, painful death and now it's gone forever.  The NEW machine (thanks mom!) just arrived, but in the interim I was in my garage trying to scrunge up something crafty and I remembered the lace bowls and Jacinda's yarn version and came upon this idea for hanging lamps.  You could really do so many variations of these to match your nursery.  I used gray yarn, but you could use a variety of yarn colors in so many different patterns, or you could crochet a cover. You could even cut a hole in a doily bowl and use it if you're into that look.
Too easy, see how after the jump...
You'll need some yarn, some fabric hardener (or Jacinda used elmer's glue and it worked okay), and a bulb/cord kit.  I used a $3.99 Hemma cord set from Ikea.


1. Pick a shape for your light and find a bowl or vase that matches it.  Make sure there will be enough room for the bulb.  Cover your form in plastic wrap.


2.  Wear gloves.  This stuff is like glue, it feels really gross and crusty on your hands after a while.  Cut pieces of yarn and mix with the fabric hardener in a plastic bag.  Coat it really well, any dry spots will be floppy later.


3. Start placing your yarn in the pattern you'd like.  I just did a spiral, when I came to the end of a piece of yarn, I twisted the next piece around it so it would all stay together when dry.  This probably would have worked better if I had criss-crossed the yarn, or did two layers, I did have to touch up later because my infrastructure was a little weak, so consider that.  Also, don't wrap it so tight you can't get it off, using a bowl shape rather then a straight-up cylinder would have made for easier removal.


4. Let dry overnight. Every few hours gently pick it away from the plastic wrap so it doesn't totally stick.  It's not that big of a deal, like you don't need to get up in the middle of the night to pick at your yarn-lamp, I mean really. 


5. While that's drying cut a base for your lamp out of some cardboard.  I traced the bottom of my form onto the cardboard, and then traced the bulb socket in the middle:
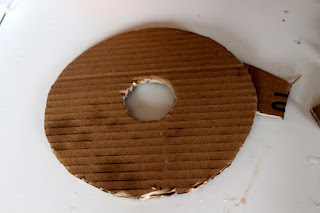


6. Spray paint it so it blends with your yarn:


7. Spray paint the bulb holder as well so it all blends:


8. Delicately remove your lamp from the form, place the cardboard base at the top and glue with some clear craft glue.  I also used some craft glue on the yarn in a few places because I hadn't criss-crossed the yarn enough, necessitating a little help.


9.  Place cord kit in, screw it on, add lightbulb, hang!


I can't vouch for the fire-safety-ness of this.  Does that make it a bad DIY?  ...maybe only leave it on while you're around.

Labels: , , , , , , ,

2 Comments:

Blogger Rachael said...

Awesome idea! I think I'll try it for my little sewing nook that needs some light. Thanks for sharing!!

November 2, 2009 at 1:06 PM  
Anonymous Ivy said...

I simply love it and I am going to give it a try for a a lamp over our dining room table!

January 15, 2010 at 4:51 AM  

Post a Comment

Subscribe to Post Comments [Atom]

<< Home