Two Minute T-Shirt Dress

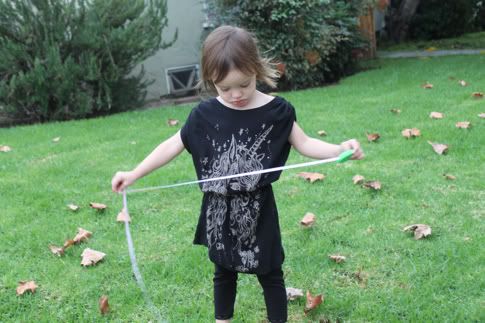
OK, so here's a dress you can sew out of an old t-shirt in literally two minutes (even faster then our most-popular-tute-ever the Ten Minute Onesie Dress). I showed this to you awhile back as part of a bigger post on doing more with less, but I wanted to share it with you again because it is Scarlet's MOST FAVORITE DRESS EVER and it took two minutes to make.

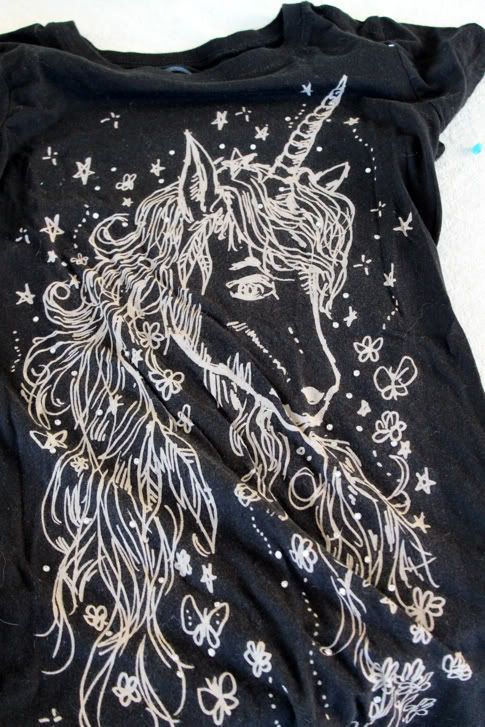
You guys seemed to like the Recycled Ruffle Sleeve Bubble T, and a bunch of you mentioned adding some old tees to the sewing pile. I have the same pile so I tried to use one of them to make the quickest, easiest, simplest possible dress. It seriously doesn't get any easier than this, it doesn't even involve any cutting. Also, this unicorn t-shirt was from Wal Mart, it's pretty cute right?Get the Two Minute T-Shirt Dress Tutorial after the jump...
And remember, leave a comment on this or any post this week and you could be the proud new owner of a yard of Jacinda's pom pom trim in any color you like!
Two Minute T-Shirt Dress
1. Acquire one t-shirt. I used a woman's t that my friend Kate bought me as gift for the White Trash BBQ. I don't know that unicorns are white trash, but unicorns+rhinestones+glitter+skin tight for an adult, probably qualifies?

2. Load your bobbin with elastic thread and regular thread on your spool. I used gray so you could see it, but normally I would recommend using the same color as your shirt in the spool. For tips on sewing with elastic thread visit this post. Now grab your shirt and find the seam at the top of the sleeve. Sew from the neckline to the end of the sleeve 1/2" from the seam on either side, backstitch at the beginning and end to hold your elastic thread in place. So you're sewing two straight lines:

Do that to both sleeves. Sleeves complete.
3. Now look at your shirt and imagine it as a dress on your kid. Choose a general waist area for it, a little low so it can pouf over. Then just start sewing in a spiral all around the shirt. I started at one side seam and just sort of went up and down, not paying attention to straight lines, spiraling around for 60 seconds, backstitching at the beginning and end:

See, it look sort of messy up close, but you'll never see it because it's gathered and the dress poufs over it anyway.

Done. Pretty cute for two minutes?

And one t-shirt put to good use. The kid LOVES it.

What do you think?
Labels: Baby, Before and After, Clothing, DIY, Kids, Recycle, Sewing, Under $5, Under an Hour

39 Comments:
SO stinkin' cute! I'm on the lookout for some cute grown-up shirts now!
AWESOME!! I LOVE this!! Now all I have to decide is which project to do with my old shirts!! THANK YOU for sharing!!!
OK, I really need to bite the bullet and give shirring a try. This project is AWESOME!!
Jess
jbeedelightful.blogspot.com
WOW that is awesome! She looks adorable with her t-shirt dress and leggings!
I am about to get my first sewing machine and this will be one of my first projects!!
cinsarah.blogspot.com
Very cute, I should whip something like this up for my girlie. She'd love the unicorn glittery dress too.
I love it!
Very nice! ^_^
This is really cute. I wish I had some old shirts so I could do one for my little girl.
shirr perfection!
pardon the pun, hehe!!! can't wait to try this one for my little fashionista, who's only 19 months by the way but already does fashion shows and FLIPS OUT in excitement when she gets a new outfit! she's a crackup!
ps. her birthday is coming up in july and i would LOVE to make her one of those cute little petti-rompers. I can't find a tutorial anywhere...do you have one? pretty pretty please????
This is absolutely adorable!!! If I ever have a little girl, I am going to be totally prepared for little girliness!!
Very cute. I heart easy sewing projects + re-using things in the closet. Well done!
Adorable!
um i love it!!!!!
cute! and I just figured out shirring yesterday too - perfect timing!
This dress design is looks such a very beautiful and unique design. She looks very pretty in this dress, This is best dress for wearing on birthday.
casino spel
Upcycling at its best (and easiest)!
Love cute & EASY ideas like this!
this could not have been better timing! i just acquired a few shirts that I wanted to make into dresses for my daughter, now I know how to do it! thanks!!
Didn't know about elastic thread. What a fun idea!
I Love this so much... Stinking adorable... I love reinventing things
I Love this so much... Stinking adorable... I love reinventing things
Very cute. And fast, whip up. Love it.
My daughter would go gaga over the unicorn and making it into a dress just makes it even more perfect.
Love the Unicorn!
Do you have any suggestions for making the elastic tighter? Mine is just a little loosey-goosey on the sleeves and I am not quite sure about how exactly it works. :)
Super! It would be cute with some ric rac on the waist too, so many things you can do with this idea! Thank you! I'm just loving your blog and think you ladies are doing something special by directing it towards moms. There aren't enough of these types of blogs and even if there were, they wouldn't top yours! Thank you for giving me so much inspiration!! xxoo
A loyal reader with a 15 month old crazzzzy daughter :)
This is adorable! And your little model is the cutest!
Love it! Great ideas!!!
clpena34(at)gmail(dot)com
I'm SO making that. Thanks for sharing!
This is the cutest idea! My 5 year old daughter is always wanting to wear my t-shirts and tanks for a dress and this is the ticket! I usually end up clipping it with a belt or safety pins. Thank you for all of your great ideas and craftiness to keep all of us prudentent mamas sewing for the kiddos!
super cute project
Love this idea!
This is sooooo cute!!! Too bad I can't find a shirt huge enough to make one in MY size. Waaah!
I linked to your tutorial on Craft Gossip Sewing:
http://sewing.craftgossip.com/tutorial-2-minute-t-shirt-tunic-dress-for-little-girls/2011/03/12/
--Anne
adorable!!!! I'm making this!
Wow this is soo cute! I have a few t-shirts that I knew were worth hanging on to in hopes of coming across and idea like this one. Thanks!!
Its cute...! and looks easy..! thankss...! :) <3
LOVE IT!
rockstarhousewife: mine was a bit baggy too, i follwed the shirring instructions but it was still baggy so what i did was go back over where i had already sewn on the sleeves..so i sewed straight over what was already gathered and it looked abit more like Scarlet's dress.
I am in the middle of sewing one for my friends 3yo Iris for her birthday.
I just made this dress tonight, marking my first-ever shirring project--shirring could get addictive! So excited to try it on my little one in the morning. When I get this project up on my blog (bethbeingcrafty.blogspot.com) I'll link to you. Your blog is a bit addictive too :)
I'm addicted to your site and just made this for Sidney. Not as awesome as yours, but not too shabby. Thanks!
I made this today and I LOVE how it turned out! The only thing is, the neck is too big on my two year old. How do you suggest I fix it? I was thinking of maybe doing some shirring on upper back, I think that would tighten it a bit. Any advice?
love love LOVE this!! Only thing is I just tried it for my little girl on one of my old T-Shirts, but the shirring ended up way too tight - the elastic popped when I put the dress over her head. Is there something I am doing wrong? How do you make the elastic end up 'looser'? I hand wound the bobbin, loosely, so not sure what else to try...! Any advice greatly appreciated :) Thanks
Post a Comment
Subscribe to Post Comments [Atom]
<< Home