Making Your Own Fabric Labels (& Carving Your Own Stamps!)

We have been swooning over your gorgeous potholder entries for The Sewing Machine Double Down.9 days left to enter!! One of the cutie-patoots entries is this set of play kitchen potholders featuring handmade fabric labels. So fun, right? So we asked the adorable Katie from Notes from a Very Red Kitchen to share her tute for Making Your Own Fabric Labels (& Carving your Own Stamps!)

Thanks Katie! Take it away!

Learn How to Make Fabric Labels and Carve Stamps after the jump.
The more you create handmade items--whether they be gifts or just things for your own family to enjoy--the more you'll want to make your creations look polished and professional. One quick, simple, and cheap way to do this is by making your own tags.
Handmade tags can be as simple as adding a small piece of folded bias tape or knit fabric before sewing a seam or as elaborate as professionally made stamps and ink pads. Today I'm going to show you one way that I've been making some handmade labels lately.
Materials:
To carve your own stamps and make your own labels, here's what you'll need (from left to right):
-plastic lid(s)
-felt scraps
-fabric paint(s)
-X-Acto knife
-artist carving block (or some other material to carve your stamps)
-fabric (I used a heavy muslin)
-pencil & paper (not pictured)
To carve my stamps, I bought this very basic X-Acto knife (it was cheaper than the generic brand), and this piece of artist carving block. I've read a handful of tutorials on carving your own stamps, I especially recommend reading this tutorial from The Storque) and seen a variety of materials used for carving into.
The three most common materials I've seen are corks, erasers, and linoleum. I wanted my stamps to be a step up from corks and erasers, but didn't want to pay for linoleum, so I took one step down and went for the artist carving block. This also proved to be a great decision because the artist carving block requires less carving tools. Where linoleum requires a whole set of carving tools, all I need to cut my little artist's block is this cheap-o X-Acto knife. Excellent.
Carving Your Stamp:Begin by drawing what you'd like to have on your stamp. Be sure to draw the shape with a pencil. Otherwise the next step may not work.
Trace over your drawing a couple of times with your pencil to make sure there's plenty of pencil for the stamp to pick up.
Press your drawing directly onto your carving block.
Ta-da! You will have an exact mirror image of your drawing.
*Note: If you are making a stamp with letters or numbers, just write your letters or numbers facing the right direction on your piece of paper. When you transfer your image onto the carving block it will be the mirror image. Then when you use your stamp the words or numbers will again read the right direction. So you never have to write anything backwards or upside down! Easy!
Next, using your X-Acto knife, cut a rectangle around your image.
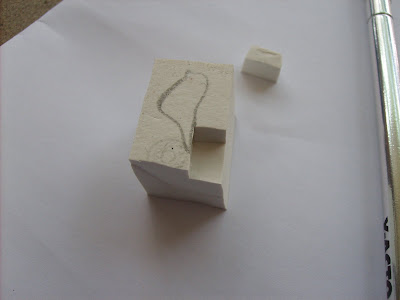
Now comes the trickier part. Using your X-Acto knife, carefully begin to cut away chunks of carving block, leaving your image as a raised stamp.
I find it's easiest to cut away the excess carving block by doing the following:
First, make a vertical cut (or cuts, as the case may be), along the line of your image.
Second, make a horizontal cut into the excess carving block, going in only as far as your vertical cut.
Third, remove the piece.
You may need to make smaller cuts around curved edges, but be able to make larger cuts along straight edges. If you're feeling nervous about it, try carving a simple shape with straight lines first like a triangle or square. Then, once you feel a little more comfortable, move on to shapes with rounded edges. It's really not hard to do, but it can be a little intimidating at first.
Continue doing this until you've carved away the excess block around your entire image.
Then, I like to carve just a little bit deeper around the entire image. This is fast and easy to do since you don't have to be quite as precise now that you're not working right next to your image. Also, it will save you from the frustration of having little bits of your background accidentally show up. By cutting deeper into your excess it ensures that your image is all that will show when you use your stamp. And when you're working with permanent fabric paint getting things done right the first time is important.
Now your stamp is ready to be used!
Stamping:
Before you can start stamping, you'll need to get a few things ready. (Unless you're cooler than me and you have a fabric ink pad. In that case you can just skip ahead to actually using your stamp.)
First, here's a look at the fabric paint I use:
I honestly couldn't tell you if this particular brand is better or worse than any other brand. I've had these sitting around in my stash since I was a single college kid making t-shirts with my roommates, so this is all I've ever used. But they work great! I've used them for painting directly onto t-shirts as well as for making these fabric tags and these paints have held up well for both.
Now, let's put these paints to good use. You don't want to put your stamp directly into a glob of paint because all the excess paint is likely to make a nice big blob on your fabric instead of the pretty little image you just carved into your stamp. So, in order to avoid the blobbiness, we'll make our own stamp pads. I learned how to do this in this tutorial from Handmade Therapy.
Find one plastic lid for each color of fabric paint you're going to use. Cut a scrap of felt (use an ugly color because you're just going to throw it away later) to fit inside the lid. With the underside of your lid facing up, squeeze a nice little glob of paint onto each lid.
Cover each glob of paint with a felt scrap.
Using your finger, lightly dab the felt into the paint until the paint just barely starts to show through the felt.
Now your stamp pads are ready.
Press your stamp into the felt ink pad a couple of times. You may not have very much paint show up at first.
Continue to press your stamp into the felt until the stamp is evenly coated with paint.
Press your stamp onto your fabric.
And, viola! Your very own printed label! Well, sort of. It's not quite there yet, but it's getting closer!
Here are some stamps I carved when I was first trying this out. From left to right they are, a wooden spoon, a scalloped edge, kl (my initials), and a heart.
To stamp multiple labels at once, I start with a long scrap of fabric. (Again, I'm using heavy weight muslin here. The piece in the picture above is 3" tall.)
Starting a little ways away from the edge (you'll need to leave enough room to fold your raw edges under), stamp your image(s).
(Ta-da!)
Continue stamping your images, leaving a good inch or two in between each image. You don't need a lot of extra fabric to fold under, but it'd be sad to have to scrap a label because you didn't leave enough extra room, so I say it's better to leave a little too much room and have to cut off some excess than have your images too close together.
The amount of paint you get on your stamp will make a difference in the finished appearance. In the image on the left I didn't get quite as much paint on the stamp as I thought I had. In the image on the right the stamps were evenly coated with paint. I like the look in both, but it's important to pay attention to the amount of paint on your stamp so you can come out with the look you want.
If you end up with an image like the one on the left (above) and you'd like to fix it to look more like the one on the right, just re-ink your stamp and carefully stamp over your original image. I had to do this a few times while I was making labels today and it looked just fine each time.
(This picture serves no real purpose, but isn't it pretty?)
Here are a few more stamp/image pictures to give you an idea of different combinations. Umm... and maybe just because they're pretty too.
(I added a little orange heart to our birdie friend.)
Love that little sideways heart. I bounce back and forth between using the scalloped edge with my initials and using the image above as my "logo" for labels. I like both.
Love this simple little wooden spoon. I feel like it hints at my random blog title. Notes From A Very Red Kitchen. Get it? Okay, okay...
Washing Your Stamps:
To clean your stamps (and lids), just run some cold water and rinse them out by gently rubbing your finger over the areas that still have paint.
When washing your stamps, make sure to get all the paint off, especially on the top of your image. In the picture above I'm pointing to the spot (the head of the birdie) that still has paint on it. You can see that all the paint is gone in the middle of the birdie. If you leave paint on your stamp it may peel off and make your images come out funny next time you use your stamp. Which would be no fun. So take a minute to gently rub down those stamps properly.
Yay! Clean stamps and lids!
Now they're all ready for next time.
Turning Your Printed Images Into Labels:
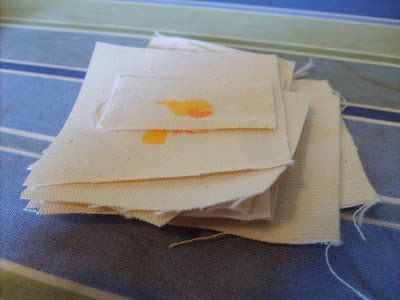
First, cut your printed images apart, leaving plenty of extra fabric around each image.
Just so you can get an idea of how much extra fabric you'll need, here's a point of reference for you. The label in the picture above had too much extra fabric. I ended up having to cut a lot of it off.
Our little birdie label, on the other hand, had just the right amount of extra fabric on the top, but not quite enough on the bottom. The sides also had too much and I ended up having to cut some off.
Once you work at it and make a few you'll get a feel for how much extra fabric you want around the edges, but I typically like to start with a little too much (probably 1/2" to 3/8" and cut down the extra after I've made and ironed my folds.
Okay, so back to our birdie tag.
Looking at the image on your label, fold under the raw edge, making sure your fold is even across the length of your image. (The edge may not be even on the back, but that doesn't matter. A level fold is what we're going for here.)
Using steam and brute force, iron that fold until it promises never to be a flat piece of fabric again.
Yes, it's okay to iron on top of the fabric paint.
Again, looking at the image on your label, fold the bottom raw edge under evenly and iron. (See what I mean about not leaving quite enough extra fabric down there on the bottom edge?)
This is what it should now look like from the back.
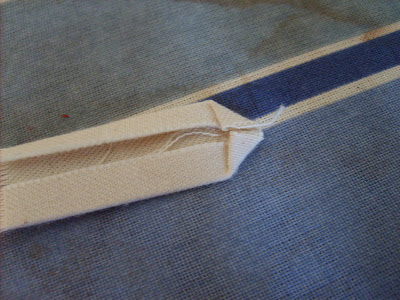
Next, carefully fold in the corners on each end. Iron and steam the folds in place.
The corners should be folded in as far as you want your edge to fold over when it's finished. I trimmed a little off each end before folding the edges over.
Now, with the corners already folded in, fold over the remaining edges on your tag and iron. Again, do this by looking at the front of your label so your lines are straight. The back should now look like this.
Ta-da! This is what our little birdie label now looks like from the front. Straight lines on our folds. No more raw edges.
Ready to be sewn onto a sweet little something.
-Pin the label on using two pins, one going up and down and the other going side to side. This is really just to hold the label in place while you get started. You shouldn't need to pin down each edge of your label since you told those folds who was boss by pressing them with steam and brute force.-Begin sewing on one of the bottom corners of the label.
-Making sure to backstitch as you begin and end, edgestitch (in other words, sew less than 1/8" away from the edge of your label) all the way around your label.
This will give you a polished look that will stand the test of time.
I wish you all the best of luck in creating your own labels! It's a fun way to add your signature to a handmade piece of work. I hope this tutorial has helped you feel more capable to do just that. Although, really, the hardest part is coming up with a design in the first place, right?
Labels: DIY, In One Evening


24 Comments:
I'm so often think about making my own labels! I guess it's a sign
What a fun project!
I love it! How simple and beautiful. ps yours what one of my favorites on the slideshow. . .good luck.
These are adorable. Great tutorial!
Awesome! What a great tutorial. Thank you!
I have looked at so many ways to make my own labels. I haven't wanted to buy a fancy stamp though so this will be great. Thanks!!!
Ashley- I haven't tried doing this on twill tape, but I think it would work just fine. Great idea!
This comment has been removed by the author.
Thank you so much for this tutorial! As soon as the weather is better I am going to get my supplies! -8* is way to cold to go out in!
I've been wanting to make my own tags forever just wasn't sure how to do it. Thank you so much for this how to! Now I don't have to continually answer "did you make this?".
Wow, what timing! I was just pricing tags on Etsy (very, very pricy-for me at least). I think I will have to try this first! An art teacher at the elementary school that I worked at had sets and sets of homemade stamps that she carved out of those cube, gum erasers. She said she would carve them at night while watching Wheel of Fortune. My husband is a wood carver, so I think I'll draw it and pass it off to him to carve.
This is amazing!!! Thank you soooosososoo much! Totally doing this!
Katie is amazing! Cute cute stamps!
This is so fantastic! I'm really excited to try it. I just bought some printable fabric to make labels, but I've been feeling a bit uncertain about it. THIS is more of what I was looking for! Just one thing, where did you get your artists carving block?
Thanks for the tutorial!
xoxo
Janee
yellowbirdyellowbeard.blogspot.com
Janee- I bought my artists carving block in the art supplies section of the bookstore on campus (my husband is still in college). But I'm sure you could find them online, and local art supply stores would likely carry them too. Best of luck!
I wondered how she made that when I saw her cute potholder--thanks for investigating and alerting the public! Great tutorial!
-brooke rains
I want to try this, too. I love the twill tape idea. Thanks, Katie!
What a great idea! I never thought of using linoleum block printing as a textile method. Although, I would recommend this style cutter if you're doing anything a little more complicated: http://www.dickblick.com/products/speedball-linoleum-cutters/
I just find them easier to handle.
Absolutely love this idea! Thanks so much for sharing.
I have been thinking about making labels for my new shop! (harmlesscolor.etsy.com)
Thanks so much for making me brave with your tutorial!
this is brilliant. i love how they turned out!.. perfect for labeling the kiddos clothing for school
thank you so much for the tutorial....i've been wondering about this for some time, but haven't have the nerve (or money) to try it out.
when i do get around to it, i'll be coming back here.
THANKS!!
this is so helpful!
This is an amazing tutorial!
Post a Comment
Subscribe to Post Comments [Atom]
<< Home