Zen and the Art of Cookie Cutter Maintenance
So it's finally happened, despite all of my anti-baking protests... I've become addicted to decorating fancy sugar cookies. Jacinda is a true expert at this craft, as you can see here, here, here, and especially here.
She once told me something I now understand to be so true: "Decorated sugar cookies are one of those things that people enjoy receiving - they love how cute they are and appreciate the hard work that went into them - but it's actually like fifty times more work than they realize." You sugar-cookie decorators know exactly what she's talking about, right?
Once you get into the craft of cookie decorating, you find yourself collecting various supplies (decorating bags, tips
, flower nails
, couplers
) and of course, cookie cutters. After treating myself to a Sur La Table cookie-supply shopping spree armed with Jacinda's list of Ten Tools for Decorating Sugar Cookies, I set down to get organized. Decorating tools and cookie cutters require specific maintenance - from removing the sticky tags (note: why do they put sticky price tag goo right onto cookie cutters???? Don't they know we are going to put them on our food? There must be a better way!), to avoiding rust, to efficient storage and organization.

I'm going to share the details on how to care for cookie cutters and my take on Zen and the Art of Cookie Cutter Maintenance after the jump...
Let us know your cookie cutter maintenance tips in the comments, you just might win that gorgeous Kokka fat quarter!
Zen and the Art of Cookie Cutter Maintenance
First let's go over How to Clean Cookie Cutters:
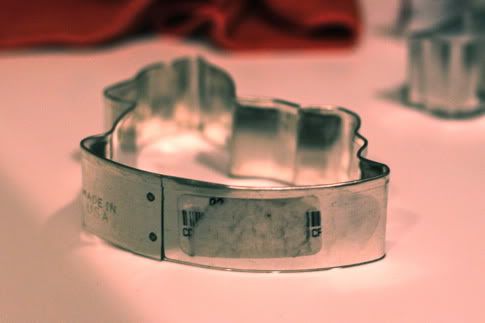
Most cookie cutters are made of tin. If they aren't properly cleaned and stored, they will get rusty around the edges and you'll end up with something you would never put near your food, like this:

So let me show you the right way to clean cookie cutters.
First off, when you get home from the store, they often have a stupid sticky price tag on them, ugh, it makes me crazy. I even bought a box set, and inside the box, every cookie cutter had a sticky tag, blech:
So we'll need to remove that. I use Goo Gone.

So douse the tag with a bit of goo gone and let it sit for a few seconds. Then you can just rub the tag right off. Sometimes it might take a few applications. Don't add water, that doesn't help. Sometimes the tag will all come off in one swoop, but often it'll go about this far:

Then you'll give it a second dose and be able to wipe the rest of the tag off. You don't need a scrub brush or sponge (they will just get gunked up), but you may want to wear gloves, particularly if you are doing a lot of cookie cutters at once.
Now, you don't want to eat goo gone, so immediately dunk the cookie cutter in a bowl of hot soapy water. Dawn works great to cut the grease away quickly. Give it a quick wipe with a sponge, rinse until the water is clean, then immediately dry the cookie cutter. You DO NOT WANT your cookie cutters to be wet for any amount of time, this invites rust. So dry that sucker before moving onto the next cookie cutter. Lay them on a dry towel as you move through your stash to let them further air dry.
If you live in a moist environment, I would even suggest giving them a quick blow dry to ensure they are completely dry before you put them away. This same cleaning process goes for every time you use a cookie cutter. Never put them in the dishwasher. Moisture is the enemy of tin cookie cutters.
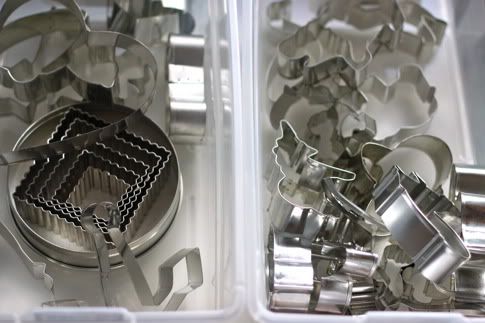
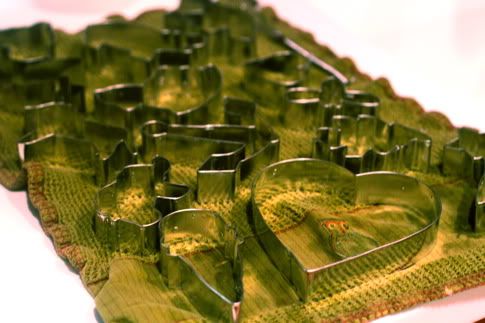
Now it is time to organize them (this is the zen part for me, it feels so good to get organized)! Depending on how many you have, you can go different ways, but if you learn to love baking and decorating cookies, your collection will grow quickly. I find that plastic shoe storage boxes are the perfect size to allow you to store them, but still be able to see them all and pick the one you want without having to empty the box.
I have a collection, but not a huge collection, so I split mine into three categories: Holiday, Animals, and Basic Shapes. Holiday holds Christmas, Hanukkah, Fourth of July, Halloween, etc. Animals is pretty self explanatory, but, I am about to outgrow the shoe box and I think I will be splitting it into Animals and Bugs (I have a lot of bug shaped cookie cutters, why is that?). Basic Shapes includes circles, squares, stars, anchors, etc. I debated whether the heart-shaped cookie cutters should be holiday (Valentines Day, right?) or basic shapes, but I decided that I will use them throughout the year, so they went into the shapes box. Is this too much detail, ha. I added a cute label to the front of each box:
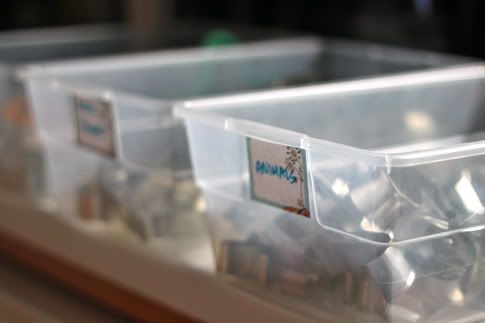
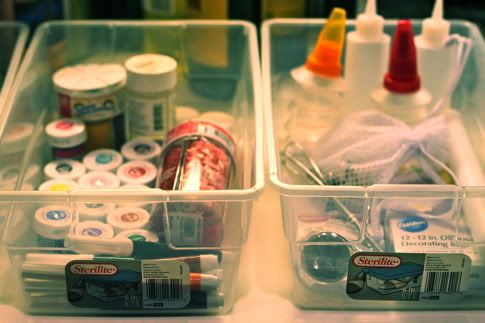
I also needed to move the decorating supplies out of the regular kitchen drawers to make space for things I use more often. So to that end, I created a box for "Tools" and a box for "Decoration."

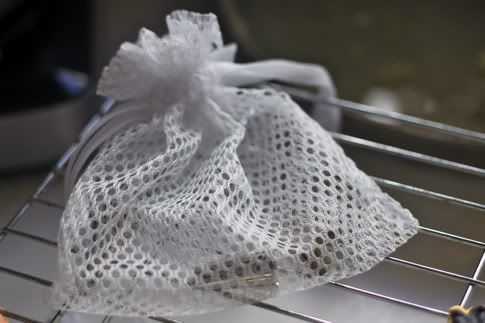
The Tools box includes:
Disposable Bags
Couplers
Toothpicks
Fondant Roller
Rolling Pin Guide Rings
Squeeze Bottles
etc. etc. It also includes decorating tips, which are so easily lost (you know you've put so many down the garbage disposal), so I store those in a mesh tip storage bag, which can also be used to put all your tips and couplers in when you throw them in the dishwasher.

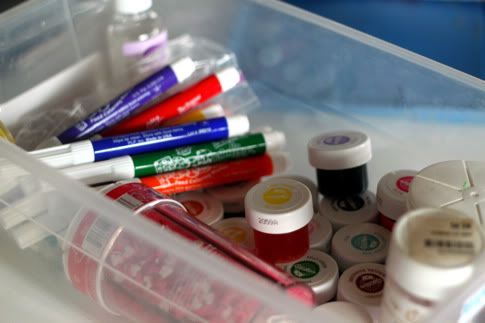
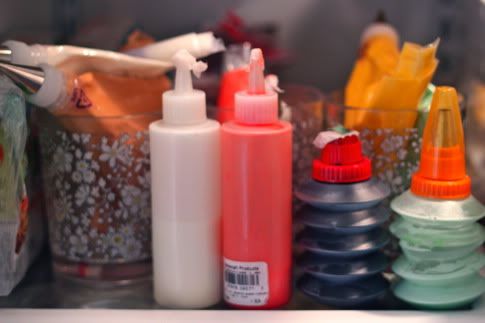
The Decorating Box holds:
Gel Food Coloring
Edible Coloring Pens
A variety of sprinkles and sugars
Shimmer Dust
Cake Sparkles
A few random cupcake toppers

When I took these pictures, the boxes looked a little empty, because so much of my stash was in use:
Looking at that makes me want one of these... and so it goes, the stash continues to grow...
The boxes fit perfectly at the bottom of our pantry, and because they are plastic shoe boxes they stack well:

So, I feel more Zen. Do you have any cookie cutter maintenance tips for us?
Labels: Kitchen, Organization, Supplies, Tips
posted by Jaime @ 2:00 AM
![]()

39 Comments:
You could throw one of hose little silica gel packs they put inside new shoes and bags into the cutter box. They absorb any moisture in the air, just make sure the kids don't eat it.
ohhhh I am off to buy plastic shoe boxes! All of my cookie things are in a big siplock baggie...this is MUCH better! :)
I can never, ever get into all the little nooks and crannies to dry my cookie cutters completely. After I lest a cute set to rust a few years ago, I started drying them in my toaster oven - you can also dry them in the regular oven if you don't have a small toaster oven.
I leave them all in the sink since running water won't dry, and then just let them run through a medium brown toast cycle. They get heated evenly, so anything that slipped into the grooves and crevices should be dry too.
I am so not interested in taking up sugar cookie design (at least not at this moment). I do however have a similar set of supplies for cake decorating. I will have to try the shoe boxes, right now my color dies are piled into a baggy, oozing all over each other...YUCK! Thank you for the tip.
wow.... My cookie decorating supplies are not that great compared to yours. I like the shoe boxes, my cookie cutters are in 2 large ziplock bags (one christmas, one not). My decorating supplies are just ziplock bags for frosting, and a tin full of sprinkles, candies.. I need to work on increasing my treasures. I do love decorating I am not that good at it though, maybe if I had those tools of inspiration.
Here's a great tip...teach your husband not to soak the cookie cutters in the sink overnight! I'm still working on that one. Of course, maybe I just need to teach myself to deal with the cookie cutters before taking him up on his offer to do dishes (good man!). =)
Heather
Ooo...I just thought of another one! Don't let your two year old get at the cookie cutters. Your perfect circles (used regularly for biscuits) will become squished beyond repair and all your biscuits will forever be heart shaped. (since that's the only other cutter you have that makes a decent size biscuit). This is actually cute and I wish I'd been making biscuit hearts all along!
Heather (can you tell we had a busy cookie decorating holiday season?)
I need to zen my kitchen. We have a huge kitchen, but a ton of appliances and party ware that fill our cabinets. It would be really nice if I could get all of my baking items into one cabinet.
Thanks so much the tips, I'll be trying these out soon.
I'm just picturing your sheer giddiness as you are trying to reach your "zen". I know we've all been there for something or another. I love the way you did this makes me want to make cookies, but really that won't happen as I really really don't like making them. I'll just stick with pies and cakes for people!
I actualy store my cookie cutters on a wall. Everytime I buy a new one i just ad a nail to the wall. That way they don't rust and I always know what I already have, which keeps me from buing similar cutters twice. And it looks pretty too.
wish I had a great comment for this. I just want a good sugar cookie recipe.... I mean a GOOOOD one! Come on Jacinda... you holding out on us!?
The title of this post made me laugh:) Zen and the Art of Motorcycle Maintenance is one of my husband's favorite books:)
Also...great tips on keeping the cookie cutters from rusting! I have a love hate relationship with cake/cookie decorating...ok mostly hate...but it makes me want to get rid of all my ghetto plastic cookie cutters and give it another go!
I use the oven method too, just set it at a low setting a wait a few minutes, and they're good to go! I also use small shoesize tupperware bins and store in my cabinet! I don't get to decorate my cookies often in a house full of growing boys ;)
Thanks for sharing, margie
yes, the oven method, good call! mama jill, this is the recipe jacinda and i use, from martha stewart of course: ideal sugar cookies
Oh jeez ... this post just made me feel bad. LOL! I have all my stuff shoved in a basket --- no organization whatsoever. I love your labeled boxes. I definetly need to do this!
This post will make my husband SO grateful! In a few hours, he'll be able to open the cabinets in our kitchen without ducking from falling decorating tools! My cookie cutters, currently, are looped on a long ribbon, but I'm sure they'll get bent that way. And all my other supplies are just dumped in a large box... it takes me ages to dig to the bottom to find the right dye, sprinkles, etc. Your labeled boxes are just adorable - and such a space-saver! BLESS YOU!
I'm so proud of any part that I had in creating this monster... as I find myself looking through your cutters making a note of which ones I don't have yet.
I have no tips, because I have no cookie cutters. But, because of this post I will begin to collect some and rediscover my love for baking! And now I will also know how to take care of them! Thanks for the inspiration!
Oh gosh, I needed a post like this.. mine are all rusting... and squished... what shapes are they?? No one can tell!
It looks like you just took a photo of our cabinets. One recommendation is to put any seasonal ones with your seasonal decorations so they aren't cluttering up the cabinets year round.
This came at the perfect time. Since we're "iced in" I've decided to get my cabinets back in order. After the holidays, everything seems to be out of order. lol Thanks for the tips. You know something else I just found, cookie cutters and dishwashers don't mix well either. I'm not sure why but after one round the the dishwasher, the cutters showed signs of major wear and some rust! Might be the brand I guess but I thought that was weird and learned a valuable lesson.
So. . . . I am cake decorator more thana cookie decorator, but I can see myself turning to the darker side. I use a small, flat, clear fishing lure box (donated by hubby before used fish lures had been placed in it, UGH fish spit) to store my tips by number. Each numbered tip has its own, small divided compartment to live in harmony with it's neighbors but not to be confused with its neighbors. And of course the OCD came out (as did my Ptouch) and each compartment has a labeled number over it, so I can find the tip quickly. It stacks nicely in the pantry and its so slim that it takes up minimal room. LOVE the zen of organization. Great work!
Those plastic shoe boxes are my best friend! All of my girls' toys are organized and stacked on a book shelf in the family room, the colouring supplies are stacked on the shelf above my fridge, and my cake decorating supplies are stacked in my cupboard. They're genius!
You know, it honestly hadn't occurred to me to organize my cookie clutter before I saw this, but I'm totally going to now! I have a cookie scoop in a bottomless drawer of utensils, cookie cutters thrown in somewhere amongst the rest of my baking stuff (which might explain why I couldn't find my gingerbread man at Christmas), decorating tips in another drawer (with my cutting boards. Whats up with that?) and sprinkles on my spice rack. But hey, at least I know where everything is! I think I'm going to get some stacking plastic drawers and stick them in a cupboard for all of my cookie clutter. That way, I can access a drawer without having to unstack or completely remove the box from the cupboard. Let's see how that works!
I was going to suggest like RandomCreativity...after washing cutters, cookie sheets, cake pans and muffin tins put them in the oven on a low setting or even just use the leftover warmth of the oven from when you were baking to dry them and prevent rusting. I do a lot of baking being a cake and cookie artist and have found this works for me very well.
www.smyleybears.weebly.com
Oh, I like the nail idea! We don't have a lot of wall space, though, stuck with a galley kitchen like we are (sigh). I just ditched all my plastic cookie cutters and am slowly buying new ones--I had to switch to gluten-free baking. Any special tips for copper cookie cutters? I bought the cutest little mini fish cutter so I can make my own gluten-free fish cheese crackers. I'd hate to see it rust.
amy - copper doesn't rust - maybe thats why the copper cookie cutters cost so much more :)
This isn't much of a tip, but I thought it was quite clever. While Christmas shopping for a client who loves to bake, I found the cutest little cookie cutters and they were strung on a metal hoop! How clever is that for keeping them together? I almost bought one for myself.
Ah, thanks, Jaime! The copper ones were a lot more but I had one of those Visa gift cards so it didn't quite register how much that itty bitty fish actually cost. ;) The cheese crackers were awesome and so cute, too. Totally worth it!
Well this isn't really about how to store them, but is a part of organizing...kinda..?? I used to have a hard time remembering which cutters I had when I was at the store browsing for new ones, so one day I spent a few hours with a composition book, tracing each cutter I had and then writing inside of the trace what it was or which brand or if it had any markings. Then I used markers to "color code" what they were. For example green ones are all Christmas cutter, red for valentines, etc. etc. That way I didn't have to worry about putting them in order in the pages since I'm always adding new ones anyway. :)
I have a tip, but it is not so much for cookie cutters as a general tip. Another way of getting labels and the sticky stuff they leave behind is to rub margarine over it and wait a couple of minutes and wipe. If it does not all come off in one go do it again. It works like a charm and I would rather do that with marg than put it on my bread! It works on plastic as well.
I hate using Goo Gone but I also hate sticky tag residue. I have found that if you blast the sticky tag with a hair dryer until it's heated a little, you can peel the sticker off much more easily. This works for anything- glass vases, shoes, cookie cutters, etc, because the heats breaks down the adhesive. It's also probably 95% more sanitary than Goo Gone.
http://one-girl-vs-world.blogspot.com
I store mine in my vintage tupperware canisters but I don't have a million like you two. And I will always love my plastic ones as much as my metal ones. My Snoopy is plastic, as well as some other great vintage ones. I would urge anyone purging plastic cutters to donate them to a thrift shop. People like me love finding those. I do like the oven method for the metal ones though. Very clever.
Jacinda - cookie cutters make good Christmas list fodder (just have to wait a year) : )
Such fantastic tips!! I posted a link on my other site (ediblecrafts.craftgossip.com). :)
I was just talking to a girlfriend last week about cleaning cookie cutters, and we weren't sure of the proper way, so thank you! I'll have to share this with her :)
I also use the oven method for anything tin/metal I have been using. The oven is absolutely the best for drying a metal grater or the pieces from a grinder placed on a cookie sheet.
I organized all my decorating tips, good colors, cookie cutters, etc years ago and am so glad I did. It makes life so much easier when you want to bake. I did this for my daughter on a recent trip to her house, during the holidays she was so thankful. The time it saves you by doing this is unbelievable.
Great post. You can dry the cookie cutter and your baking pans in the warm oven after baking. This helps prevent rust from forming.
I have waaaaaay more cutters than 3 shoeboxes worth, so I store Xmas in one, Halloween in another, and Easter in a 3rd (for these I keep the regular and mini-sized ones together.)
The rest I have fewer per theme, so I used cardboard in gallon-sized Ziplocks to keep the bags so they could stand upright and have all my, say, ocean-themed cutters in a bag. I have the cardboard so the cutters son't bunch up at the bottom. They are all in a single layer in each bag, so I can see them all at a glance. I have a basket that all my bagged cutters are in, and I can flip through them like record albums. I tuck mini cutters in smaller bags and have them on the side of the basket, since the basket is wider than the large bags. (Farm animals, sea life, other animals, princess/fairy tale, dog/cat, basic shapes, dinosaurs, etc, each in their own bag. Mini bags include alphabet, mini-farm animals, mini-vehicles, mini basic shapes, etc.)
I also have loads of muffin tins, so I use plastic shoeboxes and have them go in sideways, so I can grab one without knocking down a whole stack of them! Christmas-themed ones (with seasonal cupcake liners and picks tucked in) on one shelf, Halloween (also with liners and picks) on another, and all the rest on 2 other shelves. I use mini baskets (the width of a cutlery drawer compartment) to go alongside the plastic shoeboxes to fill out the cupboard shelves and have my frosting tubes, sprinkles, food coloring, etc in those. I hope to find skinny STACKING baskets to better utilize the space, but no luck yet.
And we haven't even TOUCHED all my bento gear yet! :P
Post a Comment
Subscribe to Post Comments [Atom]
<< Home