DIY "Pillowcase" Baby Dress Pattern
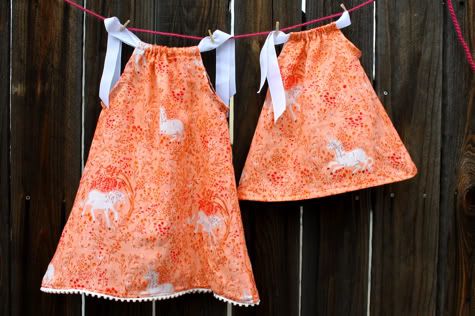
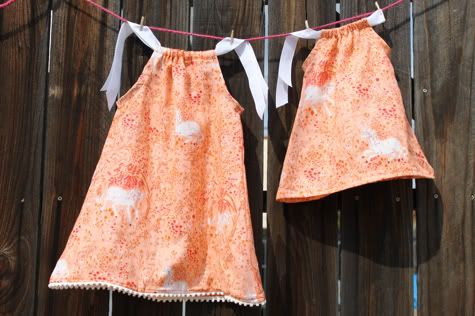
"Pillowcase" dresses are popular because they are so simple to make, the measurements aren't super important, and they can grow with baby from a dress into a top. I guess they are often made out of pillowcases but I used regular old fabric. The small one pictured here fits about 0-3 months and the large one is about a 2T, templates for both are after the jump. If you are new to sewing and want to try a dress, this is the one.

See pics of it on my girl here, and get the full DIY on How to Sew A Pillowcase Dress after the jump...
Pillowcase - Style Baby Girl Dress Free Pattern
1. First you need to cut your fabric. You need two identical pieces, a front and a back. The easiest way to determine your size is just to trace a dress that fits your child well:

However, I will share with you this drawing of the sizes I cut. The first is a 0-3 month size and the second is about a 2T. The great thing about this type of dress is the measurements don't need to be very specific and it will still fit, AND it can grow from a dress to a top as baby gets taller.
Baby Dress Template size 0-3 months:

Baby Dress Template size 18 months - 2T:

2. Lay your two dress pieces right sides facing and pin:

3. Sew up either side and finish the edges by serging, sewing with a zig zag or overlock stitch, or cutting with pinking shears:

2. Fold the bottom edge 1/4" to the inside and iron.

If you are going to skip a trim and just hem, then go ahead and fold another 1/2" iron and sew the hem in place (like the smaller dress pictured). If you want to add trim, then don't complete the hem. Instead, with your edge ironed just 1/4" under, pin your trim to the front of the dress aligned with the folded edge, with the pretty part of the trim up to the inside of the dress like so:

Sew it in place:

Now fold the trim under, iron and pin:

Here's a shot of the folding in action:

Top stitch into place to complete your trimmed edge:

3. Now grab a piece of single-fold bias tape, it's the one that looks like this:
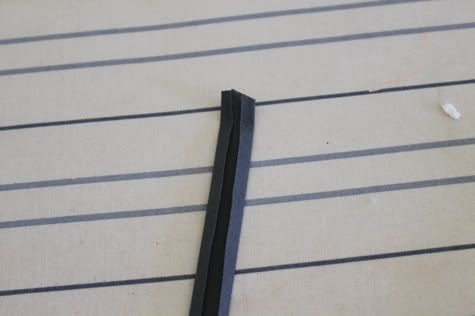
Open the bias tape and align one edge with the armholes on the right side of your dress and pin it in place all the way around:
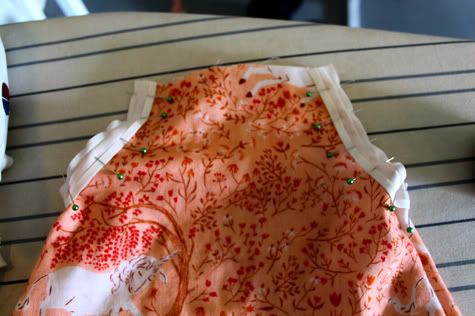
Sew in place along the fold:

Now flip the bias tape all the way to the inside of the sleeve and pin like so:
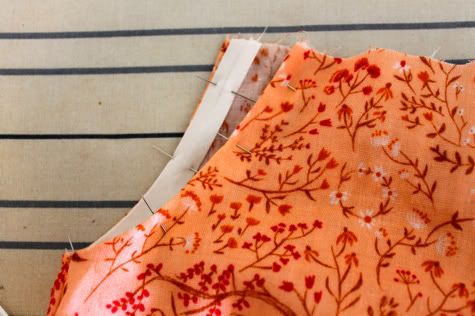
Sew it in place along the edge of the tape. This holds the shape of your sleeve as well as giving a clean finish to the armhole. You could use double fold bias tape if you wanted it to show, but for this dress I didn't.
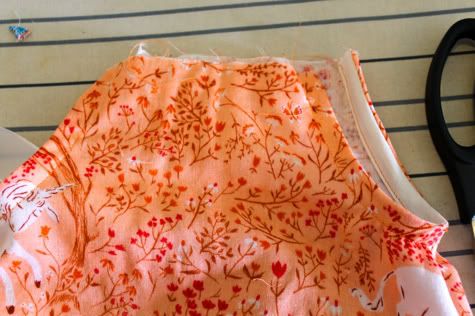
4. Now fold the top edges of your dress in 1/4" and iron, then 3/4" and iron and pin in place.

Sew right next to the edge to create the pocket for your ties.

5. Thread your ties through with a safety pin. Any kind of ribbon is cute, or you could sew some ties out of bias tape or matching or contrasting fabric. You can do one in the front and one in the back so the dress ties above each shoulder, or one long one that only ties on one side (like the smaller dress pictured). You're done!:
Labels: Baby, Clothing, DIY, Gifts, In One Evening, Kids, Serging, Sewing, Under $5

51 Comments:
I love making pillowcase dresses for my daughter! I've ran out of old pillowcases to use so this pattern will be great for the next time I want to make one! Thanks!
I'm inspired to make this little dress out of like 20 different fabrics... all with different trims and ribbons. Love!
Great tutorial!! I linked to it on Craft Gossip Sewing:
http://www.prudentbaby.com/2010/03/diy-pillowcase-baby-dress-pattern.html
---Anne
Thanks for posting the complete instructions. This dress should last a long time for my little one who's been growing 1" per month!
This is SO adorable! I have a little girl due in July and I think she will have a wardrobe of these dresses to wear this summer!
I'm so excited, going to make this for my niece who just turned 2! How gorgeous..thanks so much for posting instructions, I've been looking for them! I'll be posting my version and linking you! Thanks so much!
By the way that Unicorn print is scrumptious!
Is it wrong to think about trying for a girl just so I can make her one of these??? :) Beautiful.
I love it. It's puurrrty.
PussDaddy
Just made 2 dresses using your pattern and they are lovely!! I'll be linking you in my blog..thanks for the wonderful tutorial :)
RoseMamie
www.in-a-galaxy.blogspot.com
I shared you on my blog..and thank you again!
http://in-a-galaxy.blogspot.com/2010/04/wip-wednesday.html
I love the way you flared out the bottom. It’s a very positive variation. I am going to give it a try. Thanks for the great tutorial.
Fun and comfy-now I just need a daughter so I can sew for her :)
Jana
thanks for the fun tutorial, I tried it and wrote about it on my blog, if you'd like to check it out http://sweetpetiteblog.blogspot.com/
I'm new to the bloging world, but I love yours and all the fun projects.
Love the dresses, LOVE the tutorial! I tried it with great success! I posted my copy here http://icopiedthat.blogspot.com/2010/05/pillow-case-dress-kinda.html and linked up to your post!
Thanks so much!
i love your website! i have made several pillowcase dresses for my twin girls. i also used the pattern with a bath towel to make swim cover-ups for my girls. they are so cute and great for the pool!
I love this website..
I made my first dress for my twins today...
Posted it on my blog with a link to your blog...
Thanks for the confidence to make these..
Love this pattern and LOVE how it turned out when I tried it!
http://astitchinlime.wordpress.com/2010/06/25/baby-dress/
Thank you so much for providing us with such great inspiration all the time! :)
- Jana Kim
I love EVERYTHING about your blog....thank so much for being the creative voice for this Grammy and it also lets me know what young Mom's like.....thank you~!~!
Marilyn
I made a dress using your pattern today. So easy and quick for a birthday gift. Thank you, I love your blog, its a regular for me. I posted it today on my blog with a link to your blog.
http://sweetestalchemy.blogspot.com/2010/07/happy-birthday-little-one.html
I am so addicted to your site! I am new to following blogs, a week to be exact, but in that week i have become a bias tape addict! what else can i do with it besided cool trim for these dresses and the awesome bags? i made my 7 mth old daughter one of these dresses(my 1st piece of wearable clothing ever from my "gotta have" sewing machine). i can't sleep now...too many ideas in my head. My husband misses me!
I have made these little dresses before, but the angled body is new to me. I'll have to give this a try!
I have seen this dress first time. This is so easy to make. I would try this for my cute baby.
Thanks Jaime for the pillowcase dresses & thanks for posting the complete pattern.
http://www.bumbleandbobble.co.uk
Could you do the tracing thing with any style dress?
Thank you!! I used this tutorial to make a pillowcase dress out of an old adult dress for a friend! I will be posting it on my blog with a link to you (probably next week sometime). This was my first time doing bias tape and you explained it great!
Has anyone come up with a pattern the right dimensions for a little girl's size 6? I sure could use some help with this...pattern making is not my strong point!
Thank you.
Linda
I'm ong to make a few of these for Little Dresses for Africa. Something so easy and quick. http://www.littledressesforafrica.org/blog/
Wanted to let you know I used your tutorial to make my first pillowcase dress! I linked back to you and you can see pictures on my blog!
www.alyandash.com
Lovely Collection with nice designs, I really like your costumes and more informative post also sharing pretty design and comfortable fabrics for your affectionate baby's delicate skin, all dress gives off a suitable glow as a gives sweetest smile and making her seem as angel. The excellent selection of Flower Girl Dresses available to all baby and girls size.
I made an ADORABLE DRESS using this :) pics on my blog lilthisnthat.blogspot.com
I made this one with my 4 year old. The pattern is so easy that she was able to measure, cut, pin and even help sew it together.
This one was for the Dress a Girl Around the World donation. But I can see my daughter and her babies decked out in matching dresses in the very near future.
I just made my first pillowcase dress using your tutorial!!
Thanks so much!!!
here it is on my blog:
http://cinsarah.blogspot.com/2011/04/my-first-pillowcase-dress.html
I love these dresses, but I can never get the armhole right. I don't know how to get the measurements for my girls :(
learn2 - trace a dress that fits them
I am a novice sewer. How can I make this for a 3-6 or 9 month old? Thanks!
I made two dresses today out of old embroidered pillowcases for my daughters, who are 6. Your directions worked perfectly! I laid one of their current dresses on top and cut about an inch outside for the sides, top and armholes. Thanks!!
I made a dress similar to this for my little girl for her first birthday. The only measurement I took was of her chest so I knew how wide to make the chest piece. I borrowed your tutorial to make it and couldn't believe how easy it was to make! :) I kind of just threw it together and it magically turned out perfect. Instead of ribbon, I used a shoestring that I found on sale at Joann Fabrics.
I have a few pics here: http://wp.me/p1eggC-1Z
Thanks for the inspiration! I just read the post about the tulle dress and I think I'll make one. Maybe two...or three!
Thank you so much.....I recently made two new dresses....used this pattern for one and your one shoulder dressy dress for the other! Thanks for great tips and pics for the arm holes and the pom pom trim. I love the dresses!
Thanks! This is so cute and I can't wait to try it!!
This comment has been removed by the author.
I finally made my first real sewing project using your wonderful tutorial. I cannot wait to get different fabric to make more! You can see my final creation at
http://simplemomgoinggreen.blogspot.com/2011/06/first-detailed-sewing-project.html
DARLING! What a great tutorial!I'm visiting from 101 summer sewing tutorials roundup. Have a great day! http://runwithglitter.blogspot.com
Wow! Just stumbled upon you and saw this easy to follow dress pattern. Thank you so very much! It is adorable! I purchased a similar pattern a while back and it wasn't cheap or easy. This is the look I was looking for and so easy! Once again, thanks.
mmjohnson555@gmail.com
Nice information, valuable and excellent design, as share good stuff with good ideas and concepts, lots of great information and inspiration, both of which we all need, thanks for all the enthusiasm to offer such helpful information here.
girls holiday dresses
thank you!! this is the easiest dress ever, and your directions were perfect! i used a cute owl print and soft rick rack for the bottom and inside the 'sleeves' for a scalloped effect. http://www.craftster.org/pictures/showphoto.php?photo=477762&ppuser=104078
I made pillowcase dresses for my daughters using your instructions with some variations. You can check out how they turned out if you want. : ) I linked to you in my post. Thanks for the tutorial!!!
http://jennisrandomramblings.blogspot.com/2011/08/pillowcase-dresses.html
I used this tutorial to make matching dresses for my daughter and the doll I just made her. :)
I linked to it (and another!) in the blog post I wrote about it:
http://fineandfair.blogspot.com/2011/08/sew-fun.html
This comment has been removed by a blog administrator.
This comment has been removed by a blog administrator.
I love making pillowcase dresses! here is another option - use bias binding made from the cut offs (of the pillowcase) for the ties its easy, matches the dress, then you can go a bit madder on the other embellishments.
Great dress! Wished I had found your pattern before buying one. I am happy with my dress though!
http://allswelldl.blogspot.com/2012/01/my-first-pillowcase-dress-and-tuxedo-t.html
Post a Comment
Subscribe to Post Comments [Atom]
<< Home