body { background:#fff url("http://www.blogblog.com/dots/bg_dots.gif") 50% 0; margin:0; padding:0 10px; text-align:center; font:x-small Verdana,Arial,Sans-serif; color:#333; font-size/* */:/**/small; font-size: /**/small; } /* Page Structure ----------------------------------------------- */ @media all { #content { background:url("http://www.blogblog.com/dots/bg_3dots.gif") no-repeat 250px 50px; width:700px; margin:0 auto; padding:50px 0; text-align:left; } #main { width:450px; float:right; padding:50px 0 20px; font-size:85%; } #main2 { background:url("http://www.blogblog.com/dots/bg_dots2.gif") -100px -100px; padding:20px 10px 15px; } #sidebar { width:200px; float:left; font-size:85%; padding-bottom:20px; } #sidebar2 { background:url("http://www.blogblog.com/dots/bg_dots2.gif") 150px -50px; padding:5px 10px 15px; width:200px; width/* */:/**/180px; width: /**/180px; } } @media handheld { #content { width:90%; } #main { width:100%; float:none; } #sidebar { width:100%; float:none; } #sidebar2 { width:100%; } } html>body #main, html>body #sidebar { /* We only give this fade from white to nothing to browsers that can handle 24-bit transparent PNGs */ background/* */:/**/url("http://www.blogblog.com/dots/bg_white_fade.png") repeat-x left bottom; } /* Title & Description ----------------------------------------------- */ @media all { #blog-title { margin:0 0 .5em; font:250%/1.4em Georgia,Serif; color:#353; } #blog-title a { color:#353; text-decoration:none; } #description { margin:0 0 1.75em; color:#996; } #blog-mobile-title { display:none; } #description-mobile { display:none; } } @media handheld { #blog-title { display:none; } #description { display:none; } #blog-mobile-title { display:block; margin:0 0 .5em; font:250%/1.4em Georgia,Serif; color:#353; } #blog-mobile-title a { color:#353; text-decoration:none; } #description-mobile { display:block; margin:0 0 1.75em; color:#996; } } /* Links ----------------------------------------------- */ a:link { color:#488; } a:visited { color:#885; } a:hover { color:#000; } a img { border-width:0; } /* Posts ----------------------------------------------- */ .date-header { margin:0 0 .75em; padding-bottom:.35em; border-bottom:1px dotted #9b9; font:95%/1.4em Georgia,Serif; text-transform:uppercase; letter-spacing:.3em; color:#663; } .post { margin:0 0 2.5em; line-height:1.6em; } .post-title { margin:.25em 0; font:bold 130%/1.4em Georgia,Serif; color:#333; } .post-title a, .post-title strong { background:url("http://www.blogblog.com/dots/bg_post_title.gif") no-repeat 0 .25em; display:block; color:#333; text-decoration:none; padding:0 0 1px 45px; } .post-title a:hover { color:#000; } .post p { margin:0 0 .75em; } p.post-footer { margin:0; text-align:right; } p.post-footer em { display:block; float:left; text-align:left; font-style:normal; color:#996; } a.comment-link { /* IE5.0/Win doesn't apply padding to inline elements, so we hide these two declarations from it */ background/* */:/**/url("http://www.blogblog.com/dots/icon_comment.gif") no-repeat 0 .25em; padding-left:15px; } html>body a.comment-link { /* Respecified, for IE5/Mac's benefit */ background:url("http://www.blogblog.com/dots/icon_comment.gif") no-repeat 0 .25em; padding-left:15px; } .post img { margin:0 0 5px 0; padding:4px; border:1px solid #cca; } /* Comments ----------------------------------------------- */ #comments { margin:0; } #comments h4 { margin:0 0 10px; border-top:1px dotted #9b9; padding-top:.5em; font:bold 110%/1.4em Georgia,Serif; color:#333; } #comments-block { line-height:1.6em; } .comment-poster { background:url("http://www.blogblog.com/dots/icon_comment.gif") no-repeat 2px .35em; margin:.5em 0 0; padding:0 0 0 20px; font-weight:bold; } .comment-body { margin:0; padding:0 0 0 20px; } .comment-body p { margin:0 0 .5em; } .comment-timestamp { margin:0 0 .5em; padding:0 0 .75em 20px; color:#996; } .comment-timestamp a:link { color:#996; } .deleted-comment { font-style:italic; color:gray; } .paging-control-container { float: right; margin: 0px 6px 0px 0px; font-size: 80%; } .unneeded-paging-control { visibility: hidden; } /* More Sidebar Content ----------------------------------------------- */ .sidebar-title { margin:2em 0 .75em; padding-bottom:.35em; border-bottom:1px dotted #9b9; font:95%/1.4em Georgia,Serif; text-transform:uppercase; letter-spacing:.3em; color:#663; } #sidebar p { margin:0 0 .75em; line-height:1.6em; } #sidebar ul { margin:.5em 0 1em; padding:0 0px; list-style:none; line-height:1.5em; } #sidebar ul li { background:url("http://www.blogblog.com/dots/bullet.gif") no-repeat 3px .45em; margin:0; padding:0 0 5px 15px; } #sidebar p { margin:0 0 .6em; } /* Profile ----------------------------------------------- */ .profile-datablock { margin:0 0 1em; } .profile-img { display:inline; } .profile-img img { float:left; margin:0 8px 5px 0; border:4px solid #cc9; } .profile-data { margin:0; line-height:1.5em; } .profile-data strong { display:block; } .profile-textblock { clear:left; } /* Footer ----------------------------------------------- */ #footer { clear:both; padding:15px 0 0; } #footer hr { display:none; } #footer p { margin:0; } /* Feeds ----------------------------------------------- */ #blogfeeds { } #postfeeds { padding-left: 20px }

Prudent Baby

Get sewing how to, sewing tutorials, and sewing help to learn sewing. We offer sewing tutorial for sewing moms.

Wednesday, March 3, 2010

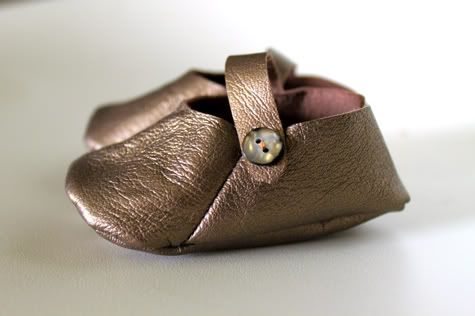
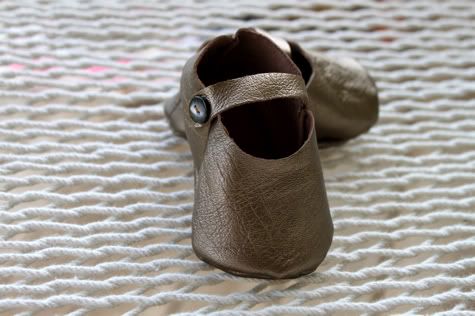
DIY Leather Baby Shoes with Free Pattern


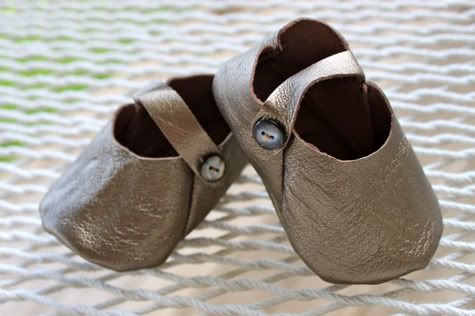
Ever look at a cute baby item and all of a sudden want another kid? That's how I felt when I finished these shoes.
I made three prototypes and created a downloadable pattern for newborns I think you'll enjoy. Yours don't have to be leather, but I suggest recycling an old purse or jacket, or picking one up at Goodwill. I machine sewed these, but in reality I think hand sewing would work really well. I hope you like them and make many pairs and send us pictures of them all!
Get the full DIY Leather Baby Shoes Pattern and Tutorial after the jump...


FREE LEATHER BABY SHOES PATTERN & TUTORIAL

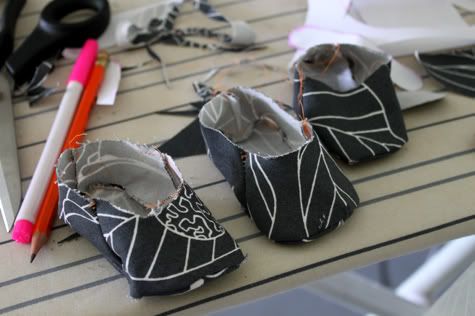
Some notes on sewing with leather:  I used a thin supple leather, and sewed it with a #14 needle, you can totally sew with this or even a thinner needle, however, because you can't pin leather (the holes will show) it's a little challenging holding it together, and for a project this small hand sewing might be easier.  Depending on the thickness of your leather and your machine's attitude, you may want to increase your stitch width, I went to 3. That said, this is a very simple leather sewing project and shouldn't cause you too much trouble.  You could make these out of another fabric, but i think you'd need to make a liner...see these prototypes made from canvas, they just don't look too comfy:


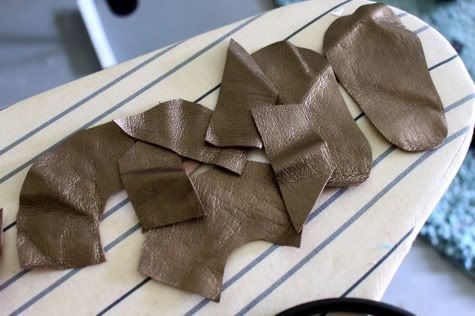
1.  Download and cut out the free pattern and get yourself some leather scraps.
PBLeatherBabyShoes

2.  Cut out the pattern, trace it onto the back of your leather:

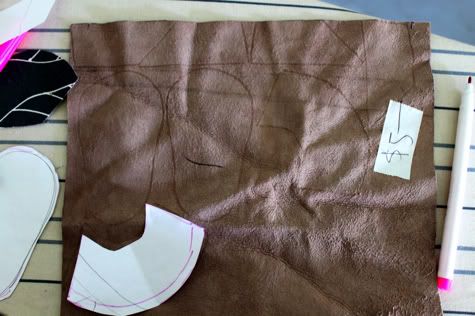
Cut out your pieces:


3.  Now take two of the side pieces (one of each of the two different shapes) and lay them together right sides facing:

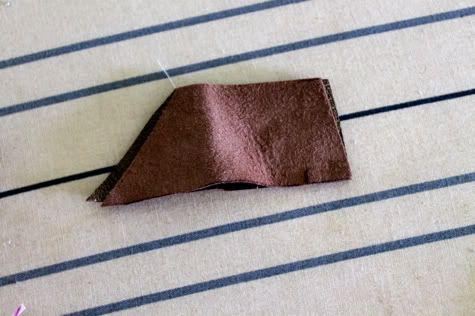
Sew them together on the short less angled side. This is the heel of your shoe. Leather tends to not feed through the machine if you start right at the edge, so start in a little like I did here, then turn your piece around and go back the other direction to finish the seam.  Go over it twice just for extra hold.


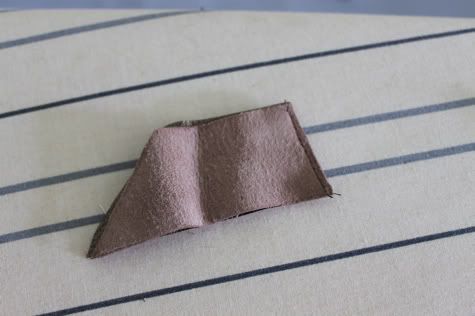
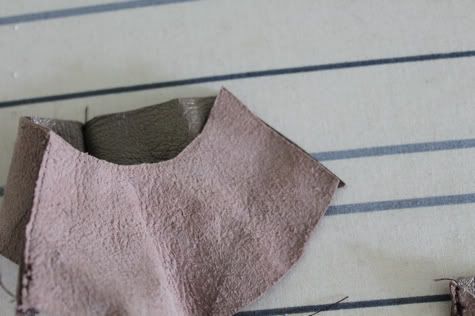
4. Now grab your top piece and with right sides facing, align one flat edge of it with the angle of one back piece:

Sew that together:


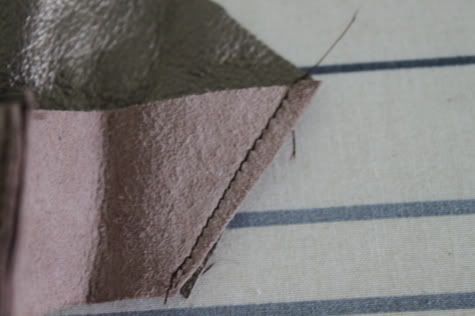
5.  Take the other edge of the top piece and align it with the other edge of the bottom right sides facing:

And sew it together as well:

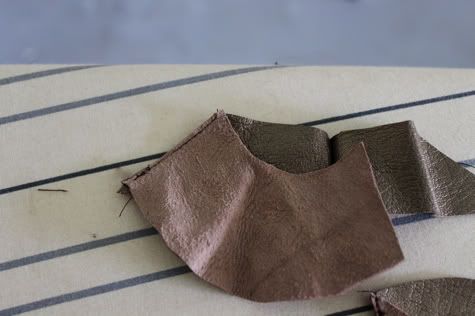
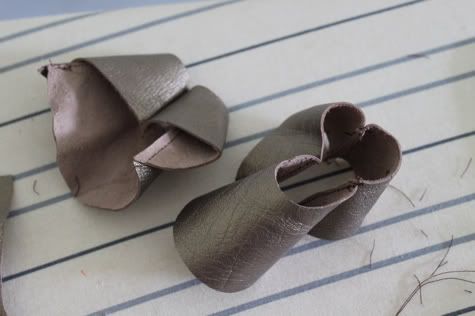
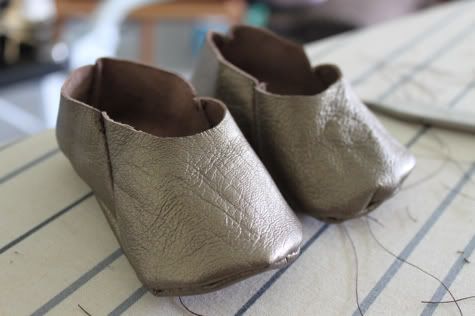
Repeat with the second shoe. You've created the top of your shoes:


6.  Now with the top right side up, align the sole of your shoe right side down (so right sides are facing).  You can't pin it together and it's a little tricky to feed it through the machine all at once and get it attached properly, so I suggest sewing a few stitches at the top center, then the bottom center, then the center of each side like so:

Then stitching all the way around.  Go slowly and don't worry about making a big mess.  See:

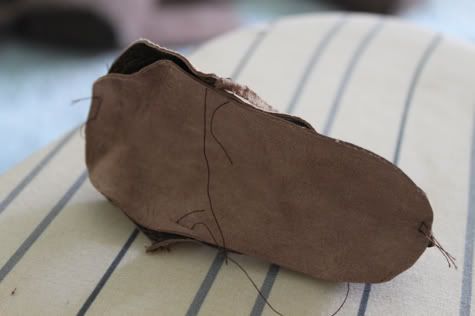
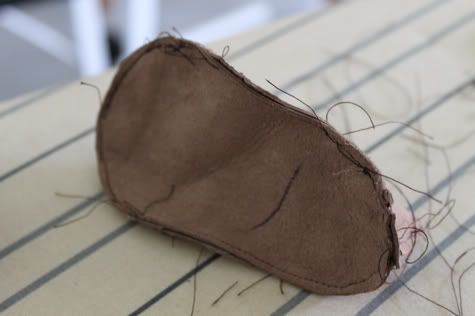
Cut your threads, turn it inside out, shoe constructed!


7.  Now for your straps.  Pick an inside of each shoe and sew the strap to that side:

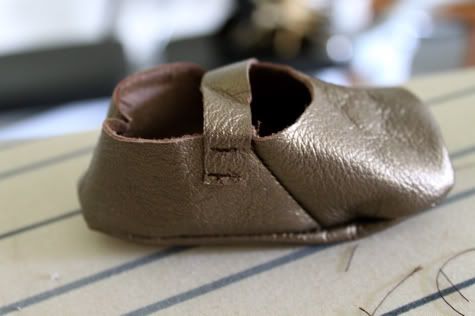
On the other side, hand sew a button:


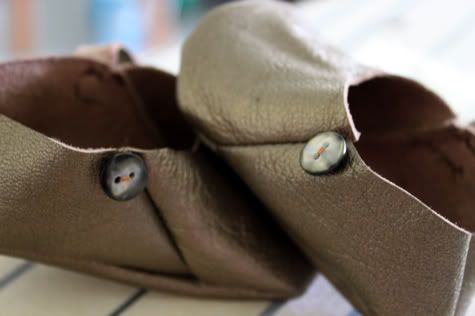
Cut a sit in the leather to be your button hole.  You're done!


Instead of straps, you could use a hole punch to punch a few holes at the top of the heel, thread a ribbon through, and use that as an ankle strap.  You could also hole punch all the way around the top and weave a ribbon in, that would be so cute!

Labels: , , , , , , ,

11 Comments:

Blogger Jacinda said...

I will never post on Prudent Baby again. I want this to be the picture I see on the top of the page every time I open Prudent Baby forever and ever.

And Quinn says... "Auntie Jaime, thank you for making me these amazing shoes. I will slobber you with kisses when I see you NEXT week. Just kidding Auntie Jaime, I'm sure you are sending them to that Jojo character."

PS. you MADE leather shoes.

March 3, 2010 at 9:13 AM  
Blogger Julie said...

Those are SO stinkin' cute!! Now I want another baby. Okay, maybe not really. Well, maybe a little.

Guess I'll just have to find some babies to make some of these for.

March 3, 2010 at 10:32 AM  
Blogger Anne said...

Little baby shoes make me weak in the knees!!! And I love the idea of using an old jacket or purse for the leather. Will add them to my rummage sale list...

I linked to your pattern on Craft Gossip Sewing:
http://sewing.craftgossip.com/free-pattern-leather-shoes-for-a-newborn-baby/2010/03/03/

--Anne

March 3, 2010 at 7:00 PM  
Blogger Gigia said...

Hello Prudent mama, I love your tutorial and would like to show a read more box regarding it in my internet site regarding sewing (www.corsidicucito.commercialinelmondo.it)
If you agree would you please confirm it at
info@commercialinelmondo.it?
Many thanks
Elena

March 4, 2010 at 2:44 AM  
Blogger Pascale said...

These are absolutely lovely!

March 4, 2010 at 6:17 AM  
Blogger Rachel@oneprettything.com said...

Yay! Thanks so much for the pattern, these are fantastic! I'm loving your projects this week. I'll be linking.

March 6, 2010 at 2:53 PM  
Blogger Nancy Ward said...

Hi!

Today I posted an entry on my blog with a link to this tutorial and template.

I'd appreciate your letting me know if that's OK.

Thanks,

Nancy Ward
http://paperfriendly.blogspot.com

March 20, 2010 at 5:07 AM  
Blogger Jaime said...

of course nancy, thanks for sharing it!

March 20, 2010 at 10:29 AM  
Anonymous Anonymous said...

The cutest thing I've seen today ! I don't have any child but those baby shoes are so trendy, love them !

September 29, 2010 at 3:16 PM  
Blogger Herve-Leger said...

hey,i like your post...

October 24, 2010 at 9:00 PM  
Blogger DIY Crush Blog said...

I linked your awesome pattern on my blog! http://whimsycoutureboutique.blogspot.com/2011/01/free-pattern-for-baby-shoes.html

January 13, 2011 at 6:38 AM  

Post a Comment

Subscribe to Post Comments [Atom]

<< Home