DIY Cute Crib Sheet
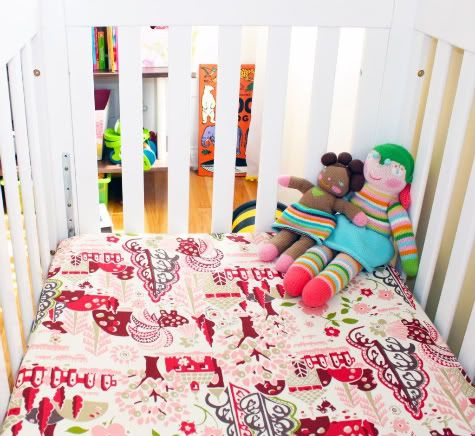
You know the nesting urge set in and you invested in a giant crib set only to find out within a few months that it was virtually useless. The bumpers are dangerous and come off before the baby even sleeps in it, and the skirt lasts a few months but comes off as soon as she learns to sit up. And if you're like me, your child has one special blanket she insists on sleeping with, so you are left to play around with fanciful sheets.
With so many adorable fabrics available there's no reason to stick to store-bought crib sheets, especially when it's so simple to make them yourself. I made my first crib sheet today and I think I'll do it a little differently next time, but it turned out great and took less then an hour!
Get the full Crib Sheet DIY after the jump...
How to Sew a Crib Sheet

2. Fold the fabric in half lengthwise and cut an 8"X8" square out of each un-folded corner. Save your four 8" squares of fabric for another project:


5. Now cut four 9" pieces of 3/4" elastic. Fold a piece of elastic in half and pin the middle of it to the bottom of the corner seam you just made. Stretch it as far as you can along the selvedge edge and pin the end of it to the fabric, then do the same thing on the hemmed edge:

When you let go the fabric will be bunched up like so:

6. Set your machine to a stretch stitch if you have it (this will help ensure that the stress on the elastic during use doesn't rip your fabric). Stretch stitch is #17 in the picture below, look for a similar diagram on your machine. If you don't have a stretch stitch just use a zig zag:

7. Put the pinned end of the elastic and fabric into your machine, lower the presser foot and turn the wheel to get the needle into it to hold it in place. Now stretch the elastic all the way out so it is flush with the fabric, and hold it taught as you sew it in place. I did it in two bursts, one end to the middle seam, then the middle seam to the other end. Repeat on all four corners. It took me the first few corners to get used to it, the last corner looked the best:

Now just iron it and you're done:

I think sewing the elastic to the outside was a bit challenging and doesn't look as polished as I'd like, but it does look great in the crib. Next time I will fold and iron the inner seams 1/4" all the way around, then fold and iron another 3/4" to create a pocket, leave a hole and feed the elastic through with a safety pin, and sew the elastic to itself to create a more finished looking sheet with elastic all the way around. I'll post when I do that.

Prudent Price for one crib sheet:
Store: One Dwell Studio crib sheet (because we're using designer fabrics I'm comparing to a designer sheet - there's always target for a cheaper then homemade option) - $36.00
DIY: Two yards Alexander Henry Granville fabric in pink at Purl Soho - $18 (with extra left over for future projects)
posted by Jaime @ 2:21 PM
![]()

34 Comments:
I LOVE that fabric...
What a gorgeous print! x
The most important fact is this wonderful sheet was made by a little girls Mommy just for her. Look at the smile on Scarlet's face!
Any ideas re: modifying this pattern for a twin size sheet?
I love the PotteryBarnKids chamois sheeting, but find the price tag a bit steep. But on the otherhand, I'm not sure the amount of fabric needed to make a twin fitted sheet is going to be that much cheaper. Any thoughts?
Thanks!
Ruthie
ruthiema@gmail.com
Question: What size did you make your seam allowances on the squares? By my math, cutting out the squares leaves you with 52", which is exactly the length of a standard mattress. Trying to figure out how this leaves enough fabric for the seams. Advice?
Hey there anon! There are no seams on the top of the mattress...the seams are all underneath on the bottom side. you want to cut out the 8" squares to get the top of your sheet to be exactly the right size, but your seams are on the bottom where the elastic is. hope that helps :)
oh i'm sorry, i didnt answer your question, i did about a 3/8" seam allowance on the squares, because they are elasticized on the bottom of the mattress it doesn't have to be precise...you are going to have gathering at the corners but the top of your sheet will be the right size, the gathering is forgiving.
Thanks for your speedy response, Jaime! This is very helpful. And your pictures make it easy to understand.
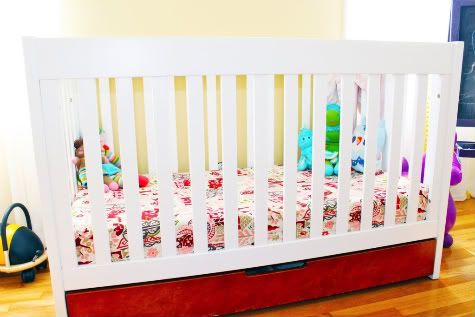
random question: where did you get your crib/what is the make?
HI Marcie - sorry i didn't reply sooner, i just saw this. I got that crib at WAL MART! can you believe it? and the quality is great and we love it. they still have it, i believe it is called Baby Mod or something like that.
This crib is seriously my dream crib. We went with a different, more traditional one from Walmart tho. I had to match all the other free furniture we got for her room :-/ I cry a little bit everytime I see the Olivia crib, but I'm in love with our current one.
Thanks again for posting this, I'm using the elastic instructions to finish my changing pad cover.
Swoon!
I wanted to tell you how much I enjoyed this project! I just finished making four crib sheets with the softest, coziest baby flannel, thanks to your instructions. Since my sewing machine skills haven't improved much since high school home-ec class 15 years ago, I used the elastic-through-the-pocket revision, which was really easy! I'm planning to give two crib sheets away to friends and keep the other two for my 6 month old. Thanks for a fun and easy project!
Wow, been looking for a DIY on making a crib sheet. My baby is hypo-alergenic, do you recommend any specific material for the fabric?
Thanks!
Thanks for the tips. Will try it with my baby's new crib.
davinci emily...i'm not an expert on hypoallergenic at all, but would bamboo fabric work?
Love this tutorial and I just got a super cute flannel to try it. I had a question for ya though...if I were to do the elastic with the pocket method versus sewing it to the inside of the sheet how much elastic would I need? Like how many inches for it to have enough stretch and be able to sew it to itself?
I just made a sheet for our baby who's due to come next month....and I love how it turned out! How fun that you can pick your own fabric and make something so cute. I love it, thanks so much for sharing all these tutorials!! This one was very clear and the elastic corners even turned out well. I took your advice and hemmed all around it, which I'm glad I did. :-) I can't wait to try more of your ideas.
Why do you need to remove a crib skirt once your baby can sit up?
Hopefully you still check this for responses.. did you ever end up using the method you recommended at the end of your post? How much elastic will I need if I do it the second way?
Michelle
Has anyone had success making jersey knit sheets with this pattern? I ordered organic jersey knit bamboo and am having such a challenging time making it work. The fabric is so baggy. I increased the pocket size and used 12" of elastic. I am a novice sewer. My mother is about to help me use bias tape to make a pocket all the way around the sheet for one whole length of elastic to go all the way around, like you suggested at the end of your instructions, Jaime. Any advice?
Thanks for the tute...I just made a sheet for my son's portable crib today at my lunch hour!
http://rabbitandpiggie.blogspot.com/2010/09/stylin-cool-sheets.html
I finally got around to making these sheets:
http://dohdums.wordpress.com/2010/09/14/diy-crib-sheets/
I made a casing all the way around the bottom edge and fed an elastic through like it was suggested to do at the end of this tutorial. I didn't measure my elastic length, I simply used a crib sheet I already had on hand to gauge the length of elastic needed. Worked like a charm!
Michelle
I love this and plan to make a few to go with the theme of my sons room!! Adorable!
This is really pretty and seemed easy enough. i will definatly have to try it. Thanks!
I am really wanting to make some super soft plush sheets for my son. Are any of you beginners? I have literally ONLY made a taggie blanket and a large baby blanket. That is the extent of my sewing skills so far! I am wondering how hard this would be for a newbie such as myself....
This was my 2nd sewing project - just got a machine for Christmas. It was so easy to follow, and I am so proud of my crib sheet!
I've cut and ironed everything but I'm nervous about how much elastic to use in the "pocket" method. Any suggestions?
Mine isn't nearly as cute as yours (I went with green polar fleece) but SO easy and quick to make. What was I thinking EVER buying crib sheets? Thank you so much for this tutorial. (And to the person before me, I used 5' 6" of elastic, and am not breaking my back trying to put the sheet on the mattress, if that helps.)
Love your crib! I'm actually looking into buying the same one, but concerned that it's made with pinewood (supposedly soft type of wood that damages easily). Any complaints? Recommendations? Thanks!
love it
Thanks for the awesome tutorials on crib sheets... I just finished making my own and am SO happy I did!
Did you mean to write 3/8 inch elastic in the instructions above? 3/4 inch seems sorta big.
I love your fabric! I'm planning on making crib sheets for my nephews (TRIPLETS!!!) when they arrive. However, the mattress is smaller than a standard since these are day care certified cribs. Do I keep the 8x8 square and just shorten the length of fabric? I just don't know how to adjust the pattern to make it work.
-Liz
Post a Comment
Subscribe to Post Comments [Atom]
<< Home