body { background:#fff url("http://www.blogblog.com/dots/bg_dots.gif") 50% 0; margin:0; padding:0 10px; text-align:center; font:x-small Verdana,Arial,Sans-serif; color:#333; font-size/* */:/**/small; font-size: /**/small; } /* Page Structure ----------------------------------------------- */ @media all { #content { background:url("http://www.blogblog.com/dots/bg_3dots.gif") no-repeat 250px 50px; width:700px; margin:0 auto; padding:50px 0; text-align:left; } #main { width:450px; float:right; padding:50px 0 20px; font-size:85%; } #main2 { background:url("http://www.blogblog.com/dots/bg_dots2.gif") -100px -100px; padding:20px 10px 15px; } #sidebar { width:200px; float:left; font-size:85%; padding-bottom:20px; } #sidebar2 { background:url("http://www.blogblog.com/dots/bg_dots2.gif") 150px -50px; padding:5px 10px 15px; width:200px; width/* */:/**/180px; width: /**/180px; } } @media handheld { #content { width:90%; } #main { width:100%; float:none; } #sidebar { width:100%; float:none; } #sidebar2 { width:100%; } } html>body #main, html>body #sidebar { /* We only give this fade from white to nothing to browsers that can handle 24-bit transparent PNGs */ background/* */:/**/url("http://www.blogblog.com/dots/bg_white_fade.png") repeat-x left bottom; } /* Title & Description ----------------------------------------------- */ @media all { #blog-title { margin:0 0 .5em; font:250%/1.4em Georgia,Serif; color:#353; } #blog-title a { color:#353; text-decoration:none; } #description { margin:0 0 1.75em; color:#996; } #blog-mobile-title { display:none; } #description-mobile { display:none; } } @media handheld { #blog-title { display:none; } #description { display:none; } #blog-mobile-title { display:block; margin:0 0 .5em; font:250%/1.4em Georgia,Serif; color:#353; } #blog-mobile-title a { color:#353; text-decoration:none; } #description-mobile { display:block; margin:0 0 1.75em; color:#996; } } /* Links ----------------------------------------------- */ a:link { color:#488; } a:visited { color:#885; } a:hover { color:#000; } a img { border-width:0; } /* Posts ----------------------------------------------- */ .date-header { margin:0 0 .75em; padding-bottom:.35em; border-bottom:1px dotted #9b9; font:95%/1.4em Georgia,Serif; text-transform:uppercase; letter-spacing:.3em; color:#663; } .post { margin:0 0 2.5em; line-height:1.6em; } .post-title { margin:.25em 0; font:bold 130%/1.4em Georgia,Serif; color:#333; } .post-title a, .post-title strong { background:url("http://www.blogblog.com/dots/bg_post_title.gif") no-repeat 0 .25em; display:block; color:#333; text-decoration:none; padding:0 0 1px 45px; } .post-title a:hover { color:#000; } .post p { margin:0 0 .75em; } p.post-footer { margin:0; text-align:right; } p.post-footer em { display:block; float:left; text-align:left; font-style:normal; color:#996; } a.comment-link { /* IE5.0/Win doesn't apply padding to inline elements, so we hide these two declarations from it */ background/* */:/**/url("http://www.blogblog.com/dots/icon_comment.gif") no-repeat 0 .25em; padding-left:15px; } html>body a.comment-link { /* Respecified, for IE5/Mac's benefit */ background:url("http://www.blogblog.com/dots/icon_comment.gif") no-repeat 0 .25em; padding-left:15px; } .post img { margin:0 0 5px 0; padding:4px; border:1px solid #cca; } /* Comments ----------------------------------------------- */ #comments { margin:0; } #comments h4 { margin:0 0 10px; border-top:1px dotted #9b9; padding-top:.5em; font:bold 110%/1.4em Georgia,Serif; color:#333; } #comments-block { line-height:1.6em; } .comment-poster { background:url("http://www.blogblog.com/dots/icon_comment.gif") no-repeat 2px .35em; margin:.5em 0 0; padding:0 0 0 20px; font-weight:bold; } .comment-body { margin:0; padding:0 0 0 20px; } .comment-body p { margin:0 0 .5em; } .comment-timestamp { margin:0 0 .5em; padding:0 0 .75em 20px; color:#996; } .comment-timestamp a:link { color:#996; } .deleted-comment { font-style:italic; color:gray; } .paging-control-container { float: right; margin: 0px 6px 0px 0px; font-size: 80%; } .unneeded-paging-control { visibility: hidden; } /* More Sidebar Content ----------------------------------------------- */ .sidebar-title { margin:2em 0 .75em; padding-bottom:.35em; border-bottom:1px dotted #9b9; font:95%/1.4em Georgia,Serif; text-transform:uppercase; letter-spacing:.3em; color:#663; } #sidebar p { margin:0 0 .75em; line-height:1.6em; } #sidebar ul { margin:.5em 0 1em; padding:0 0px; list-style:none; line-height:1.5em; } #sidebar ul li { background:url("http://www.blogblog.com/dots/bullet.gif") no-repeat 3px .45em; margin:0; padding:0 0 5px 15px; } #sidebar p { margin:0 0 .6em; } /* Profile ----------------------------------------------- */ .profile-datablock { margin:0 0 1em; } .profile-img { display:inline; } .profile-img img { float:left; margin:0 8px 5px 0; border:4px solid #cc9; } .profile-data { margin:0; line-height:1.5em; } .profile-data strong { display:block; } .profile-textblock { clear:left; } /* Footer ----------------------------------------------- */ #footer { clear:both; padding:15px 0 0; } #footer hr { display:none; } #footer p { margin:0; } /* Feeds ----------------------------------------------- */ #blogfeeds { } #postfeeds { padding-left: 20px }

Prudent Baby

Get sewing how to, sewing tutorials, and sewing help to learn sewing. We offer sewing tutorial for sewing moms.

Monday, April 25, 2011

How to Make Beautiful Dress Up Wings


I spotted these AMAZING dress up wings at Llevo el Invierno while surfing the crafty web, and I just had to ask their creator to share the tutorial with us. Her site is adorable, and it is written in both spanish and english, definitely check it out for more crafty inspiration. Take it away Eri...

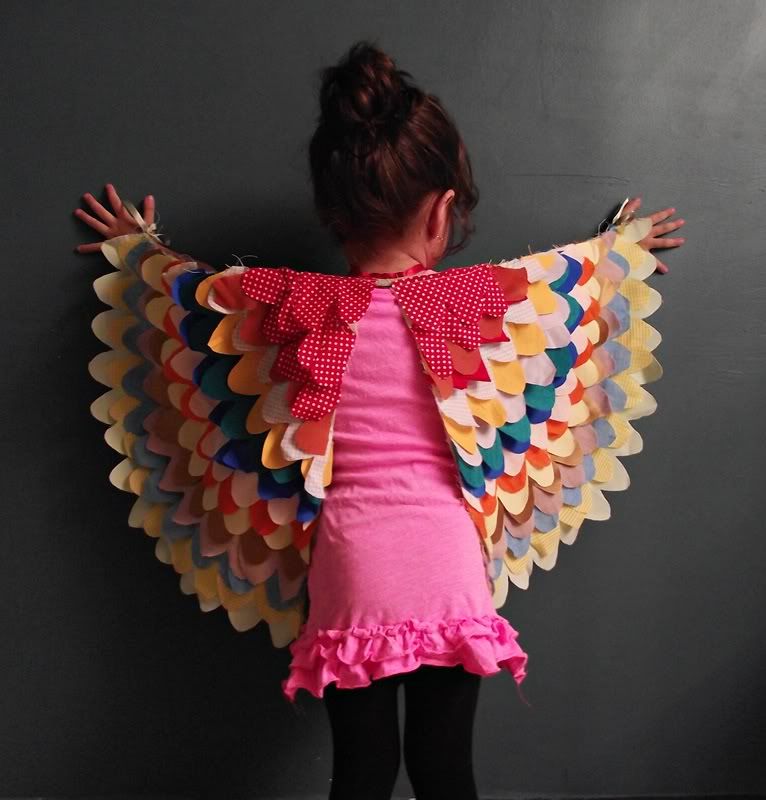
Hi everyone! I'm Eri from Llevo el Invierno, and I'm here to share my wings tutorial handmade for my little daughter Emma with Prudent Baby readers. I drew my own pattern to make these bird wings.  I share the pattern because it is near the springtime and this is a season when costumes for kids are always needed. You don't have to be an expert in sewing to make these wings, you just have to have some patience to cut and paste all the pieces of fabric. Enjoy your flight, little birds!!

Get the full Beautiful Dress Up Wings tutorial after the jump...

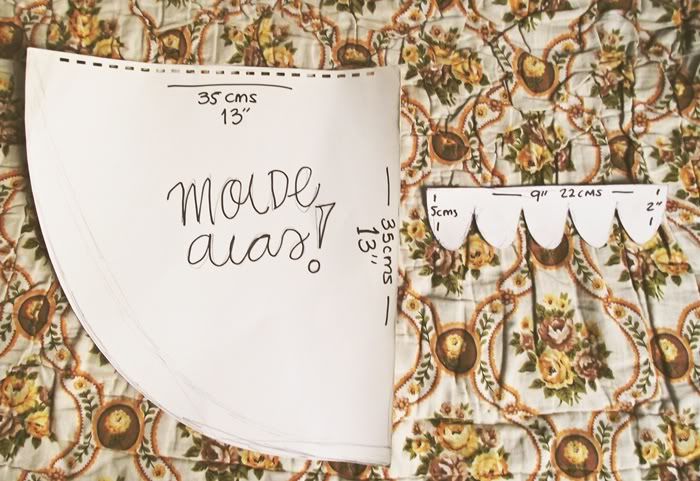
Beautiful Wings Free Pattern


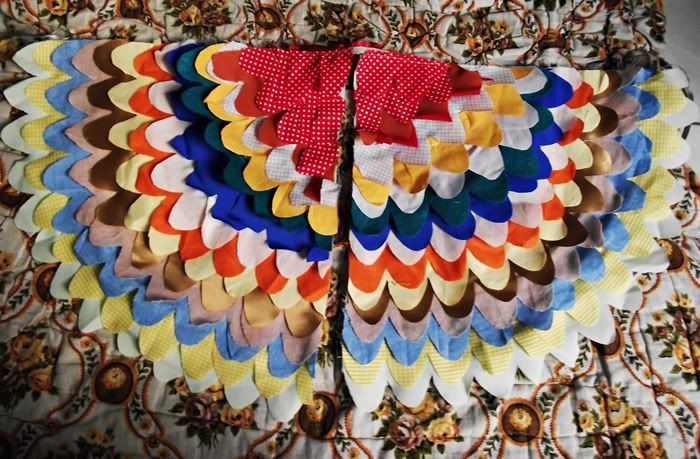
Pattern measurements are for children aged 18 to 36 months. Cut out your fabric for the wing base and the rows of "feathers" (see image for her measurements).


Then the feathers are sewn or glued to the wings from the bottom up, or one line above the other. Attach the two wings together with bias tape on the neck and a ribbon on top each wing.


Also attach a ribbon at the end of each wing for the child's thumbs.


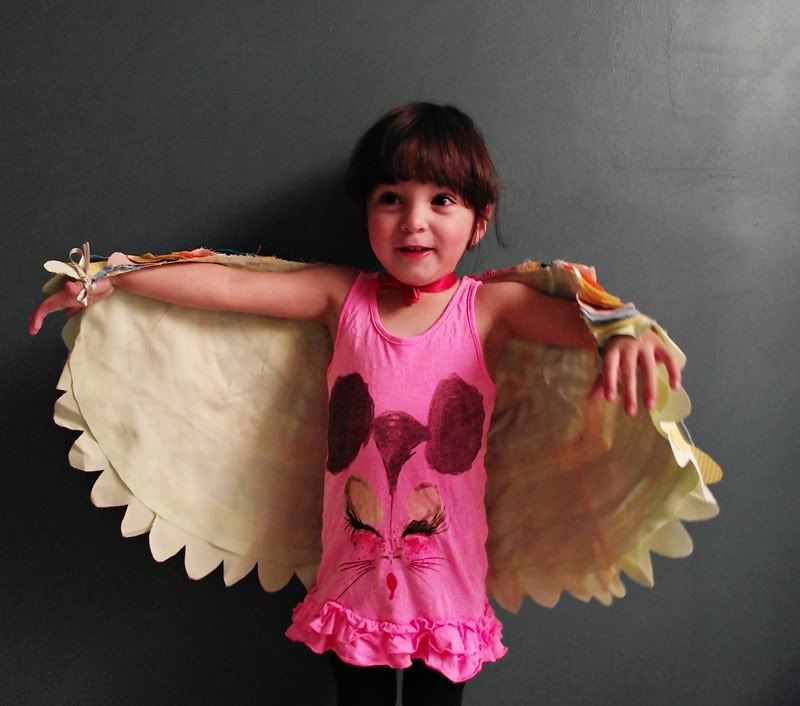
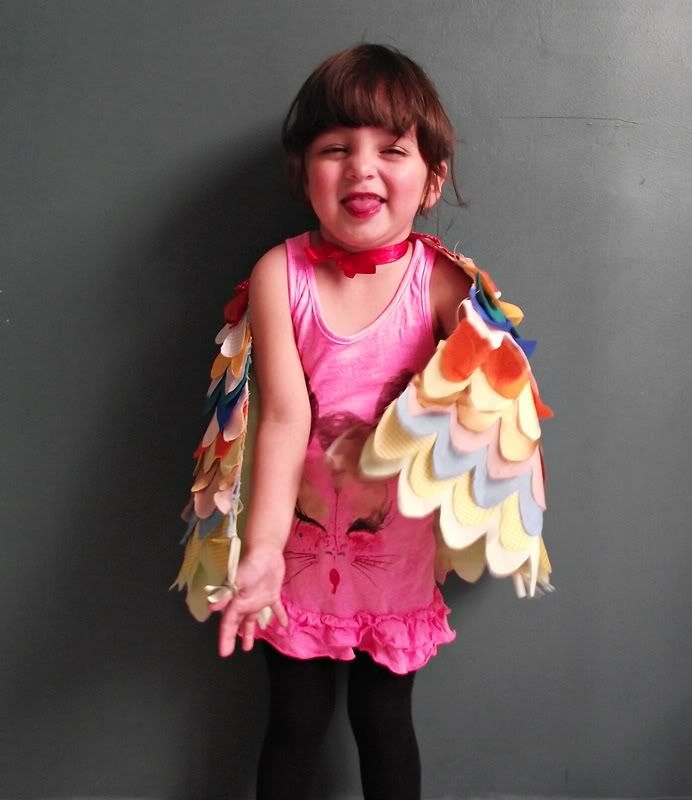
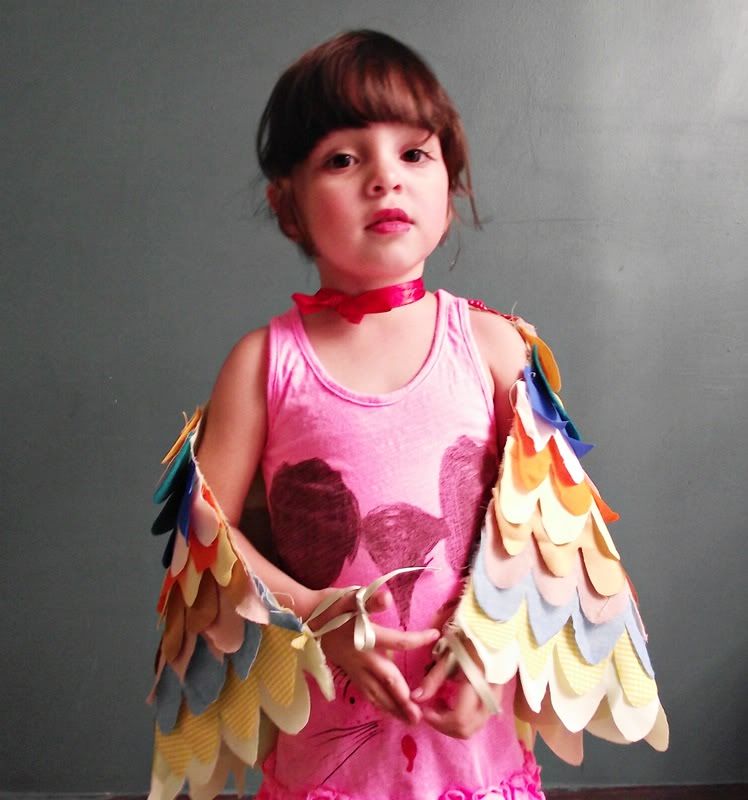
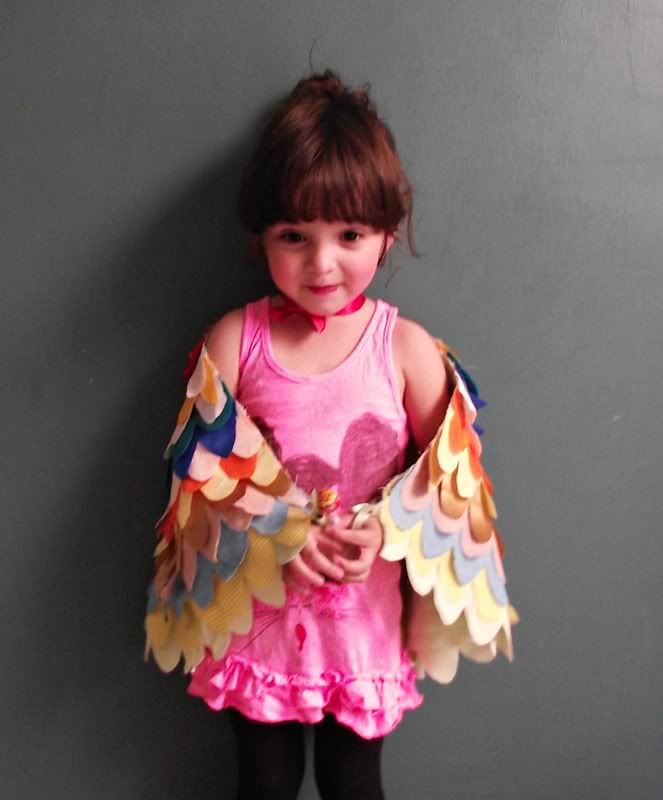
Time for a photoshoot.

Eri made a dress in much the same fashion, so check out that tutorial for more details here.

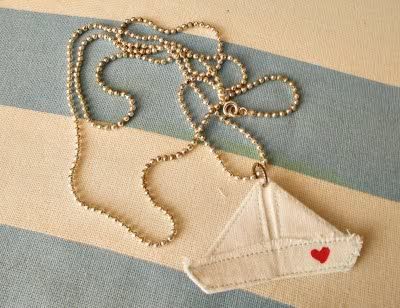
Don't forget to visit Eri at her site Llevo el Invierno for more great tutes. I especially adore this sailboat necklace!


Thank you Eri!  Let Eri know what you think of her gorg wings in the comments, and you could win three lovely Aivilo Charlotte patterns.

Labels: , , ,

48 Comments:

Blogger Yen said...

it's beautiful! i'll make one for my daughter and maybe for myself, too. perfect for playing, pretending, flying! :-)

April 25, 2011 at 12:51 AM  
Blogger loulou said...

oh they are SO beautiful. I think some of my stash has just found a project!

April 25, 2011 at 3:04 AM  
Blogger :o) mg said...

I agree that is a fabulous stashbuster project that perhaps even my older kids could do... Thank you for the easy tutorial!

April 25, 2011 at 5:24 AM  
Blogger Anne said...

These may be the most fabulous dress up wings - EVER. Love, love, love!!! I linked to her tutorial on Craft Gossip Sewing:
http://www.prudentbaby.com/2011/04/how-to-make-beautiful-dress-up-wings.html

--Anne

April 25, 2011 at 6:24 AM  
Blogger Are we there yet? said...

I adore these wings and had Babelfish trying to translate it last week! Thank you for featuring her!

April 25, 2011 at 7:06 AM  
Blogger Renee Weber said...

those wings are fantastic! I want to make them in adult size! (might get some weird looks in the office though) :P

April 25, 2011 at 8:05 AM  
Blogger Vanessa/NessieNoodle said...

THANK YOU! I loved these wings from the minute I saw them and have the idea posted in my pinterest. I am so excited to have the pattern now. I know they will be a wonderful addition to the dress up box.

April 25, 2011 at 9:22 AM  
Blogger Sweet Simplicity said...

This really reminds me of a Native American dance costume. It's so beautiful.

April 25, 2011 at 9:58 AM  
Blogger Nancy said...

These are so colorful and pretty. These are next on my list of things to make for my kids. They love to pretend and where costumes. Thanks for sharing!!!

April 25, 2011 at 11:29 AM  
Blogger Andrea said...

How very adorable and I love the bilingual site! Thanks for the idea :).

April 25, 2011 at 12:16 PM  
Blogger Natalie said...

Oh my! I'm totally making these for me. Uh. I mean my little girl... ;)

April 25, 2011 at 1:19 PM  
Blogger Unknown said...

These are so beautiful! So much better than those ridiculous wire wings that lose shape!! Thank you! I linked this up on my post today! http://vixenmade.blogspot.com/2011/04/dress-up-wings.html

April 25, 2011 at 1:51 PM  
Blogger AmAzOn said...

This comment has been removed by the author.

April 25, 2011 at 2:02 PM  
Blogger AmAzOn said...

These wings are ABSOLUTELY ADORABLE and look pretty easy to make!! THANK YOU for the tutorial and introducing me to her blog!!

April 25, 2011 at 2:06 PM  
Blogger craftytammie said...

so pretty! my lil' girl is 6 1/2 but i'm going to make her some anyways!

April 25, 2011 at 2:24 PM  
Blogger Within A Quarter Inch said...

wowee! so Glad my sister sent me this link:)

April 25, 2011 at 4:51 PM  
Blogger Pam said...

Wow!! My grandchildren will love these. I must make one all 3 of them. Thanks so much for introducing us to this creative mom.

April 25, 2011 at 5:01 PM  
Blogger AshleyAnn said...

I love this...so beautiful and whimsical!

April 25, 2011 at 6:07 PM  
Blogger Unknown said...

Wow these are so cute! I am going to make a pair asap. I'm a bit worried about my daughter trying to fly with them on since she has already mastered climbing on high places, but I think we'll be alright :)

April 25, 2011 at 6:15 PM  
Blogger Cody and Lindsay said...

I can think of a million uses for these beautiful little wings! Halloween! The prettiest angel in the Christmas pageant! Fairies!! Birds! Oh my! My little Harper (Yup, "To Kill a Mockingbird", Harper!) will love these!

April 25, 2011 at 7:29 PM  
Blogger MommaWard said...

I can't stand how stinkin' cute these wings are!! Momma's baby's gonna be ready to fly just as soon as I can whip up a pair! I'm gonna fly over to Llevo el Invierno to see what other lovelies I can find...

April 25, 2011 at 8:23 PM  
Blogger Unknown said...

aawww so beautiful!!! whish I had my own kids to make them wings!

April 26, 2011 at 8:36 AM  
Blogger AnnaPK said...

These are great! I think I am going to make them as an end of year thank you to my daughter's preschool teacher. I was thinking of getting something for the classroom and a pair or two of these wings would be perfect I think.

April 26, 2011 at 10:20 AM  
Blogger Annaoj said...

Love, love, love this! Making them for my scarlett soon!

April 26, 2011 at 11:15 PM  
Blogger Jessica said...

These are beautiful! What little girl wouldn't love flying around with those wings?

justenoughstyle.blogspot.com

April 27, 2011 at 7:24 AM  
Blogger mirabelle said...

so pretty! i think I can start a halloween costume early this yr!!

April 27, 2011 at 3:21 PM  
Blogger TheFoleyFive said...

oh my goodness, this has such a wild things, magical feel to it...how gorgeous. my mouth literally dropped open..what a darling little bit of whimsy. perfect for the little birds in our lives...

April 27, 2011 at 4:32 PM  
Blogger Planty Mama said...

Sooooooo stinkin' cute! I think I'll make two. One for each daughter. They're sure to provide hours of imaginative fun!!

April 27, 2011 at 6:10 PM  
Blogger meg.. said...

Such cute, fun wings! Love 'em.

April 27, 2011 at 7:28 PM  
Anonymous Anonymous said...

I must make these for the little girls I am convinced she will have someday! I will have to be sure she lets her daughter wear them though and not keep them for herself! They would be so adorable for little boys too. . . guess I better get to work.

April 28, 2011 at 6:04 AM  
Anonymous Anonymous said...

Oops! Forgot to say I must make them for my little sister's future daughters. It is early amd I have two little boys on my lap and no contacts in yet. Also, was distracted by Curious George. Good grief! Proofread!

April 28, 2011 at 6:09 AM  
Blogger Holly jo said...

so....about how much fabric do you think this would take to make? I am so wanting to make some of these!

April 28, 2011 at 11:02 AM  
Blogger Tricia @ SweeterThanSweets said...

That is so amazing. Love it!!! Found this via OnePrettyThing.

April 28, 2011 at 11:45 AM  
Blogger Jill @ A Mom With A Lesson Plan said...

I might have to make a Mommy size set too!

April 28, 2011 at 7:31 PM  
Blogger Cat said...

Started making a pair for my next-door neighbours little one! They're so adorable!

April 29, 2011 at 2:32 AM  
Blogger Lisa said...

These are fantastic! 20's not too old for dress-up wing...right?

May 3, 2011 at 3:27 AM  
Blogger Jackie said...

What a great job. Truly unique and lovely.

May 3, 2011 at 12:53 PM  
Anonymous Anonymous said...

Love them! Hope it won´t be too late for the giveaway.
;)

May 12, 2011 at 6:14 AM  
Anonymous Anonymous said...

So fantastic. And what a great use for all those fabric scraps!

May 13, 2011 at 2:16 PM  
Blogger Unknown said...

The wings are beautiful! My friend and I were just talking about ideas for our costume/dress-up boxes the other day. These will be perfect for little girls and little boys! Thank you so much for the tutorial!!

May 19, 2011 at 12:15 PM  
Blogger beagoodmom said...

Btw...we did wrist loops rather than thumb loops when we made our new set of wings. Giggles did not like the feeling of the loop on her thumbs. The wrist loops work fine too.

July 1, 2011 at 10:57 AM  
Blogger Erika said...

i'm completely enchanted by these! i'm wondering if the weight of the wings pulling on the ribbon around her neck would bother her? anyone whose made these have thoughts?

September 12, 2011 at 7:33 AM  
Blogger Bronwyn said...

Thank you for the inspiration. I made them! Photo on my blog. I used them for an Owl costume for a play of "The Gruffalo" from the story by Julia Donaldson.

October 10, 2011 at 4:29 AM  
Blogger Yen said...

I finally got around to making these! My daughter didn't like the ribbon tied around her neck though. :(

http://notesonnurturing.blogspot.com/2011/10/halloween-2011.html

October 31, 2011 at 6:40 AM  
Blogger Trayne1837 said...

I saw these early in the year when posted. I need to make wings for a costume.. in Stuart Little.. followed your pattern , sort of and ended up with a beautiful set of pigeon wings, in an ombre of white gray and silver felt.. finished the inside with a satin.. used the sleeves of a sweat shirt sewn inside the top of the wing.. but the basic idea came from you.. They were a hit.

November 15, 2011 at 6:33 AM  
Blogger kathy said...

I love the wings. I plan to make some for for my great-niece (3 yrs) this weekend.
Fun.

November 15, 2011 at 6:56 PM  
Blogger Nina said...

thank you for sharing how to make these beautiful wings. all my 4 year old daughter has been asking for this xmas is wings that flap. seems like they are very hard to come by, am looking forward to seeing her enjoying them. they look great! thank you.

December 4, 2011 at 12:59 PM  
Blogger Susan Cepin said...

Thanks for posting this! I made a pair as a Christmas gift for my niece, and they turned out beautifully. The wings also went together with ease. They're pictured at http://susansketches.blogspot.com/2011/12/dress-up-wings.html if you'd like to take a peek!

January 11, 2012 at 7:18 PM  

Post a Comment

Subscribe to Post Comments [Atom]

<< Home