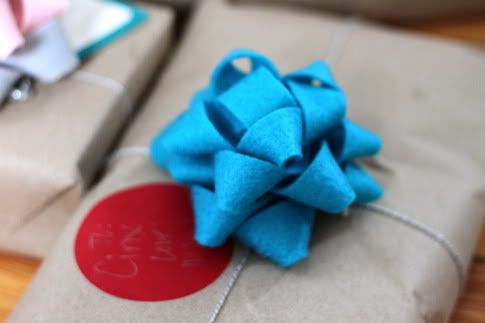
body { background:#fff url("http://www.blogblog.com/dots/bg_dots.gif") 50% 0; margin:0; padding:0 10px; text-align:center; font:x-small Verdana,Arial,Sans-serif; color:#333; font-size/* */:/**/small; font-size: /**/small; } /* Page Structure ----------------------------------------------- */ @media all { #content { background:url("http://www.blogblog.com/dots/bg_3dots.gif") no-repeat 250px 50px; width:700px; margin:0 auto; padding:50px 0; text-align:left; } #main { width:450px; float:right; padding:50px 0 20px; font-size:85%; } #main2 { background:url("http://www.blogblog.com/dots/bg_dots2.gif") -100px -100px; padding:20px 10px 15px; } #sidebar { width:200px; float:left; font-size:85%; padding-bottom:20px; } #sidebar2 { background:url("http://www.blogblog.com/dots/bg_dots2.gif") 150px -50px; padding:5px 10px 15px; width:200px; width/* */:/**/180px; width: /**/180px; } } @media handheld { #content { width:90%; } #main { width:100%; float:none; } #sidebar { width:100%; float:none; } #sidebar2 { width:100%; } } html>body #main, html>body #sidebar { /* We only give this fade from white to nothing to browsers that can handle 24-bit transparent PNGs */ background/* */:/**/url("http://www.blogblog.com/dots/bg_white_fade.png") repeat-x left bottom; } /* Title & Description ----------------------------------------------- */ @media all { #blog-title { margin:0 0 .5em; font:250%/1.4em Georgia,Serif; color:#353; } #blog-title a { color:#353; text-decoration:none; } #description { margin:0 0 1.75em; color:#996; } #blog-mobile-title { display:none; } #description-mobile { display:none; } } @media handheld { #blog-title { display:none; } #description { display:none; } #blog-mobile-title { display:block; margin:0 0 .5em; font:250%/1.4em Georgia,Serif; color:#353; } #blog-mobile-title a { color:#353; text-decoration:none; } #description-mobile { display:block; margin:0 0 1.75em; color:#996; } } /* Links ----------------------------------------------- */ a:link { color:#488; } a:visited { color:#885; } a:hover { color:#000; } a img { border-width:0; } /* Posts ----------------------------------------------- */ .date-header { margin:0 0 .75em; padding-bottom:.35em; border-bottom:1px dotted #9b9; font:95%/1.4em Georgia,Serif; text-transform:uppercase; letter-spacing:.3em; color:#663; } .post { margin:0 0 2.5em; line-height:1.6em; } .post-title { margin:.25em 0; font:bold 130%/1.4em Georgia,Serif; color:#333; } .post-title a, .post-title strong { background:url("http://www.blogblog.com/dots/bg_post_title.gif") no-repeat 0 .25em; display:block; color:#333; text-decoration:none; padding:0 0 1px 45px; } .post-title a:hover { color:#000; } .post p { margin:0 0 .75em; } p.post-footer { margin:0; text-align:right; } p.post-footer em { display:block; float:left; text-align:left; font-style:normal; color:#996; } a.comment-link { /* IE5.0/Win doesn't apply padding to inline elements, so we hide these two declarations from it */ background/* */:/**/url("http://www.blogblog.com/dots/icon_comment.gif") no-repeat 0 .25em; padding-left:15px; } html>body a.comment-link { /* Respecified, for IE5/Mac's benefit */ background:url("http://www.blogblog.com/dots/icon_comment.gif") no-repeat 0 .25em; padding-left:15px; } .post img { margin:0 0 5px 0; padding:4px; border:1px solid #cca; } /* Comments ----------------------------------------------- */ #comments { margin:0; } #comments h4 { margin:0 0 10px; border-top:1px dotted #9b9; padding-top:.5em; font:bold 110%/1.4em Georgia,Serif; color:#333; } #comments-block { line-height:1.6em; } .comment-poster { background:url("http://www.blogblog.com/dots/icon_comment.gif") no-repeat 2px .35em; margin:.5em 0 0; padding:0 0 0 20px; font-weight:bold; } .comment-body { margin:0; padding:0 0 0 20px; } .comment-body p { margin:0 0 .5em; } .comment-timestamp { margin:0 0 .5em; padding:0 0 .75em 20px; color:#996; } .comment-timestamp a:link { color:#996; } .deleted-comment { font-style:italic; color:gray; } .paging-control-container { float: right; margin: 0px 6px 0px 0px; font-size: 80%; } .unneeded-paging-control { visibility: hidden; } /* More Sidebar Content ----------------------------------------------- */ .sidebar-title { margin:2em 0 .75em; padding-bottom:.35em; border-bottom:1px dotted #9b9; font:95%/1.4em Georgia,Serif; text-transform:uppercase; letter-spacing:.3em; color:#663; } #sidebar p { margin:0 0 .75em; line-height:1.6em; } #sidebar ul { margin:.5em 0 1em; padding:0 0px; list-style:none; line-height:1.5em; } #sidebar ul li { background:url("http://www.blogblog.com/dots/bullet.gif") no-repeat 3px .45em; margin:0; padding:0 0 5px 15px; } #sidebar p { margin:0 0 .6em; } /* Profile ----------------------------------------------- */ .profile-datablock { margin:0 0 1em; } .profile-img { display:inline; } .profile-img img { float:left; margin:0 8px 5px 0; border:4px solid #cc9; } .profile-data { margin:0; line-height:1.5em; } .profile-data strong { display:block; } .profile-textblock { clear:left; } /* Footer ----------------------------------------------- */ #footer { clear:both; padding:15px 0 0; } #footer hr { display:none; } #footer p { margin:0; } /* Feeds ----------------------------------------------- */ #blogfeeds { } #postfeeds { padding-left: 20px }

Prudent Baby

Get sewing how to, sewing tutorials, and sewing help to learn sewing. We offer sewing tutorial for sewing moms.

Wednesday, December 22, 2010

Felt Gift Bows


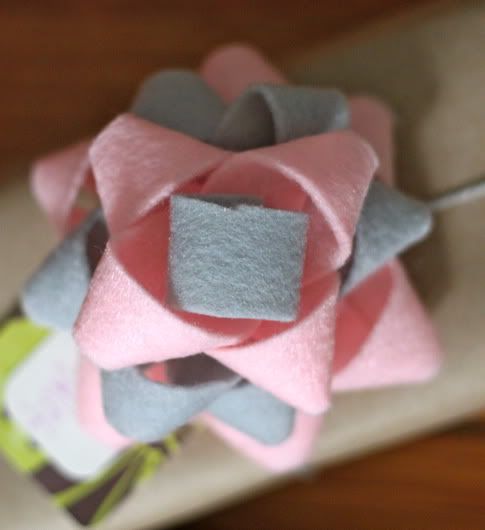
Last year Jacinda whipped up some beautiful DIY Magazine Gift Bows from a tute she found at How About Orange.  I loved them so much, this year I thought I'd try to make a few out of felt.

Fun last minute wrapping trick, and it only took ten minutes to make three of them.

Find out How to Make A Felt Gift Bow after the jump...

What are you doing to wrap your gifts this year?  Share in the comments and you could win some pretty snowflakes!

DIY Felt Gift Bows

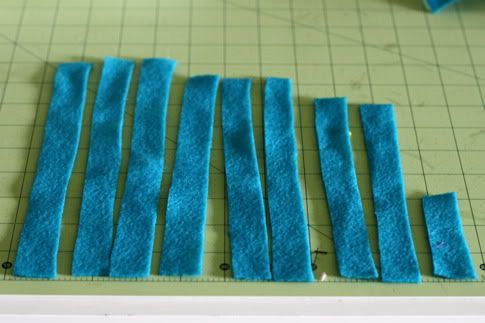
Start by cutting your felt.  For each bow you'll need:
Cut three strips of felt 9" long by 3/4" wide.
Cut three strips 8" long by 3/4" wide.
Cut two strips 7" long by 3/4" wide.
Cut one strip 3" long by 3/4" wide.


Twist each strip into a loop and glue it together in the center.


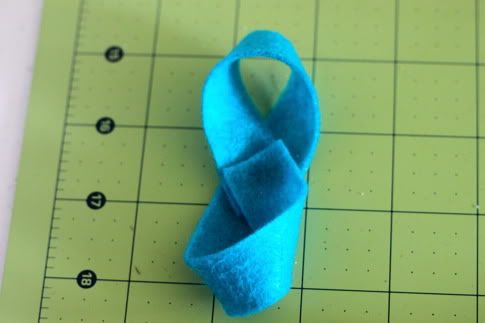
Repeat on all strips.  Make the smallest strip into a circle and glue.


Layer the three long (9") loops and evenly space them, glue together.


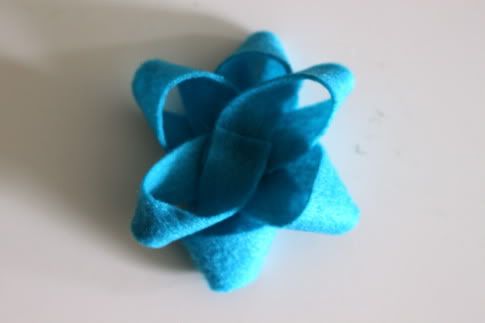
Add the next three shorter (8") loops evenly spaced and glue together.


Add the next two shorter (7") loops and glue.


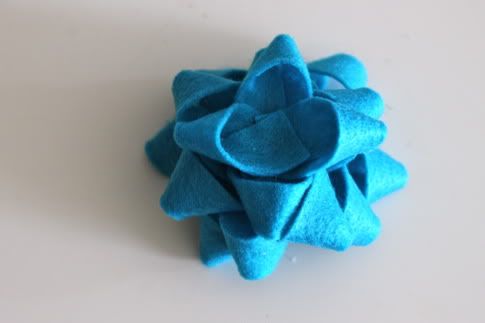
Glue the circle in the center.


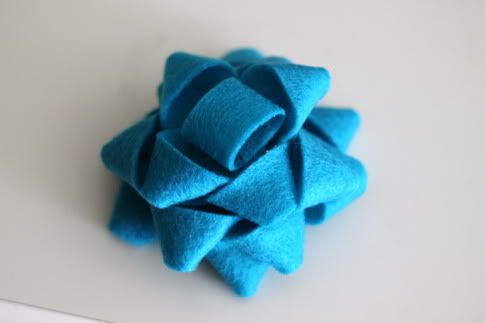
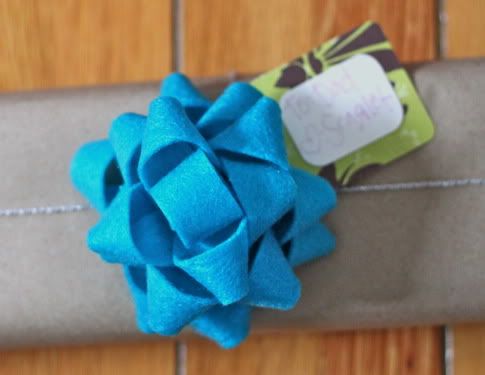
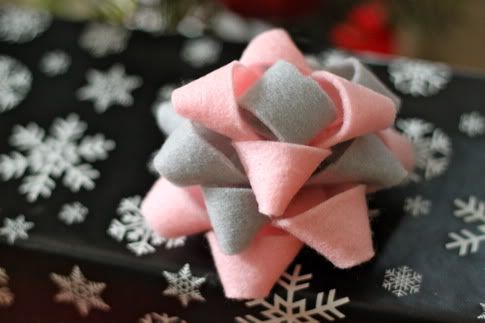
Try mixing up some colors.


 Place on gift. Done!


 Thanks for the inspiration How About Orange!

Labels: , , , ,

17 Comments:

Blogger Jess said...

insanely cute. seriously!

December 22, 2010 at 2:04 PM  
Blogger patricia said...

UBER CUTE!!!!! Working on a Vintage theme and this will fit right in!!!!

I've emailed you some pics of my work in progress!

December 22, 2010 at 2:17 PM  
Blogger Jacinda said...

Have I been in Texas too long or would this look ADORBS on a holiday headband?

December 22, 2010 at 2:21 PM  
Anonymous Anonymous said...

Very cute, thanks for sharing. I'm just a plain wrapper, no bows and ribbon. Maybe I will try these.

December 22, 2010 at 2:32 PM  
Blogger Kristin said...

Very cute! I cut 1/2 in strips and made one into a hair bow for my daughter! Thanks for the idea!

December 22, 2010 at 3:13 PM  
Blogger Sandy a la Mode said...

this is soooo cute!! i love it! thanks for sharing this tutorial!!!

December 22, 2010 at 5:12 PM  
Blogger Julie said...

dying! I love it!

December 22, 2010 at 5:30 PM  
Blogger Lil Mama Stuart said...

i just posted the same link today too! love wrapping gifts!

December 22, 2010 at 5:46 PM  
Blogger Patrick, Ashley, Audrey and Tessa said...

each package under my tree is getting a glizty glitter looking ribbon! So sprakly with the lights from the tree reflecting off of them!
HOWEVER....I am also running interferance with my 1 year old thinking the ribbons are handles...perfect for latching onto and dragging presents around the house. I've found several stacked in her room!:) ha!

December 22, 2010 at 7:05 PM  
Blogger Tara Celeste said...

can't wait to try this out!

December 22, 2010 at 7:08 PM  
Blogger Tara Celeste said...

can't wait to try this out!

December 22, 2010 at 7:09 PM  
Blogger Stevee said...

Oh man! I am using these for every gift I wrap! Such a great way to make your present a little more personal!

December 22, 2010 at 8:43 PM  
Blogger Steph at ModernParentsMessyKids.com said...

These are so lovely and the perfect use for the left-over felt I have from the stockings I just finished...yes, that's right, it's very nearly the 23rd and I just finished them (sigh).

December 22, 2010 at 11:15 PM  
Blogger Elizabeth said...

Oh this is just amazing! I LOVE LOVE them! Can't wait to make them and give to people!

December 22, 2010 at 11:27 PM  
Blogger Laura said...

I loved making the How About Orange bows - I love them in felt! Thanks for the idea.

December 24, 2010 at 4:13 PM  
Blogger Lauren said...

I am going to start making these for next year! They are wonderful - LOVE THEM!

December 30, 2010 at 10:05 AM  
Blogger Sarah Swan said...

I think I will knit these strips for my home made knitted gifts! Perfect!

June 15, 2011 at 4:18 PM  

Post a Comment

Subscribe to Post Comments [Atom]

<< Home