body { background:#fff url("http://www.blogblog.com/dots/bg_dots.gif") 50% 0; margin:0; padding:0 10px; text-align:center; font:x-small Verdana,Arial,Sans-serif; color:#333; font-size/* */:/**/small; font-size: /**/small; } /* Page Structure ----------------------------------------------- */ @media all { #content { background:url("http://www.blogblog.com/dots/bg_3dots.gif") no-repeat 250px 50px; width:700px; margin:0 auto; padding:50px 0; text-align:left; } #main { width:450px; float:right; padding:50px 0 20px; font-size:85%; } #main2 { background:url("http://www.blogblog.com/dots/bg_dots2.gif") -100px -100px; padding:20px 10px 15px; } #sidebar { width:200px; float:left; font-size:85%; padding-bottom:20px; } #sidebar2 { background:url("http://www.blogblog.com/dots/bg_dots2.gif") 150px -50px; padding:5px 10px 15px; width:200px; width/* */:/**/180px; width: /**/180px; } } @media handheld { #content { width:90%; } #main { width:100%; float:none; } #sidebar { width:100%; float:none; } #sidebar2 { width:100%; } } html>body #main, html>body #sidebar { /* We only give this fade from white to nothing to browsers that can handle 24-bit transparent PNGs */ background/* */:/**/url("http://www.blogblog.com/dots/bg_white_fade.png") repeat-x left bottom; } /* Title & Description ----------------------------------------------- */ @media all { #blog-title { margin:0 0 .5em; font:250%/1.4em Georgia,Serif; color:#353; } #blog-title a { color:#353; text-decoration:none; } #description { margin:0 0 1.75em; color:#996; } #blog-mobile-title { display:none; } #description-mobile { display:none; } } @media handheld { #blog-title { display:none; } #description { display:none; } #blog-mobile-title { display:block; margin:0 0 .5em; font:250%/1.4em Georgia,Serif; color:#353; } #blog-mobile-title a { color:#353; text-decoration:none; } #description-mobile { display:block; margin:0 0 1.75em; color:#996; } } /* Links ----------------------------------------------- */ a:link { color:#488; } a:visited { color:#885; } a:hover { color:#000; } a img { border-width:0; } /* Posts ----------------------------------------------- */ .date-header { margin:0 0 .75em; padding-bottom:.35em; border-bottom:1px dotted #9b9; font:95%/1.4em Georgia,Serif; text-transform:uppercase; letter-spacing:.3em; color:#663; } .post { margin:0 0 2.5em; line-height:1.6em; } .post-title { margin:.25em 0; font:bold 130%/1.4em Georgia,Serif; color:#333; } .post-title a, .post-title strong { background:url("http://www.blogblog.com/dots/bg_post_title.gif") no-repeat 0 .25em; display:block; color:#333; text-decoration:none; padding:0 0 1px 45px; } .post-title a:hover { color:#000; } .post p { margin:0 0 .75em; } p.post-footer { margin:0; text-align:right; } p.post-footer em { display:block; float:left; text-align:left; font-style:normal; color:#996; } a.comment-link { /* IE5.0/Win doesn't apply padding to inline elements, so we hide these two declarations from it */ background/* */:/**/url("http://www.blogblog.com/dots/icon_comment.gif") no-repeat 0 .25em; padding-left:15px; } html>body a.comment-link { /* Respecified, for IE5/Mac's benefit */ background:url("http://www.blogblog.com/dots/icon_comment.gif") no-repeat 0 .25em; padding-left:15px; } .post img { margin:0 0 5px 0; padding:4px; border:1px solid #cca; } /* Comments ----------------------------------------------- */ #comments { margin:0; } #comments h4 { margin:0 0 10px; border-top:1px dotted #9b9; padding-top:.5em; font:bold 110%/1.4em Georgia,Serif; color:#333; } #comments-block { line-height:1.6em; } .comment-poster { background:url("http://www.blogblog.com/dots/icon_comment.gif") no-repeat 2px .35em; margin:.5em 0 0; padding:0 0 0 20px; font-weight:bold; } .comment-body { margin:0; padding:0 0 0 20px; } .comment-body p { margin:0 0 .5em; } .comment-timestamp { margin:0 0 .5em; padding:0 0 .75em 20px; color:#996; } .comment-timestamp a:link { color:#996; } .deleted-comment { font-style:italic; color:gray; } .paging-control-container { float: right; margin: 0px 6px 0px 0px; font-size: 80%; } .unneeded-paging-control { visibility: hidden; } /* More Sidebar Content ----------------------------------------------- */ .sidebar-title { margin:2em 0 .75em; padding-bottom:.35em; border-bottom:1px dotted #9b9; font:95%/1.4em Georgia,Serif; text-transform:uppercase; letter-spacing:.3em; color:#663; } #sidebar p { margin:0 0 .75em; line-height:1.6em; } #sidebar ul { margin:.5em 0 1em; padding:0 0px; list-style:none; line-height:1.5em; } #sidebar ul li { background:url("http://www.blogblog.com/dots/bullet.gif") no-repeat 3px .45em; margin:0; padding:0 0 5px 15px; } #sidebar p { margin:0 0 .6em; } /* Profile ----------------------------------------------- */ .profile-datablock { margin:0 0 1em; } .profile-img { display:inline; } .profile-img img { float:left; margin:0 8px 5px 0; border:4px solid #cc9; } .profile-data { margin:0; line-height:1.5em; } .profile-data strong { display:block; } .profile-textblock { clear:left; } /* Footer ----------------------------------------------- */ #footer { clear:both; padding:15px 0 0; } #footer hr { display:none; } #footer p { margin:0; } /* Feeds ----------------------------------------------- */ #blogfeeds { } #postfeeds { padding-left: 20px }

Prudent Baby

Get sewing how to, sewing tutorials, and sewing help to learn sewing. We offer sewing tutorial for sewing moms.

Wednesday, February 17, 2010

DIY Fitted Sheet for Pack 'n Play
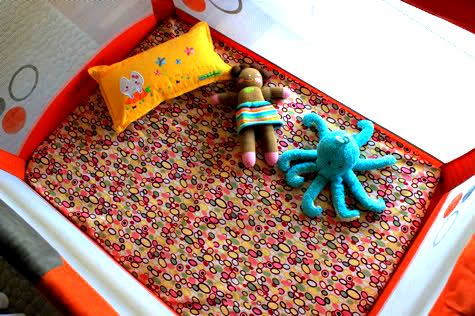

Whatever you call it (porta crib, playpen, playard, pack n play, portable baby jail) and however you use it (travel crib, baby containment unit, toy storage), you know it gets dirty.  I notice, especially when traveling, that the fabric doesn't seem that comfy for baby either.  When Scarlet was just 12 weeks old we took her cross-country to visit family and she slept in an old travel crib dug up from someone's garage.  The only thing we had to cover the dirty bottom of it was a big fluffy blanket that didn't seem safe for such a young one, so of course I didn't sleep the whole week worrying she was going to suffocate.  Never again!  Sheets for these aren't readily available, so I thought I'd show you how to make a play yard sheet.  I think it's super simple, let me know if you give it a try.

Get the full DIY Pack 'n Play Sheet tutorial after the jump...


DIY Pack 'N Play Sheet Tutorial

This sheet fits my Combi Jazz Play Yard "mattress" which is pretty standard and measures 36" X 26.5" (they're all around 30"x40"), but the sheet is forgiving so if yours is within the general ballpark this sheet should work fine.

1.  Wash, dry and cut your fabric. Add 7 inches to the length and to the width of your mattress, so i cut a piece of fabric 43" X 33.5".  And a piece of 3/4" elastic 60" long.


2.  Fold it in half lengthwise and then widthwise so it looks like this:

On the outside corner, the one with no folds, cut a 3.5" square through all the layers.

Your item now looks like this:
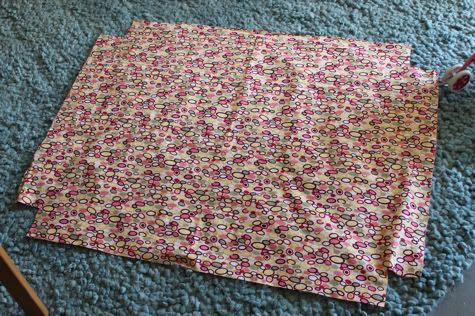


3.  Line up the cut edges at one corner and sew them together with right sides facing:
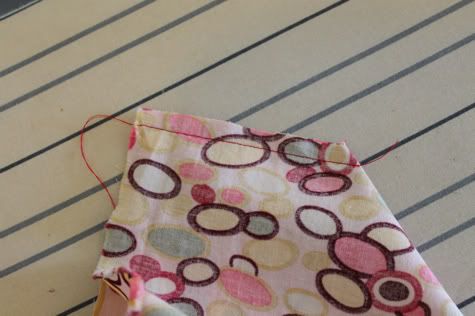
Repeat on all four corners.

4.  Along the bottom of your sheet, fold the fabric 1/4" to the inside and iron, then 1" and iron, and pin in place.

Starting next to a corner, sew all the way around with a straight stitch, leaving a hole and backstitching and the beginning and end.


5.  Thread your piece of 3/4" elastic through the hole and all the way around. It helps to pin one side of it to an ironing board or some other surface and to use a safety pin to feed it through:
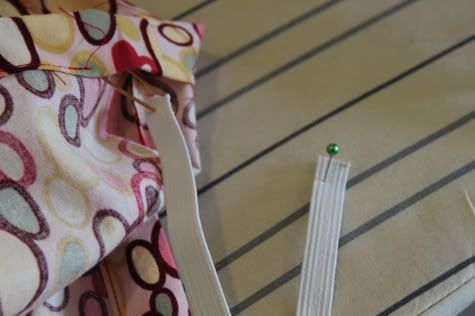
Pull it out and sew both sides together with a stretch stitch or a zig zag stitch.

Close the hole by sewing across the opening with a straight stitch.

You're done!
It looks like this from the bottom:

And like this from the top:


Place your homemade playpen sheet on the mattress.  Yay!

Labels: , , , , , ,

19 Comments:

Blogger Cris said...

I love this! I actually have an old packnplay I'm washing up, I'm going to use organic spray paint {Yes, they actually make that!} to touch up the metal and use fabric paint to paint some designs on the mess, I was dreading having to pay 20 dollars for two boring packnplay sheets! lol thanks I love the tutorial!

February 17, 2010 at 7:03 AM  
Blogger Julie said...

What a GREAT idea! I actually have a pack n play that I will likely be using in the nearish future while watching my baby cousin...and I have NO sheets for it (I sold my old one AND the sheets last year). I agree, the sheets they sell for those things are pretty expensive AND not very comfy (or cute really).

ADORABLE fabric as well!

February 17, 2010 at 7:34 AM  
Blogger Jacinda said...

I love this! I better make a prettier sheet for the pack-n-play before you visit in LESS_THAN_ONE_MONTH. You've set the bar for pack-n-play sheets very high.

February 17, 2010 at 7:58 AM  
Blogger Unknown said...

Love, love, love this.

Would you consider a tutorial for an oval shaped bassinet sheet?

February 17, 2010 at 8:25 AM  
Blogger Jaime said...

thanks everyone! i wanted to say you could use the method from our regular crib sheet diy for the elastic and it would require a lot less elastic...four 8" pieces would do it. that just occurred to me.

February 17, 2010 at 8:38 AM  
Blogger Jaime said...

also Color Prestige, i have heard of this spray paint but don't know what brands or where to buy... could you share?? thanks!

February 17, 2010 at 8:39 AM  
Blogger Cris said...

My local organic store had organic baby safe spray paint. I was just going to buy milk pain and brush it on, The brand on this is Classix, I haven't been able to find a website. I know you can buy milk paint online, the only thing is It smells kind of bad. My hubby said it smelled like rotten eggs, so we made sure to let it stay outside for a day or two and now it doesn't smell.

February 17, 2010 at 1:28 PM  
Blogger sara said...

Karen,

I just made a sheet for my oval shaped bassinet mattress. I traced the mattress onto newsprint, added 4" around the traced line and made an elastic channel in the same manner as the tutorial above. It worked perfectly, though I would recommend marking the top of the sheet in some way before adding the elastic as it is difficult to find after.

February 17, 2010 at 1:36 PM  
Blogger Mrs. Katie Picciottoli said...

I love this! Thanks for saving me the work of figuring out measurements on my own - that breaks my brain! The best part of these sheets is that they have elastic all the way round. The graco ones downt have any elastic and don't even have a pocket on the sides (only on the narrow ends) - NOT safe! Can't wait to try this :)

February 22, 2010 at 5:27 AM  
Blogger ghislaine said...

I just made one of these and this tutorial is great!! Thanks :)

March 5, 2010 at 11:25 PM  
Blogger Julie said...

Finally made one tonight, turned out great, although the mattress on my pack & play is not cooperating. I had to add several inches to my elastic measurement in order to make it work.

May 2, 2010 at 6:05 PM  
Blogger Ms. Bierwirth said...

I made one today and I'm really happy with it. I posted it on my blog along with a link to your tutorial. You can see my post at www.create-envision-evolve.blogspot.com

Thanks so much for the easy to follow tutorial!

May 5, 2010 at 6:41 PM  
Blogger Natalie said...

I love this and it does look easy enough! One thing I love about it is I ordered a pack-n-play that looked unisex online but when I got it home it was awfully girly! Which isn't bad because I have a girl, but if a baby boy comes along then I can take a more manly fabric for the sheet and make it look boyish! yayayaya!

July 24, 2010 at 11:20 AM  
Blogger The Cheap Chic Momma said...

PERFECT! I was just looking online to purchase a p&p sheet. They're not only very plain, but crazy expensive. Thank you! I can't wait to drag my kid to the fabric store to pick out some fabric!!

July 26, 2010 at 9:09 AM  
Blogger Pretty Things by Laura H said...

Thank you very much for this tutorial! I have a whole blog post dedicated to your site. You can see my pack n' play sheet here. I adjusted it to fit my Square pack n' play though. Enjoy!

http://prettythingsbylaurah.blogspot.com/2011/01/back-to-bobbin-with-prudent-baby-sewing.html

January 18, 2011 at 4:05 PM  
Anonymous Anonymous said...

I can't wait to make one for our baby girl that's on the way. Thank's for an awesome tute!

January 25, 2011 at 2:25 PM  
Blogger Unknown said...

This comment has been removed by the author.

October 12, 2011 at 7:43 PM  
Blogger Unknown said...

Thanks a bunch for this awesome tutorial. Here is my finished one

http://sewchicmama.blogspot.com/2011/10/play-pen-cover-sheet.html

October 12, 2011 at 7:46 PM  
Blogger Emily said...

Just made another one of these. Thanks again!!!

January 31, 2012 at 12:46 AM  

Post a Comment

Subscribe to Post Comments [Atom]

<< Home